Single sign-on (SSO) via Microsoft Entra ID (Azure AD)
Nolt officially supports single sign-on (SSO) via Microsoft Entra ID (Azure AD) through our OpenID Connect (OIDC) and SAML 2.0 integrations. You can use either protocol with Entra ID.
Table of Contents
OpenID Connect (OIDC)
If you prefer to use OpenID Connect (OIDC) to integrate Microsoft Entra ID with Nolt, follow the steps below:
1. Setup the application in Microsoft Entra ID
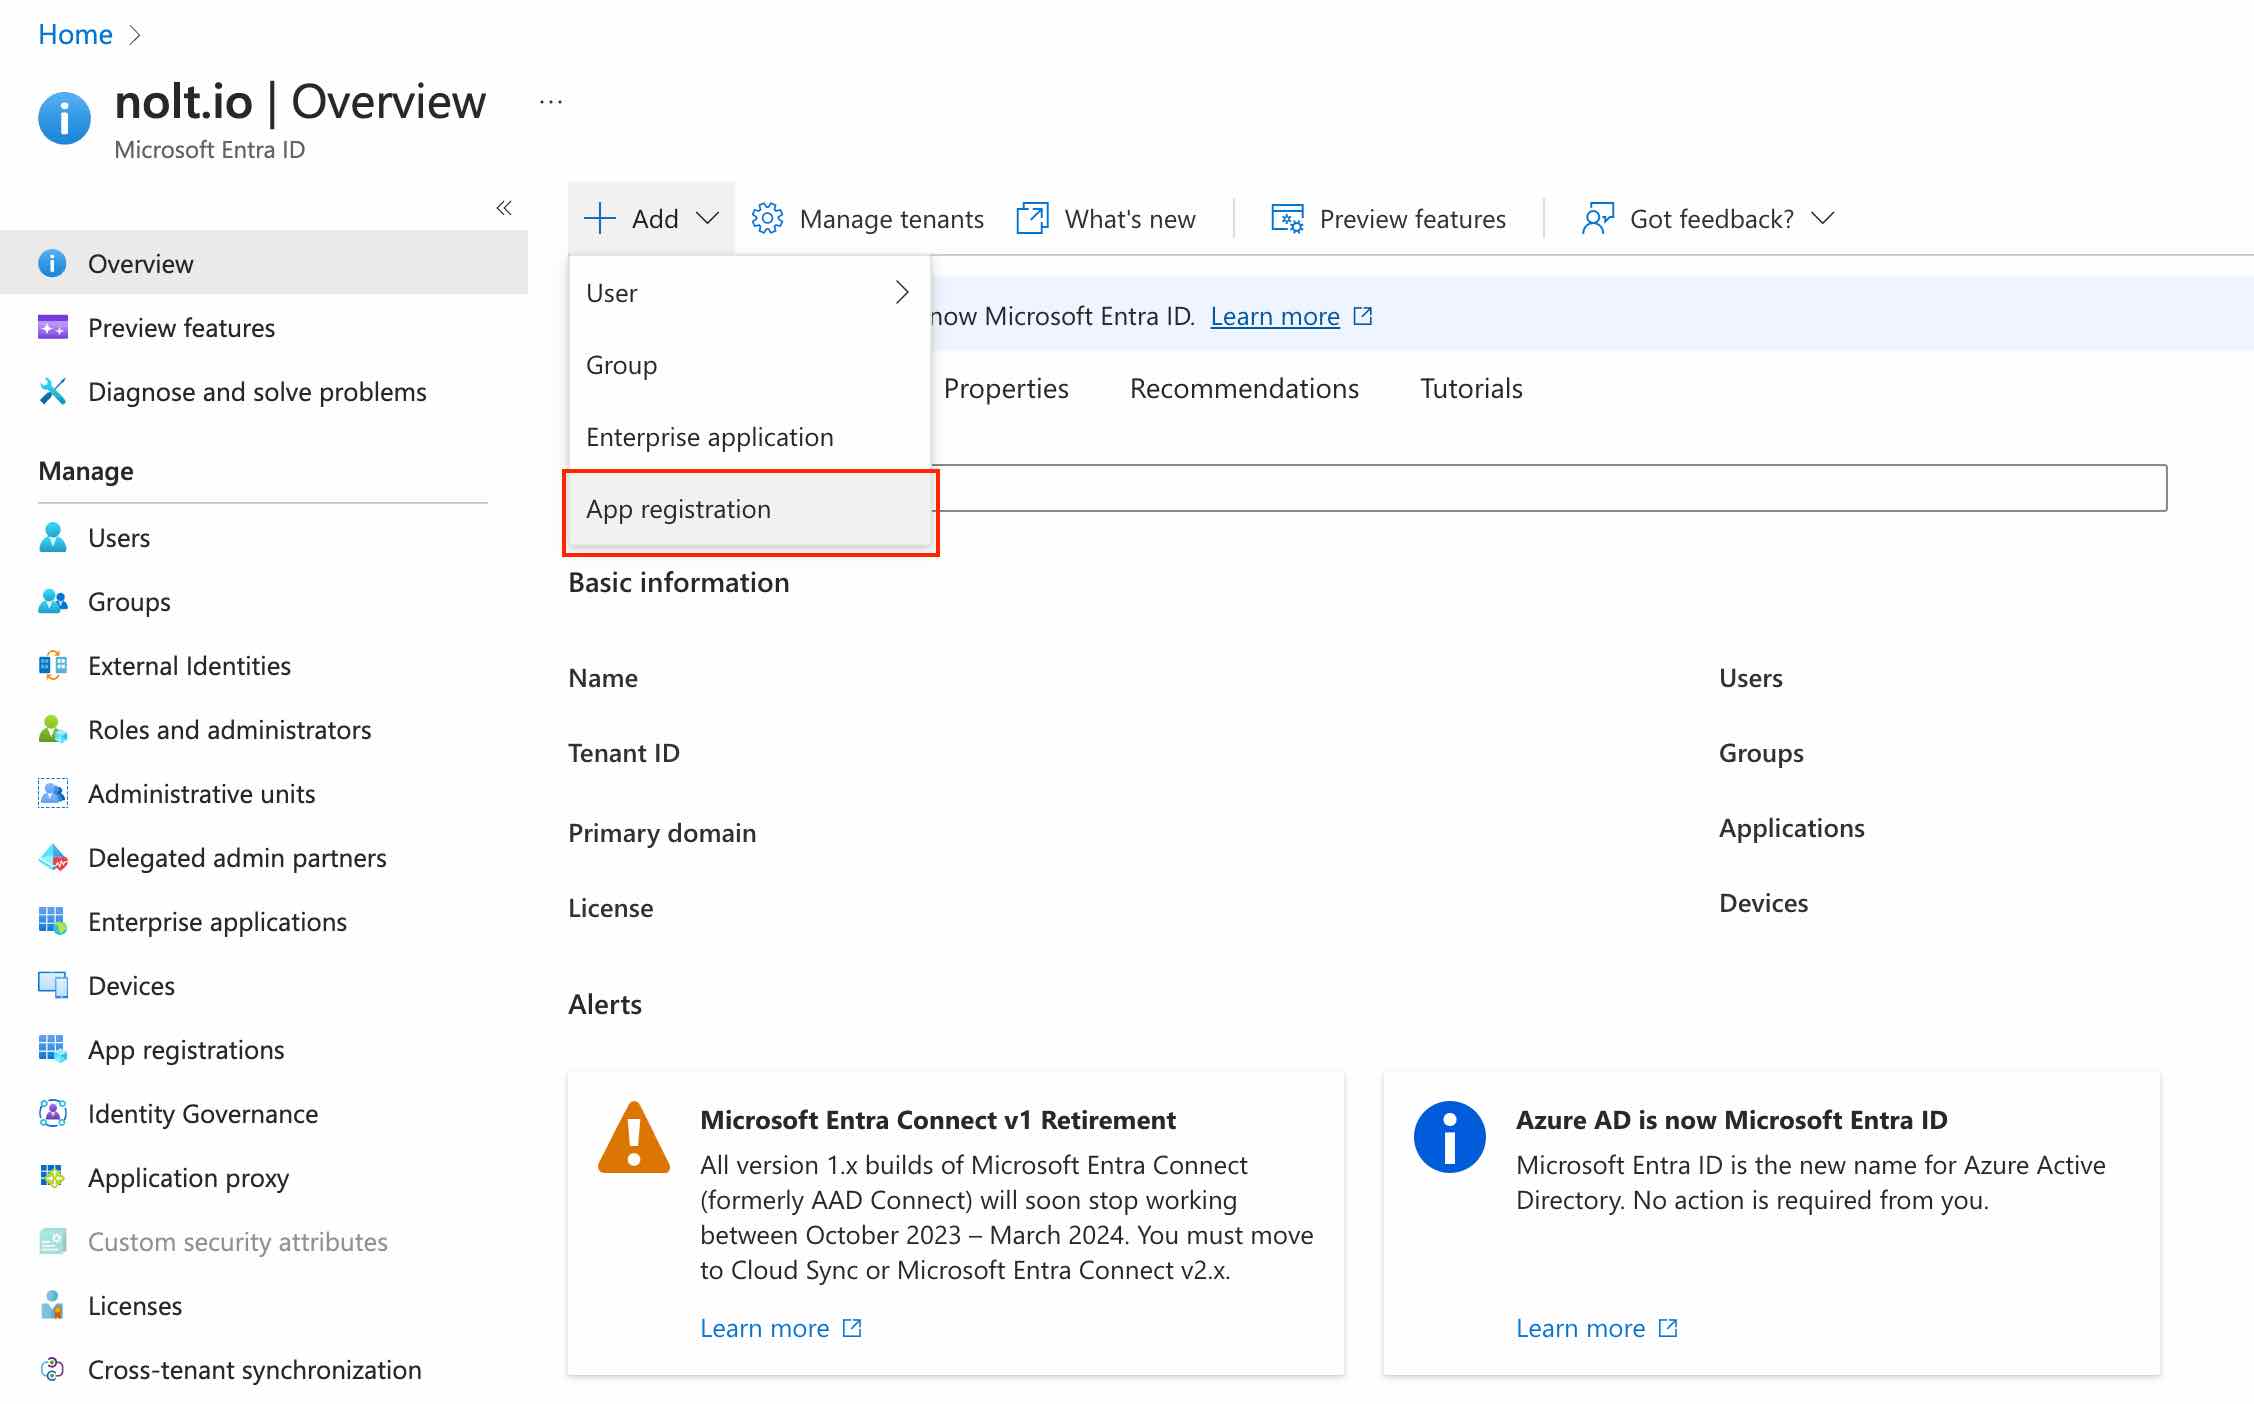
Sign-in to your Azure account and navigate to Microsoft Entra ID → Add → App Registration:
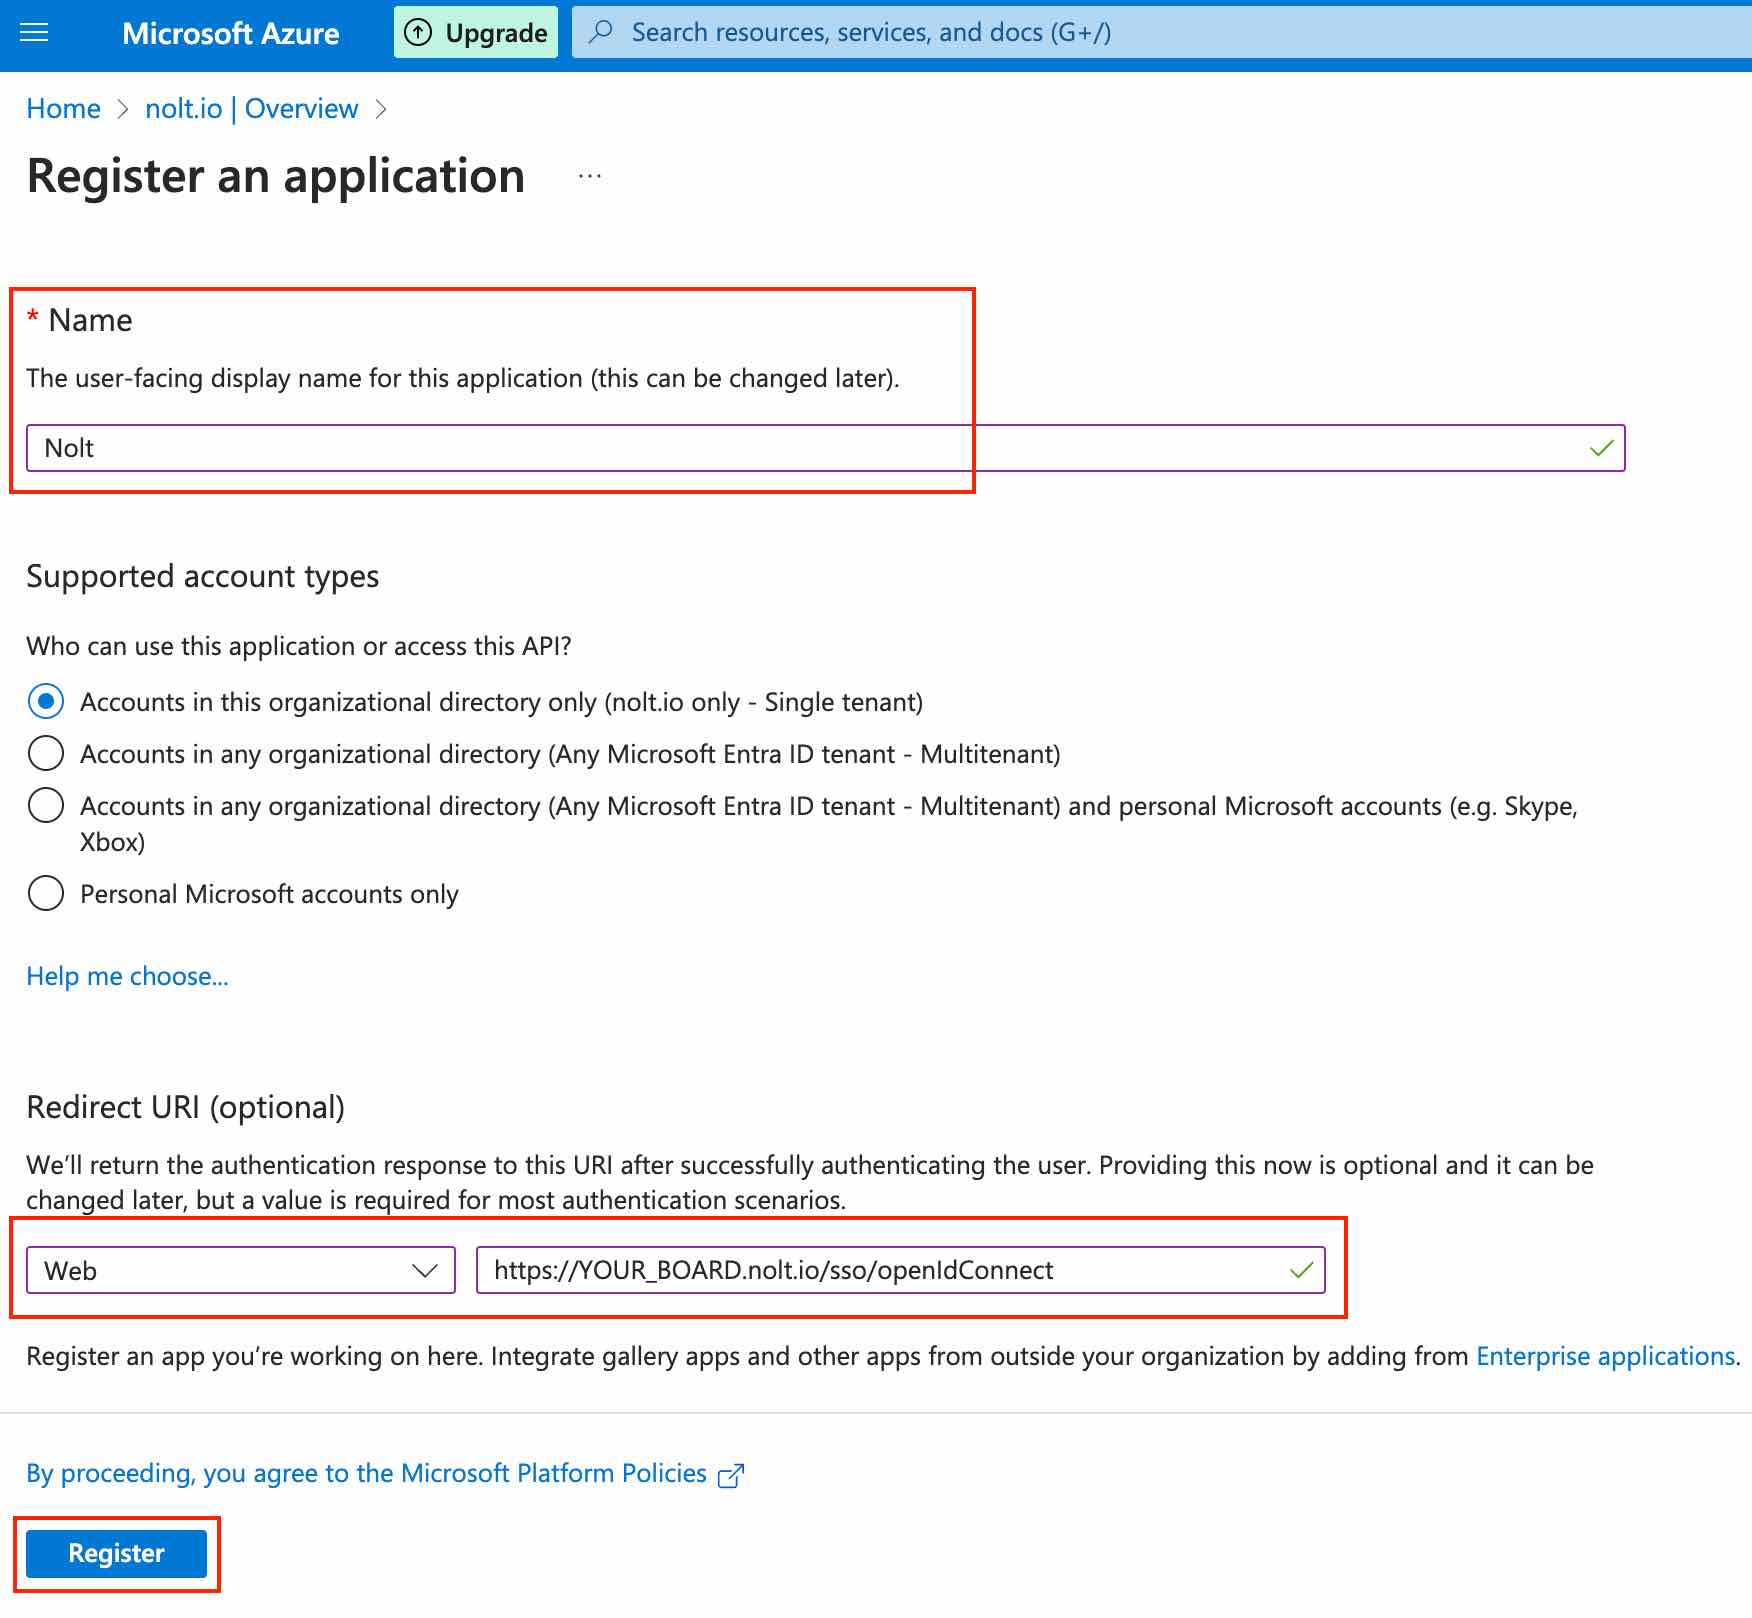
Enter a name for the application, select Web as the platform, and https://YOUR_BOARD.nolt.io/sso/openIdConnect (replace YOUR_BOARD with your board subdomain) as the Redirect URI:
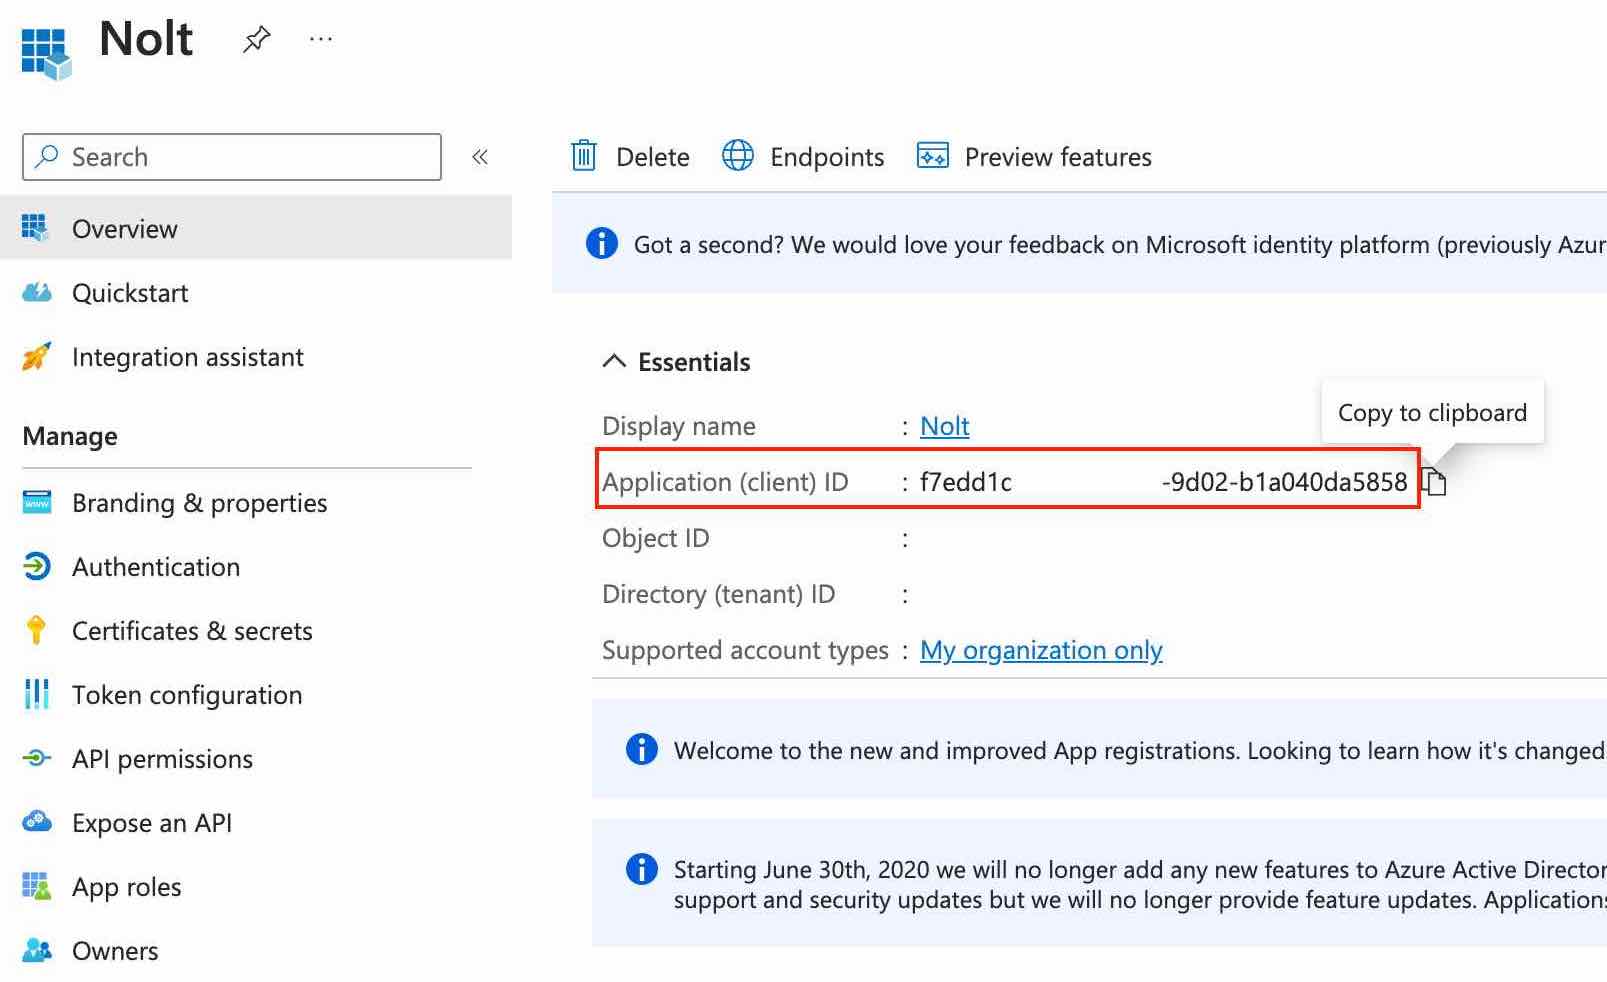
Copy the Application (client) ID of the application (we'll need this later in part 2):
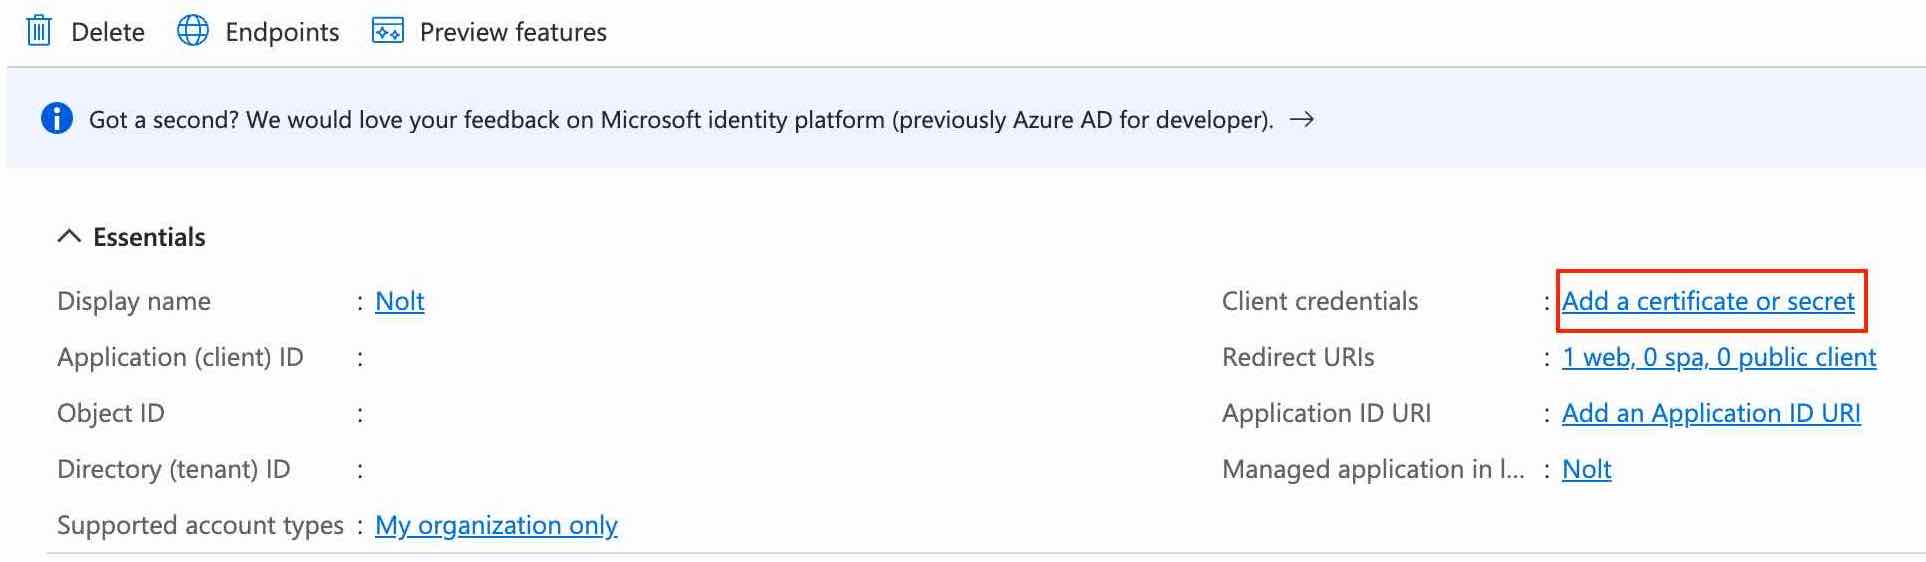
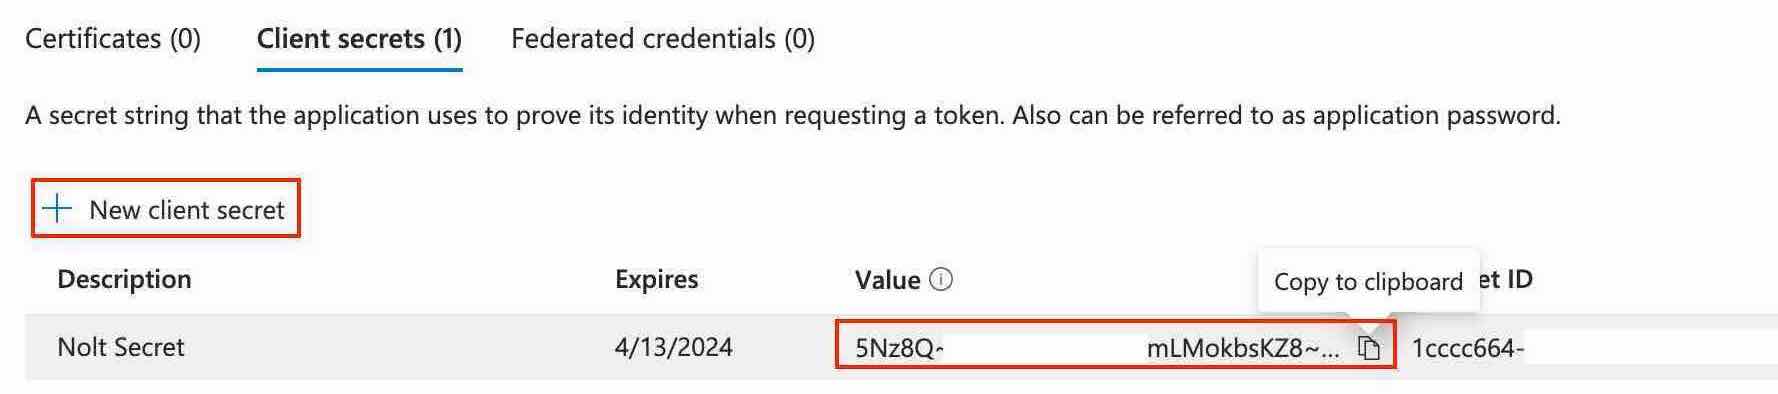
Next, we need to setup the client secret. Look for client credentials in the Essentials section of the Overview tab:
Click New client secret, and copy the secret value (we'll need this later in part 2):
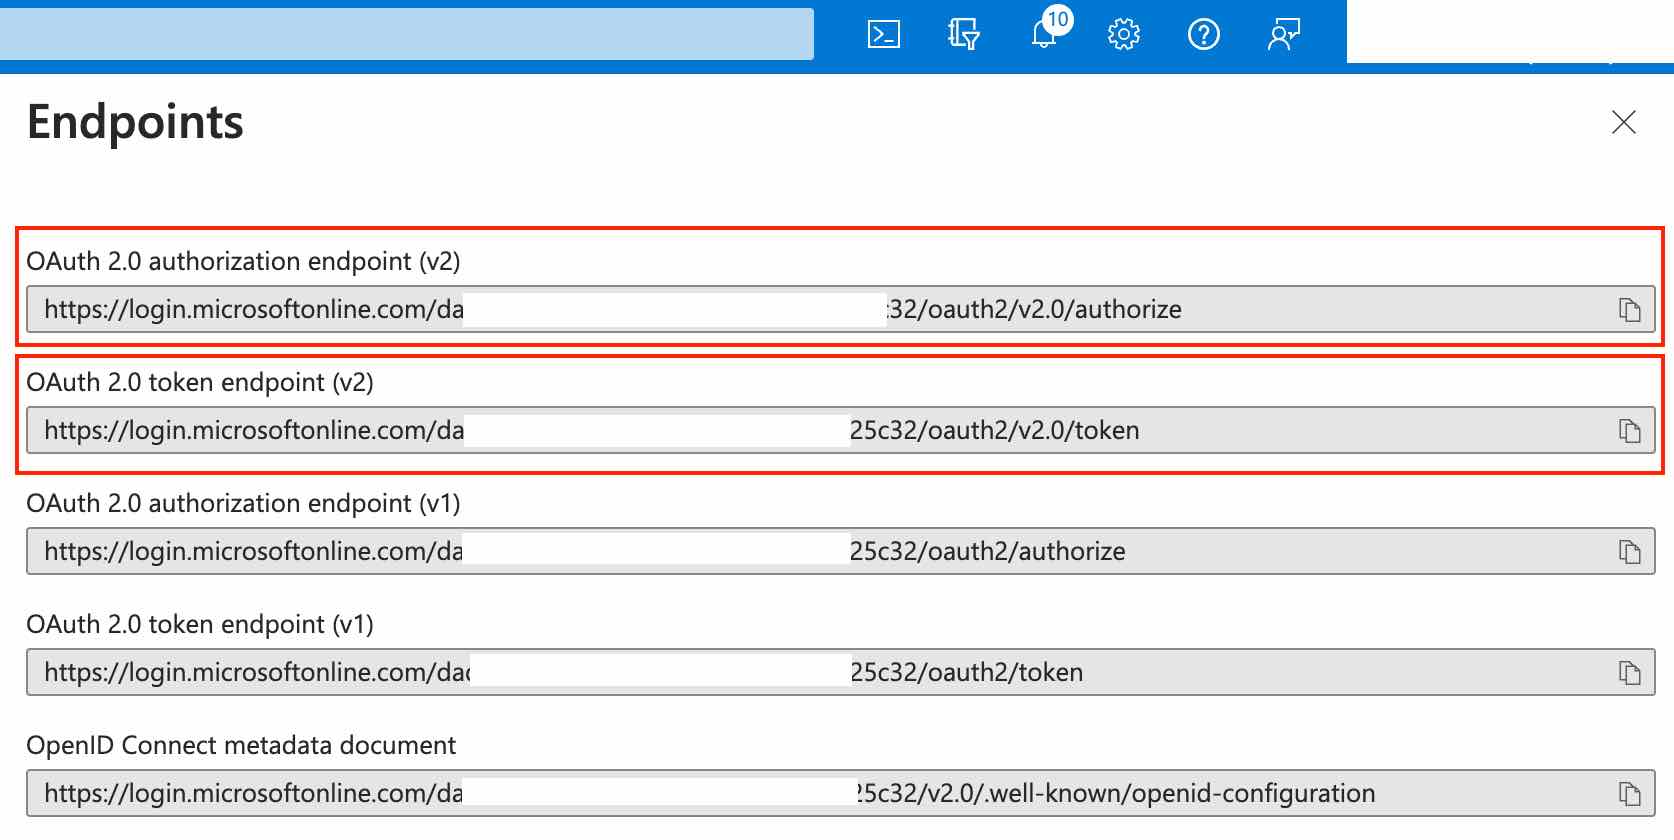
Navigate to Endpoints in the top bar of the Overview tab and copy OAuth 2.0 authorization endpoint (v2) and OAuth 2.0 token endpoint (v2) (we'll need these later in part 2):
2. Add your Entra ID application details to Nolt
Navigate to your board settings → Integrations → OpenID Connect and configure the following settings:
- Client IDPaste Application (client) ID from part 1.
- Client SecretPaste Client Secret from part 1.
- Issuer URL
https://login.microsoftonline.com/DIRECTORY_ID/v2.0Note: Replace DIRECTORY_ID with the Directory (tenant) ID from the overview tab of your application (part 1).

- Token URLPaste OAuth 2.0 token endpoint (v2) from part 1.
- Remote Login URLAppend the following to the OAuth 2.0 authorization endpoint (v2):
?client_id=<CLIENT_ID>&redirect_uri=https://<YOUR_BOARD>.nolt.io/sso/openIdConnect&response_type=code&scope=openid%20profile%20emailNote: Make sure to replace CLIENT_ID and YOUR_BOARD before using the above remote login URL.
The remote login URL should look similar to:https://login.microsoftonline.com/abcdefgh-abcd/oauth2/v2.0/authorize?client_id=dummy-dummy-dummy&redirect_uri=https://test.nolt.io/sso/openIdConnect&response_type=code&scope=openid%20profile%20email - Remote logout URL (optional)Add a remote logout URL if you want to redirect users to a specific URL after they log out from their Nolt account.
- User role structure (optional)If you are specifying the user role for Nolt (ADMIN, MODERATOR, or MEMBER) as a propery/attribute in the OIDC token which is NOT named noltUserRole (what Nolt expects by default), you need to set this field to tell Nolt which property to look for (instead of noltUserRole). For example, if you use userRole instead of noltUserRole, you need to set this field to userRole.
- Custom attributes (optional)If you are including any custom attributes in the OIDC token, you need to set this field to tell Nolt which custom attributes to expect and where to find them in your OIDC token. For example, if you have custom attribute as follows:Then the user custom attribute structure should be set as follows:
department empId{"Department":"department","EmployeeID":"empId"} - Click Test and activate:This should activate the OIDC SSO integration. To test the integration, try logging in as a new user.
SAML 2.0
If you prefer to use SAML 2.0 to integrate Microsoft Entra ID with Nolt, follow the steps below:
1. Setup the application in Microsoft Entra ID
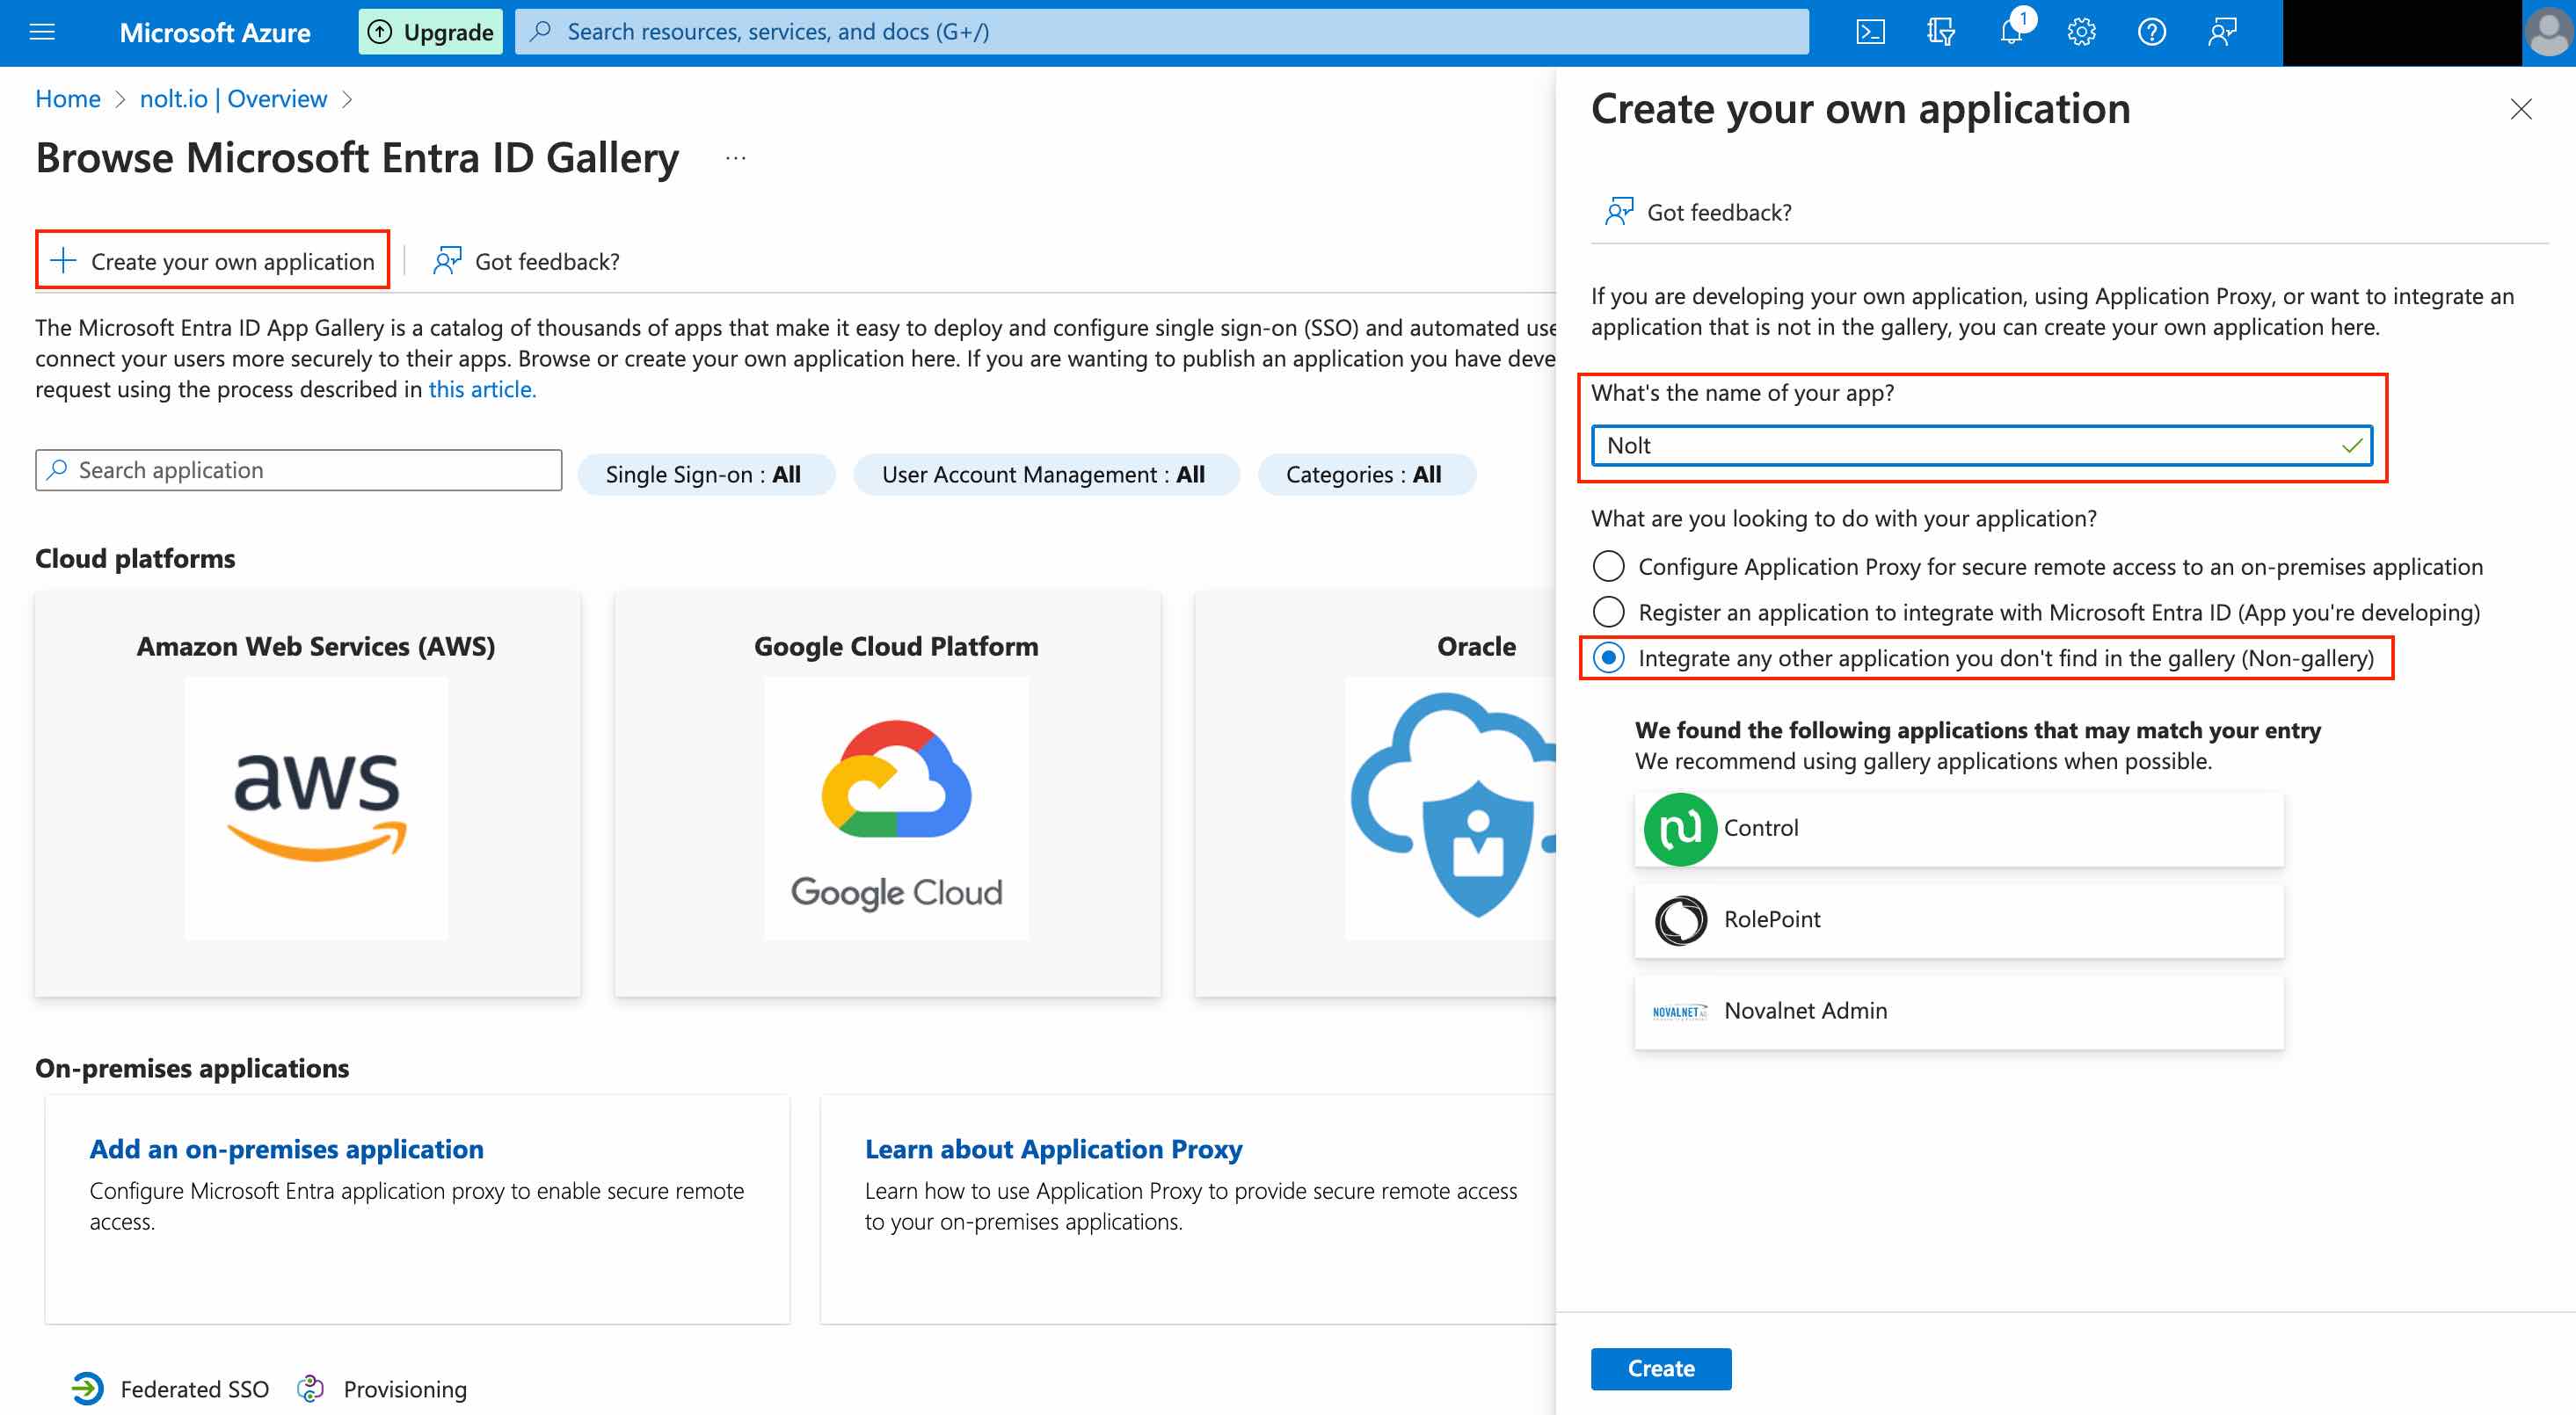
Sign in to your Azure account. Navigate to Microsoft Entra ID → Add → Enterprise Application.

Click on Create your own application. Enter a name for the application, select Integrate any other..., and then click Create.
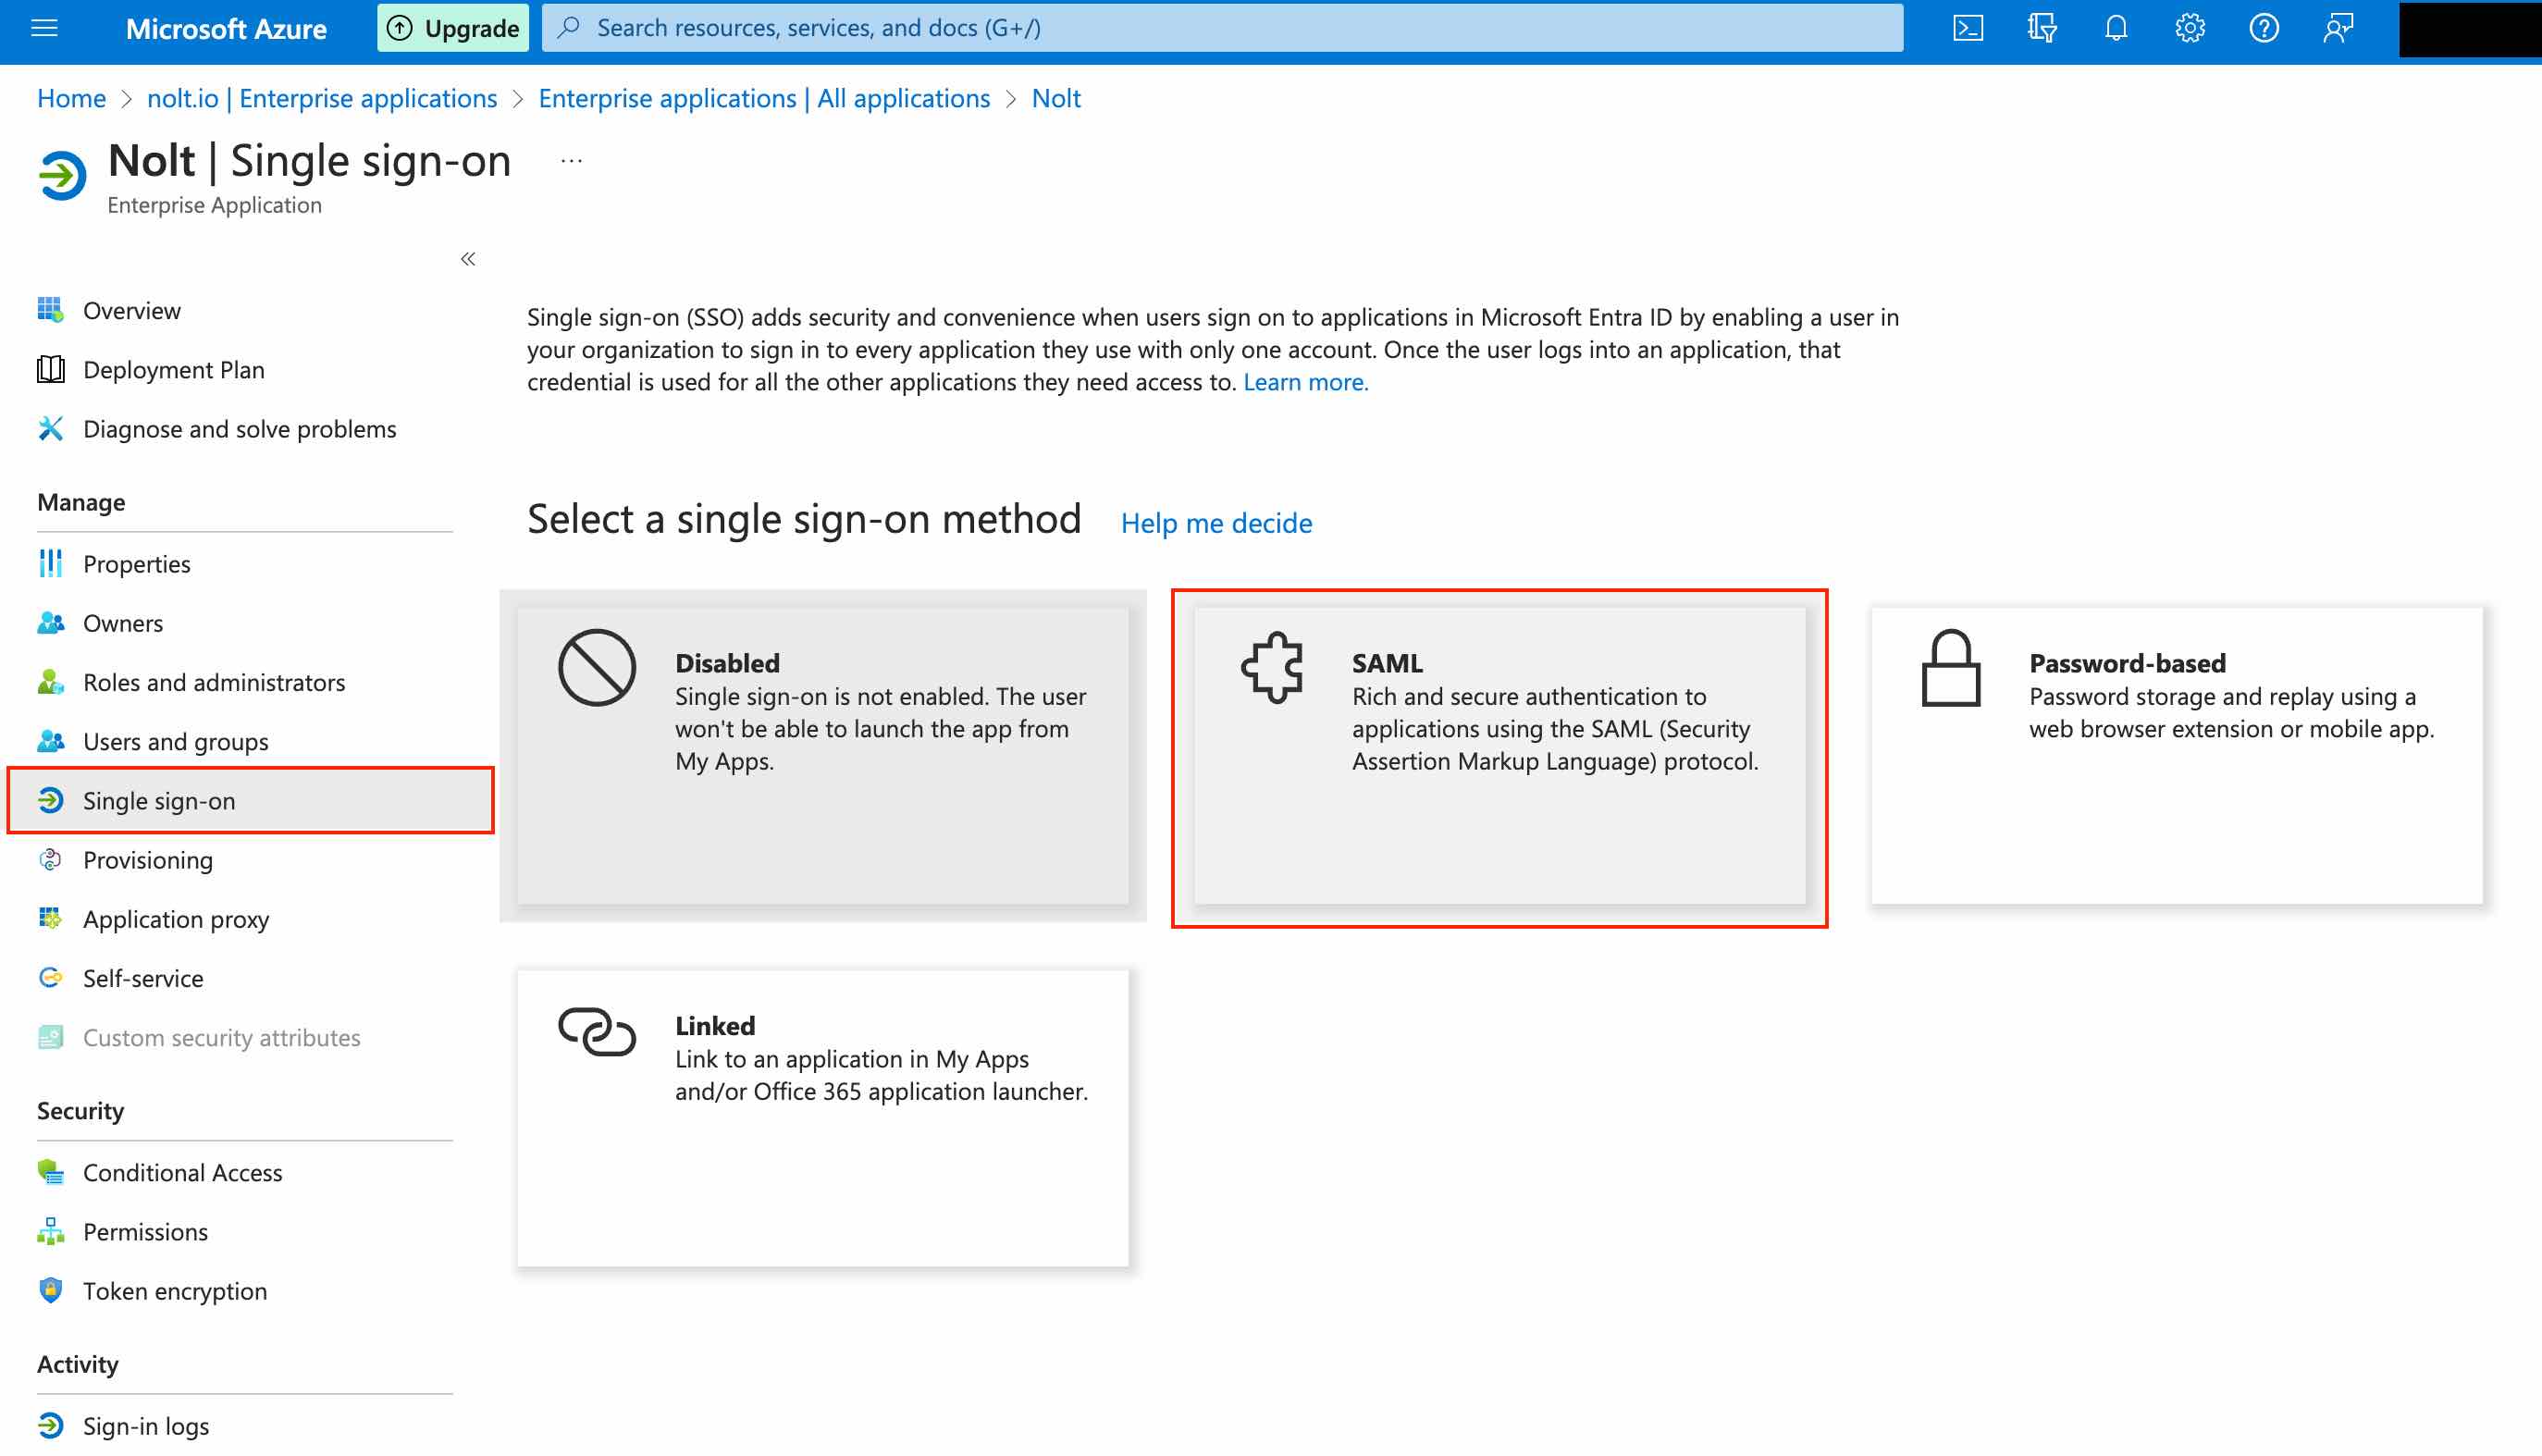
Navigate to Single sign-on tab and select SAML as the single sign-on method.
Setup SAML by filling the first two sections as instructed below...
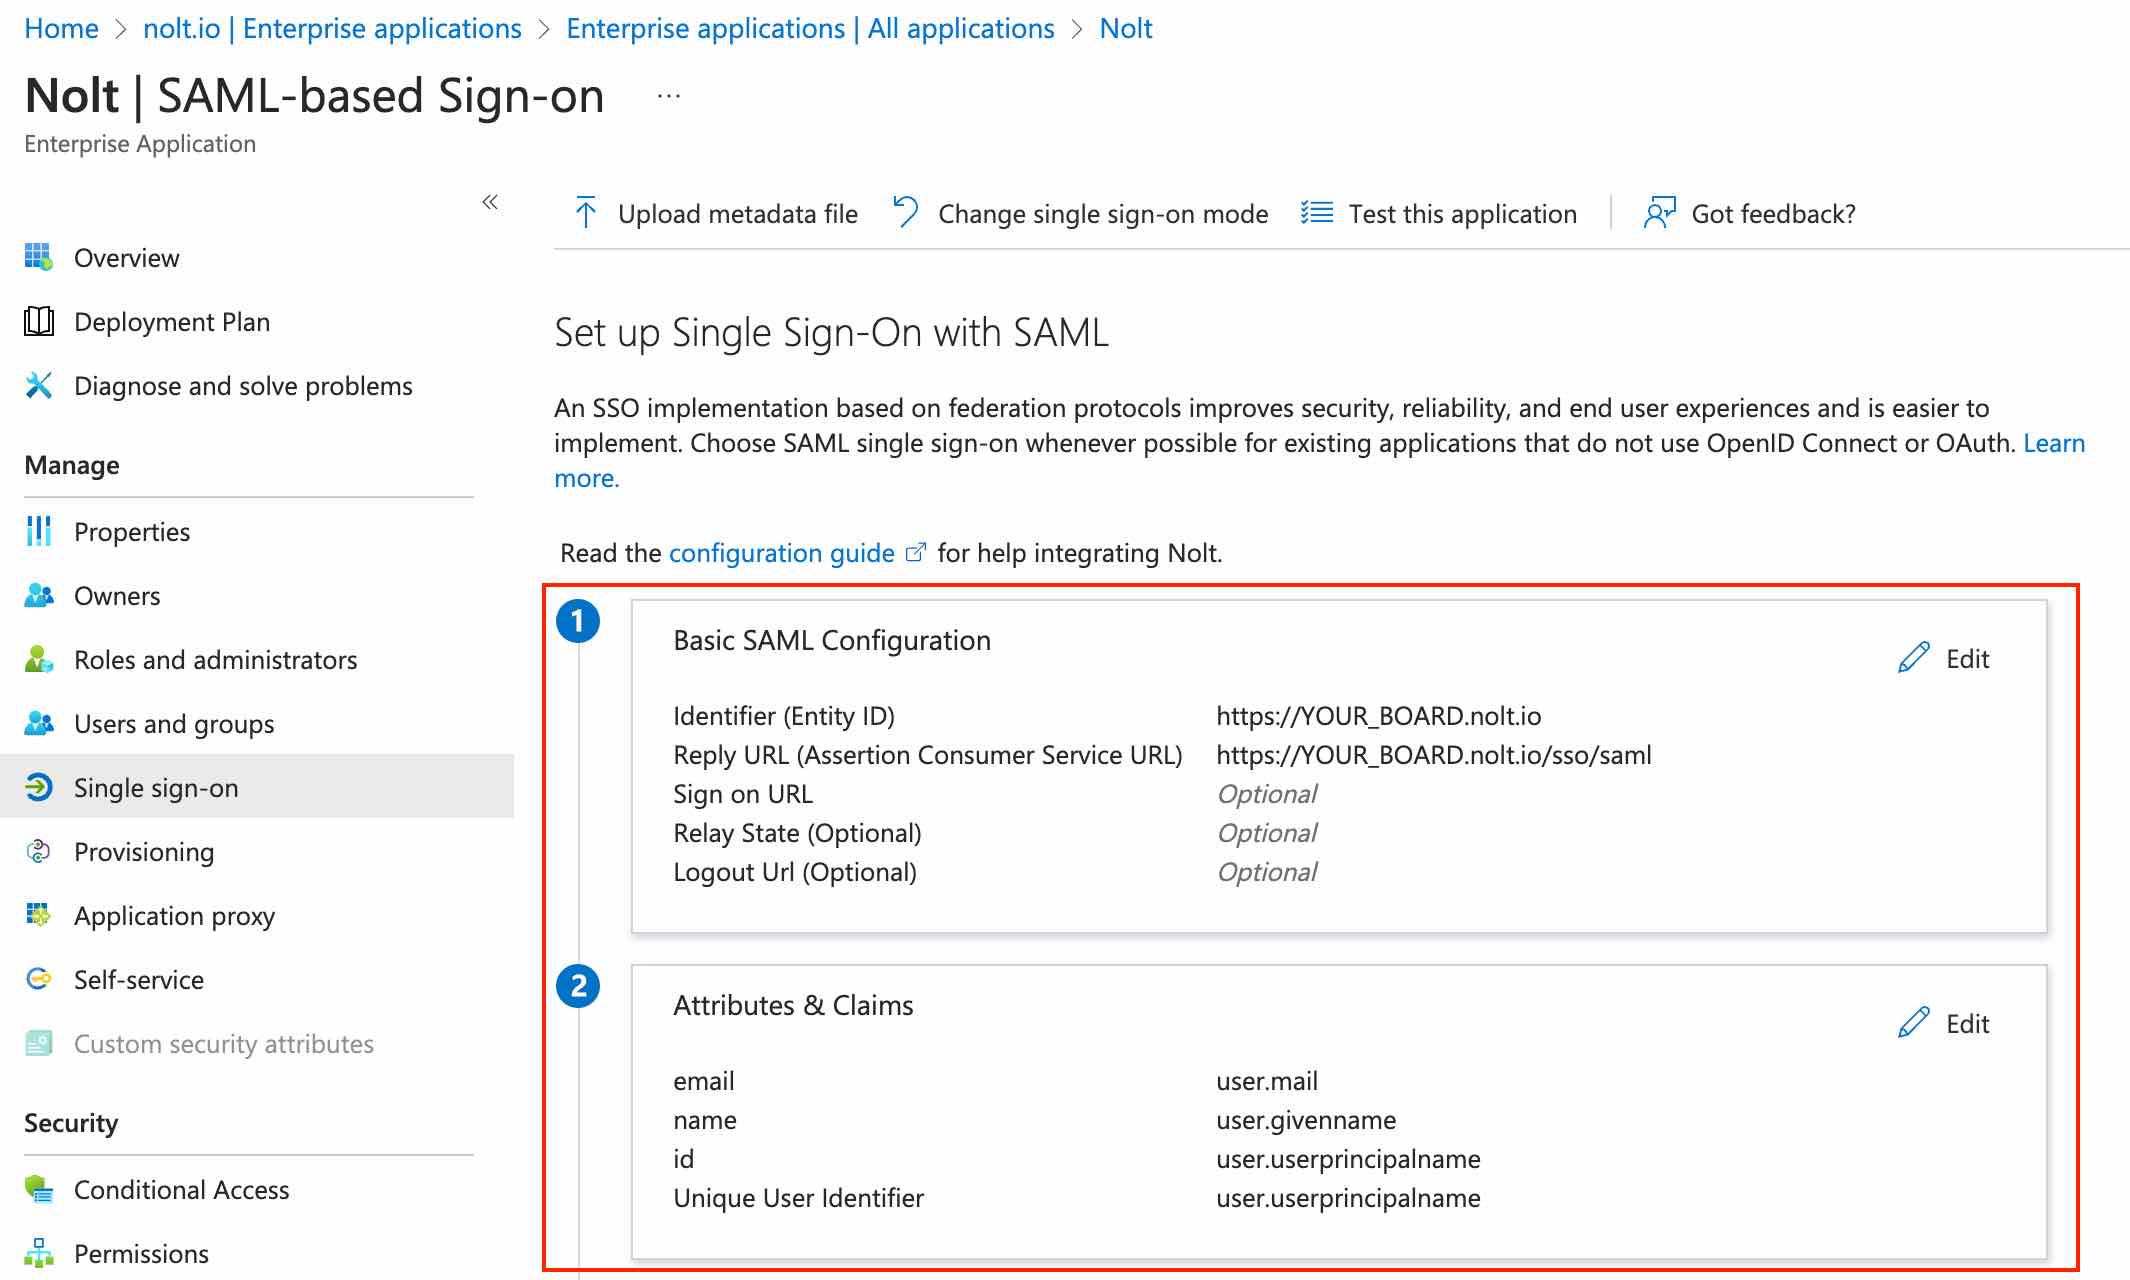
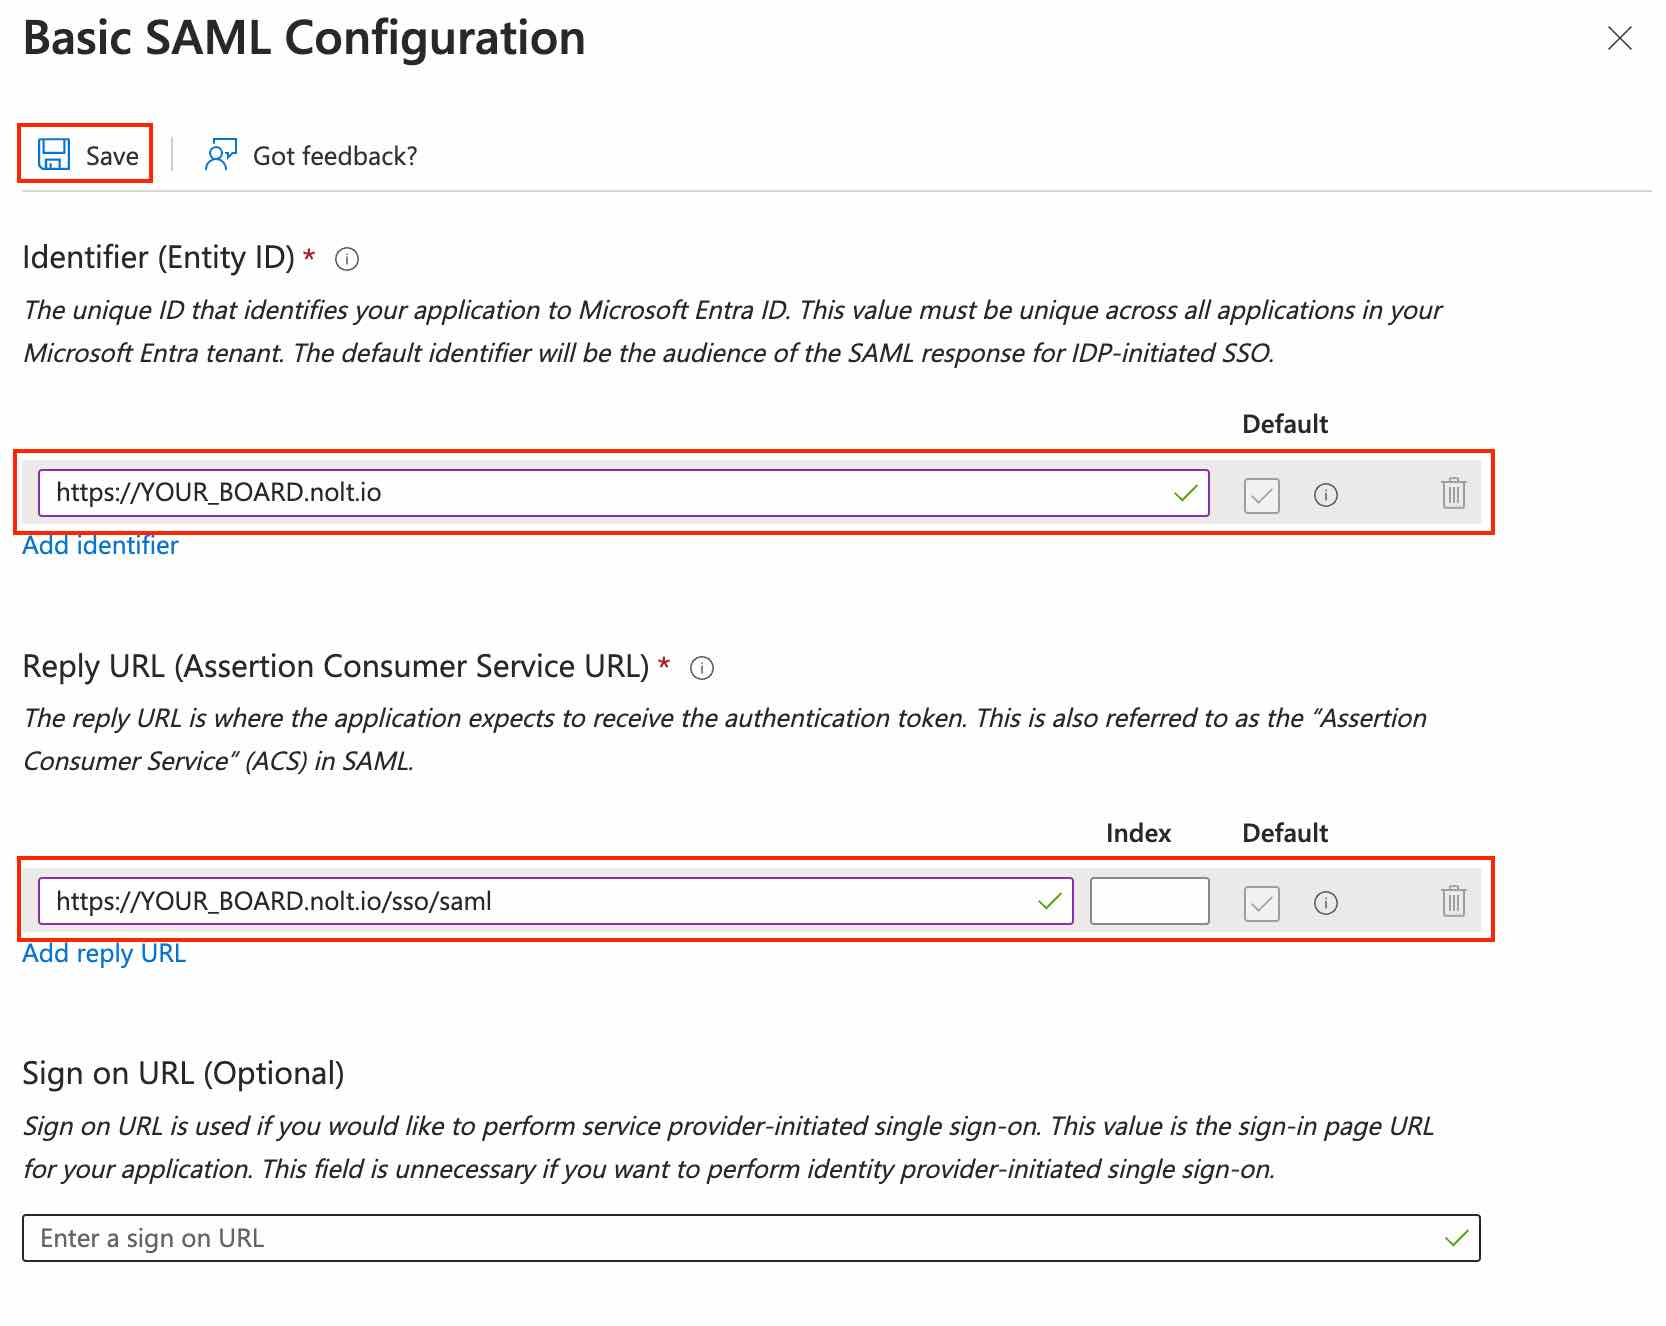
Basic SAML Configuration
Configure the required fields as follows:- Identifier (Entity ID)
https://YOUR_BOARD.nolt.io - Reply URL (Assertion Consumer Service URL)
https://YOUR_BOARD.nolt.io/sso/saml Save the configuration:
Attributes & Claims
It it mandatory to include id, name and email: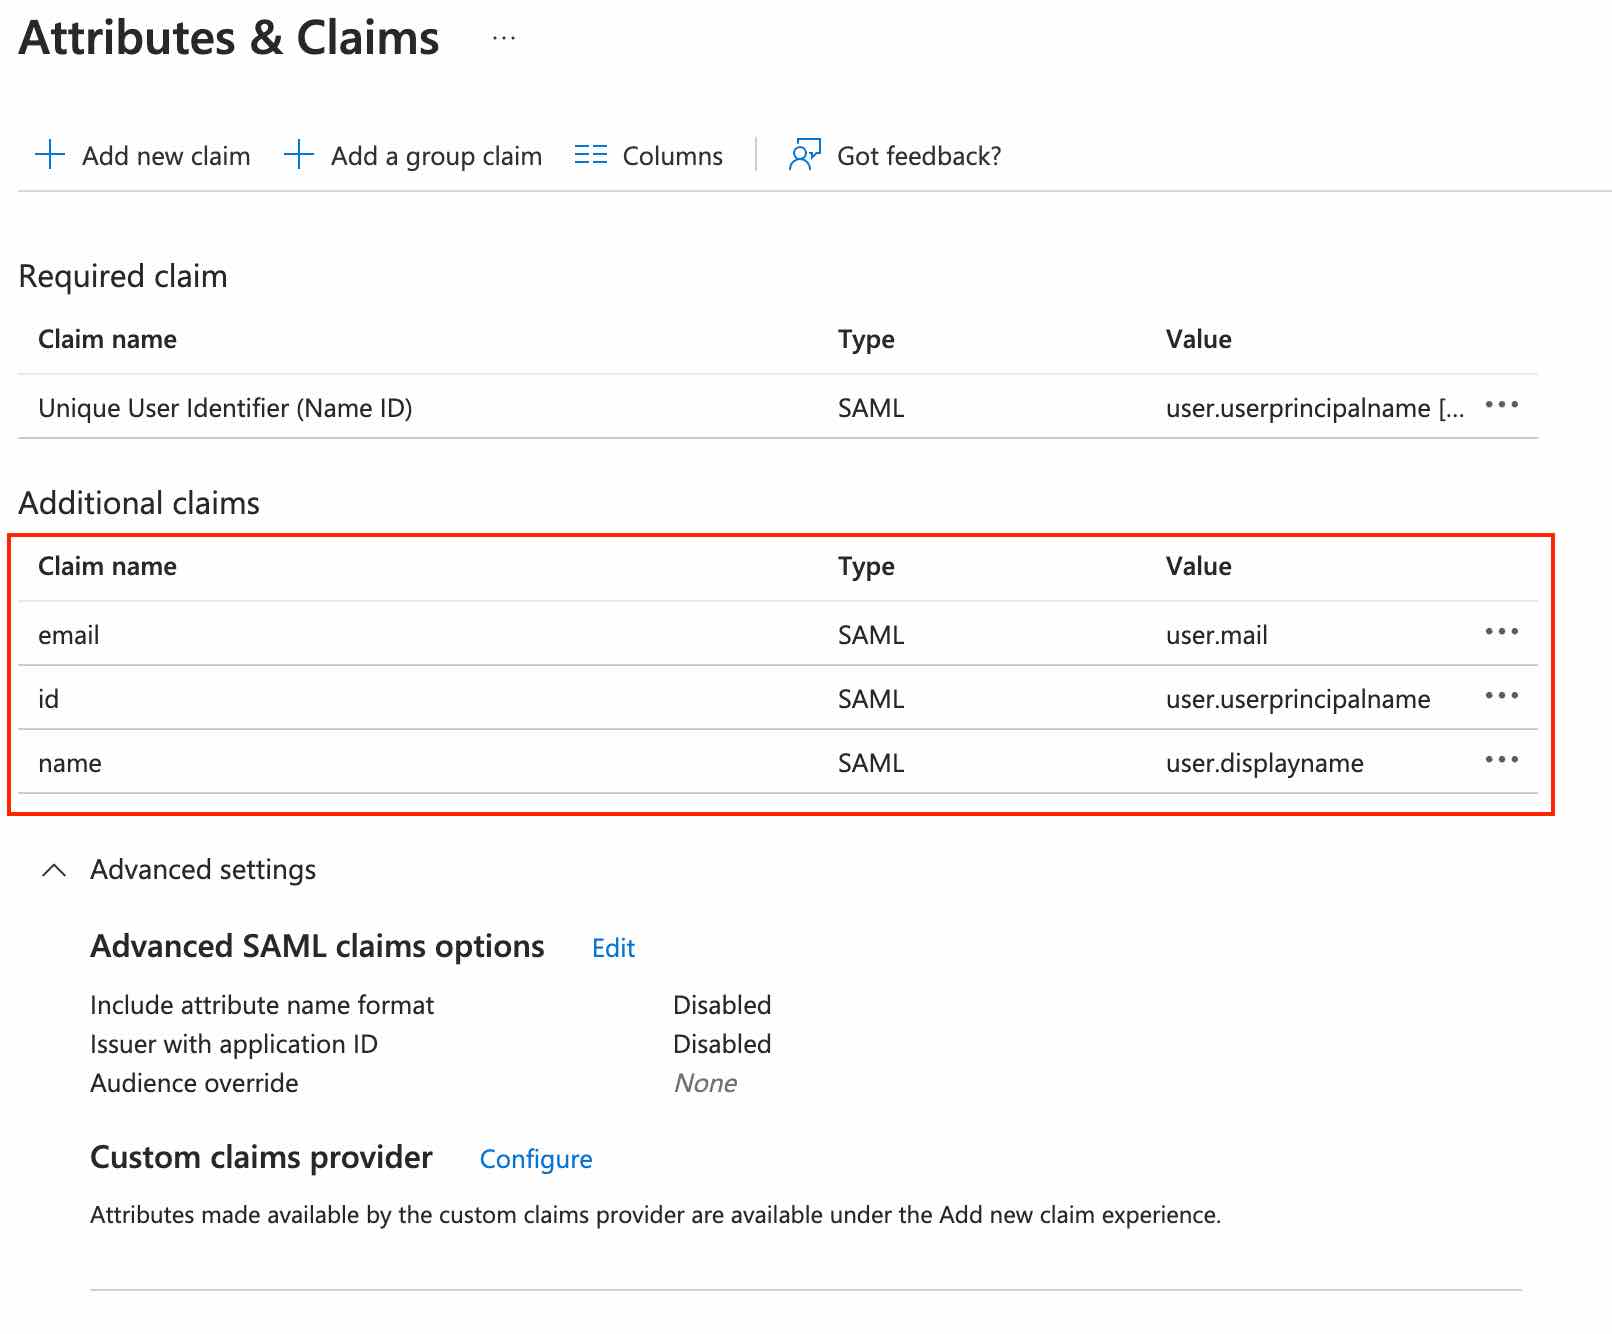
If you want to include custom attributes or set the user role (ADMIN, MODERATOR, or MEMBER) for the Nolt board, navigate to Add new claim:
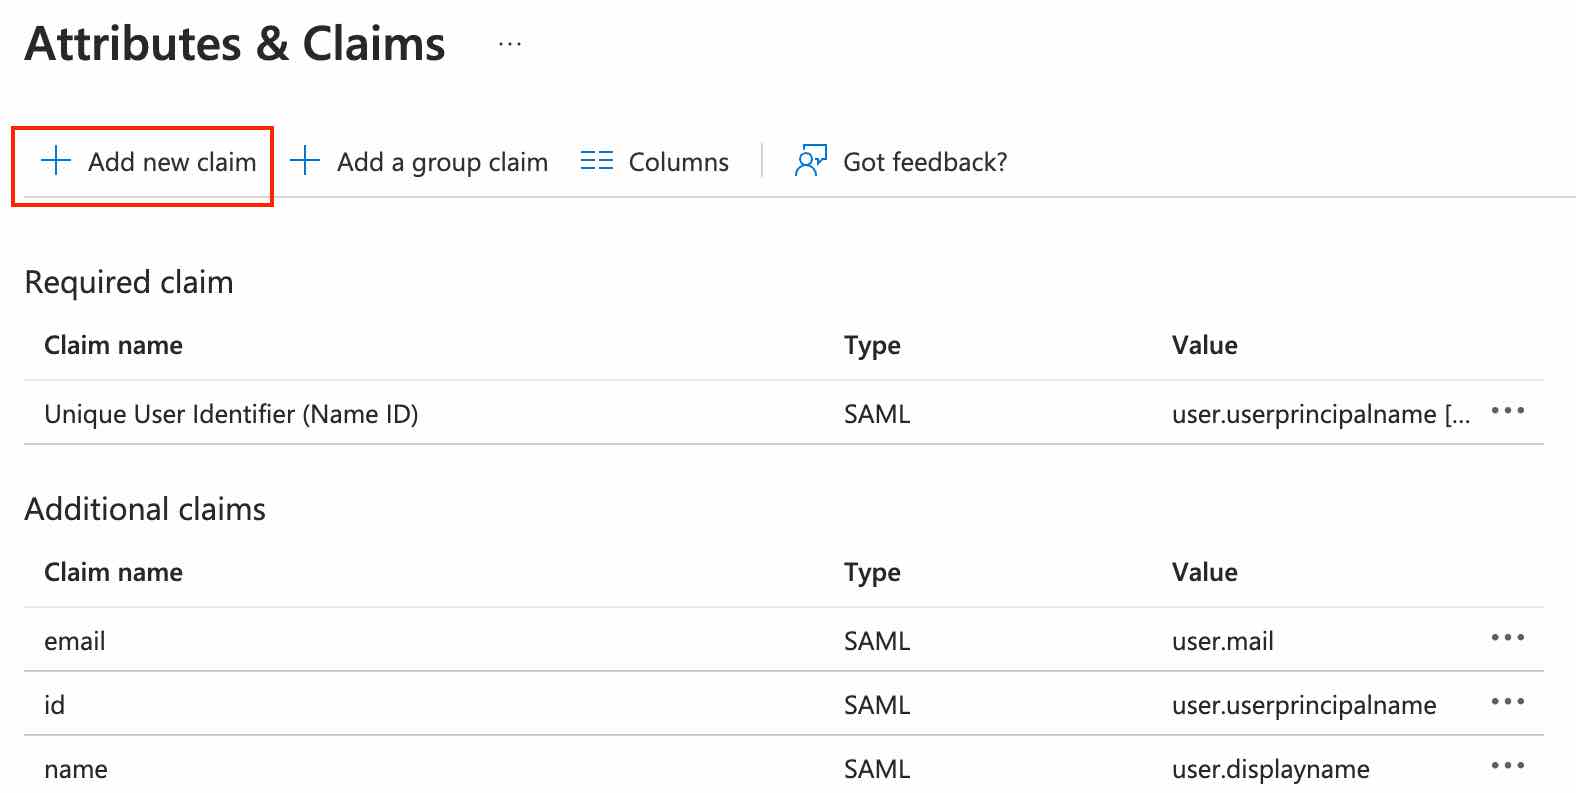
noltUserRole
This is the claim/attribute name to use for specifying the Nolt role. Note that the role can be one of MEMBER, MODERATOR, or ADMIN (case-sensitive).
Custom attributes
You can use any name and source attribute for custom attributes. However, you will need to specify the custom attribute structure in Nolt (see part 2).
X.509 Certificate
Open the App Federation Metadata Url available in SAML Certificates section. Copy the X509 certificate from the xml file.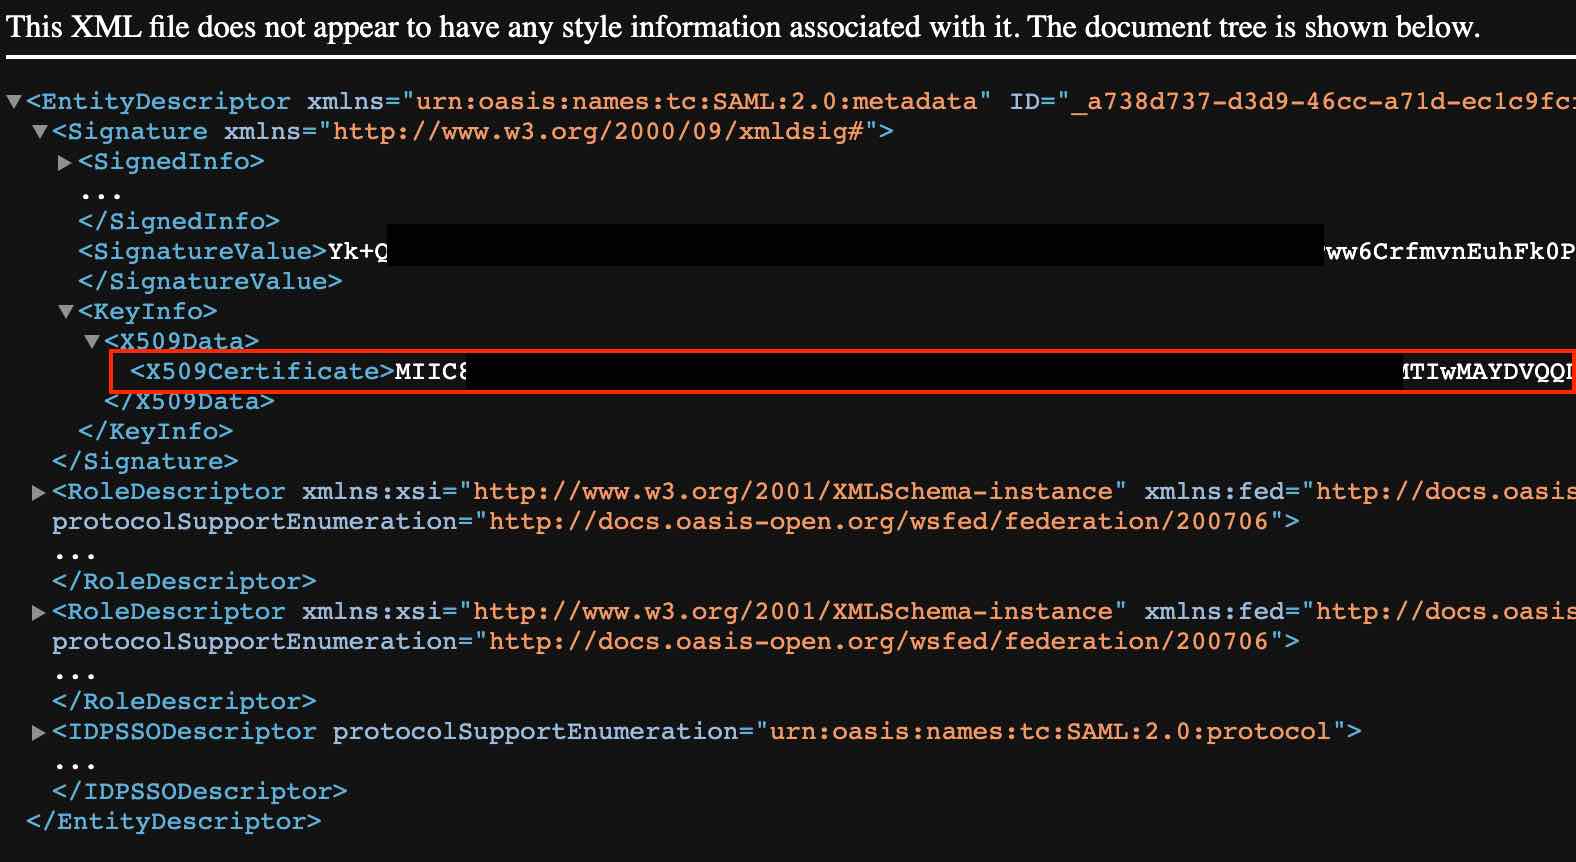
Convert the certificate to the below format and copy it (by adding the prefix "-----BEGIN CERTIFICATE-----" and suffix "-----END CERTIFICATE-----"):
-----BEGIN CERTIFICATE----- <Copied Certificate> -----END CERTIFICATE-----Identity Provider Data
Copy Login URL and Microsoft Entra ID Identifier settings from Set up [application name] section.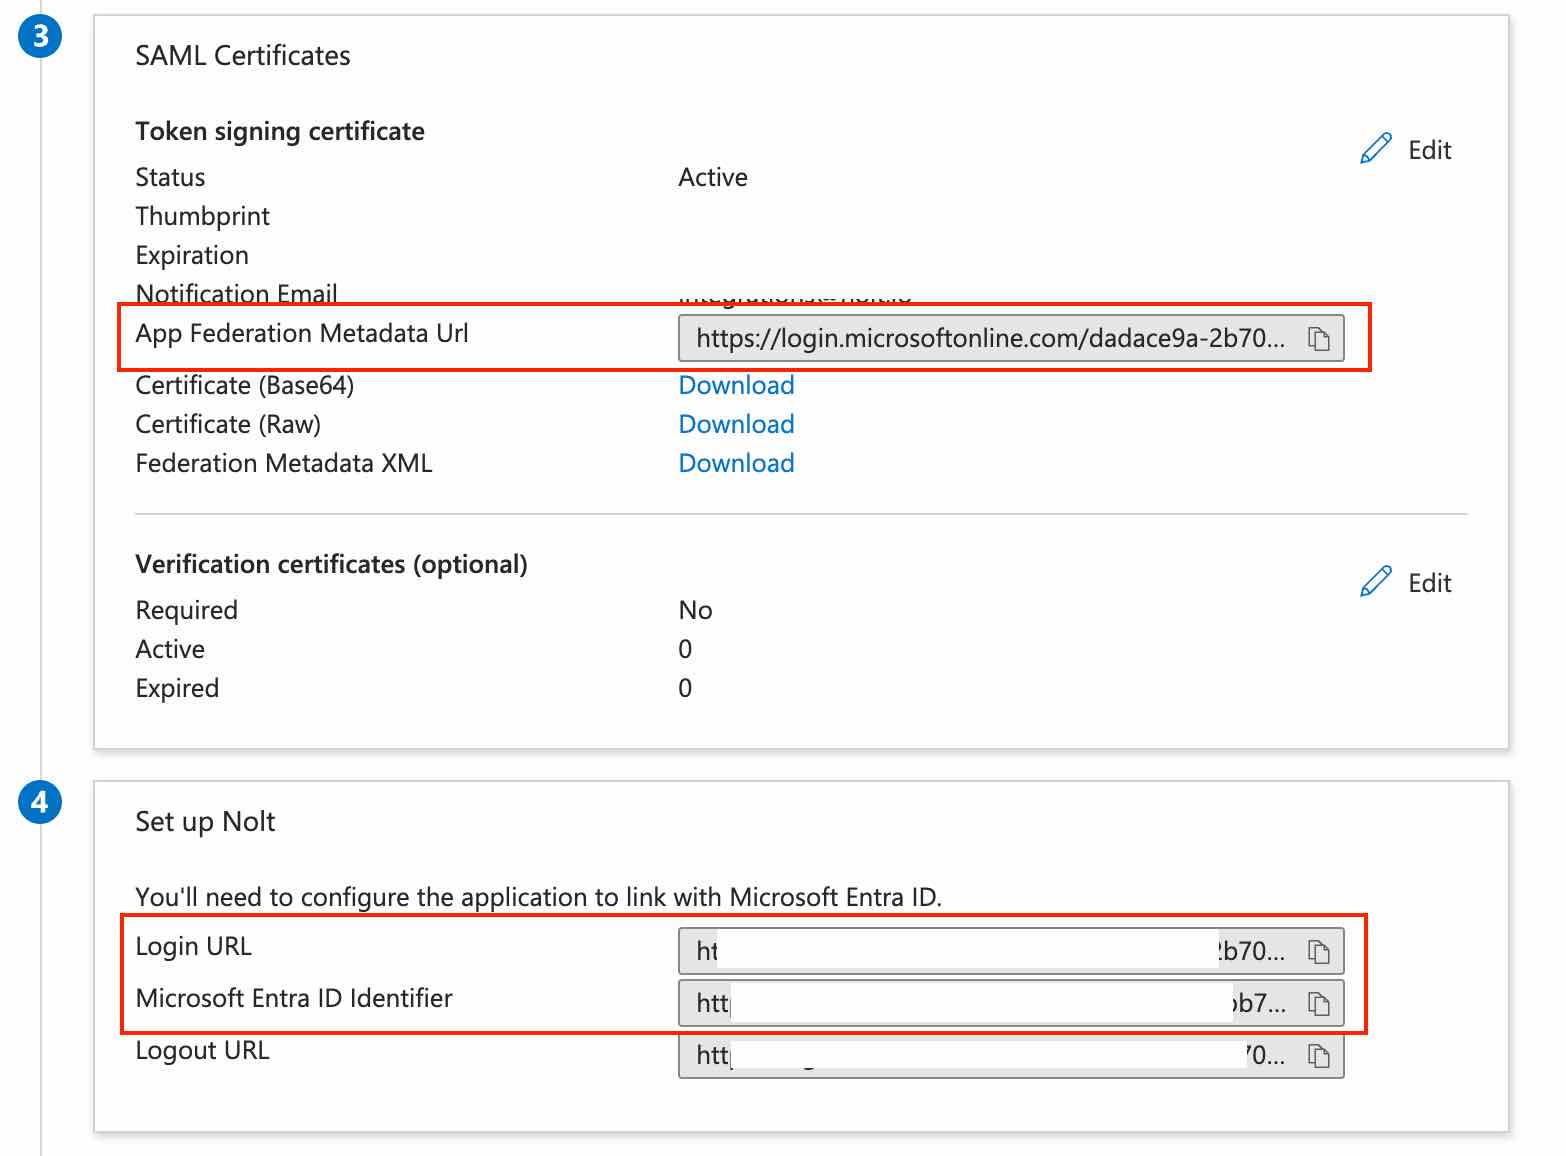
2. Add your Entra ID application details to Nolt
Navigate to your board settings → Integrations → SAML 2.0 and configure the following settings:
IDP entity ID (Issuer URL):
Paste the Microsoft Entra ID Identifier that you copied earlier (part 1).- SP Entity ID (Audience URI):
https://YOUR_BOARD.nolt.io - X509 Certificate:Paste the X509 Certificate.
- Remote Login URL:Use the Login URL that you copied earlier in the following format:
https://YOUR_BOARD.nolt.io/sso/azure/saml?loginUrl=LOGIN_URL - Remote logout URL (optional)Add a Remote logout URL if you want to redirect users to a specific URL after they log out from their Nolt account.
- User role structure (optional)If you are specifying the user role for Nolt (ADMIN, MODERATOR, or MEMBER) as a propery/attribute in the OIDC token which is NOT named noltUserRole (what Nolt expects by default), you need to set this field to tell Nolt which property to look for (instead of noltUserRole). For example, if you use userRole instead of noltUserRole, you need to set this field to userRole.
Custom attributes (optional)
If you are including any custom attributes, you need to set this field to tell Nolt which custom attributes to expect and where to find them. For example, if you have custom attribute setup in Azure as follows: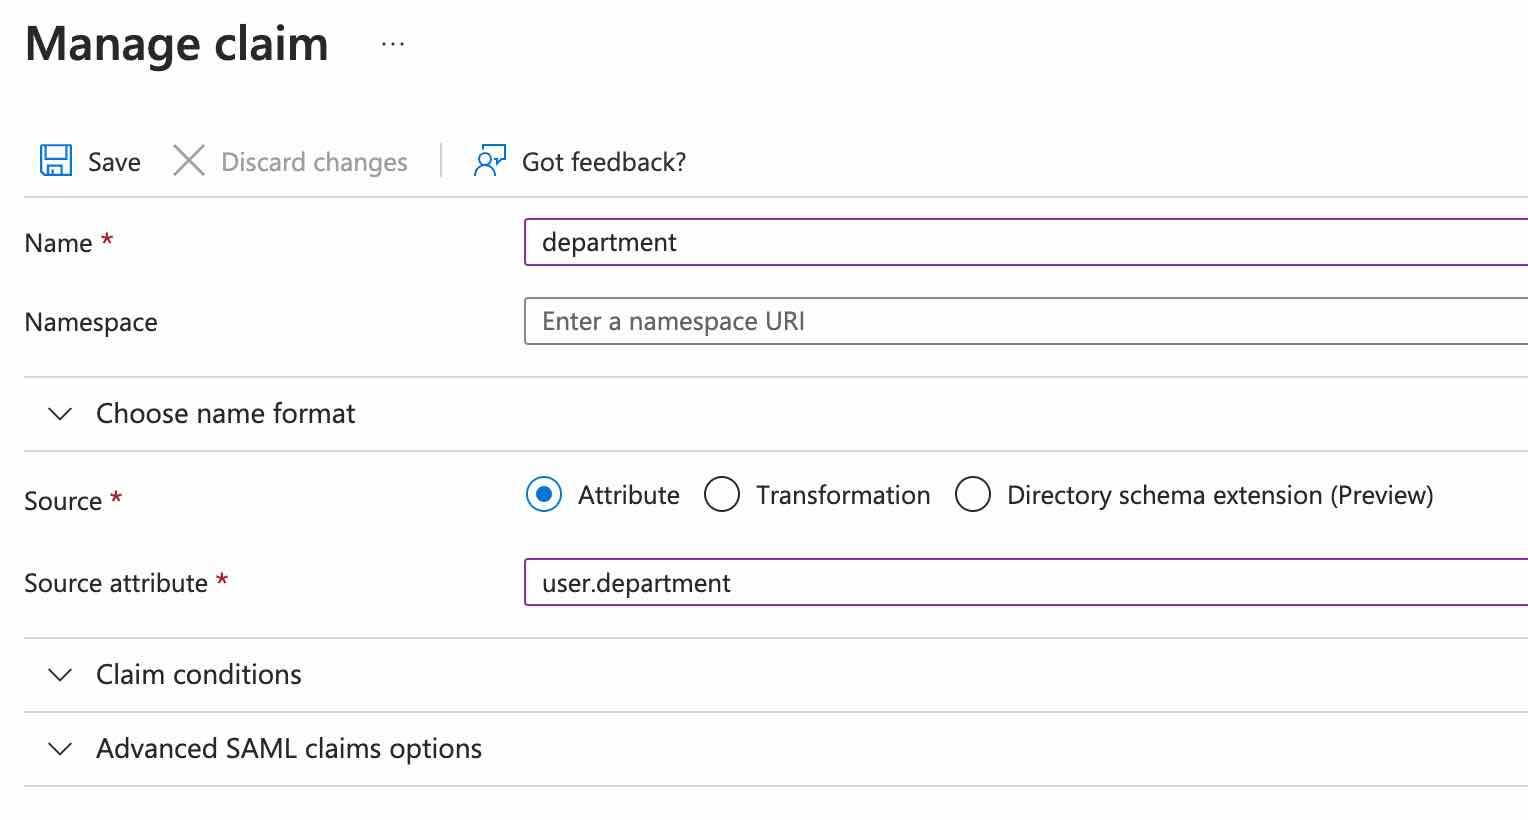
Then the user custom attribute structure should be set as follows:
{"Department":"department"}- Click Test and activate:This should activate the SAML SSO integration. To test the integration, try logging in as a new user.
Need help?
Please feel free to reach out at hello@nolt.io for help with setting up SSO.
Related
Setting up SSO with OpenID Connect (OIDC)
Setup OpenID Connect via your IdP to provide single-sign-on.
Setting up SSO with SAML 2.0
Setup SAML via your IdP to provide single-sign-on.
Setting up SSO with Auth0
Setup single-sign-on (SSO) via Auth0.
Setting up SSO with Okta
Setup single-sign-on (SSO) via Okta.
Setting up SSO with OneLogin
Setup single-sign-on (SSO) via OneLogin.