Single sign-on (SSO) via Auth0
If you are using Auth0 as your Identity Provider, you can allow your users to seamlessly sign in to your board without creating a separate Nolt account. Nolt supports SAML 2.0 and OpenID Connect (OIDC) protocol for single-sign-on and you can configure either protocol to setup SSO. This guide will help you connect Nolt with Auth0 to enable SSO.
Table of Contents
OpenID Connect (OIDC) Integration
If you want to use OpenID Connect based authentication for your users then you can follow along the steps to integrate Auth0 with Nolt.
1. Setting up Application in Auth0
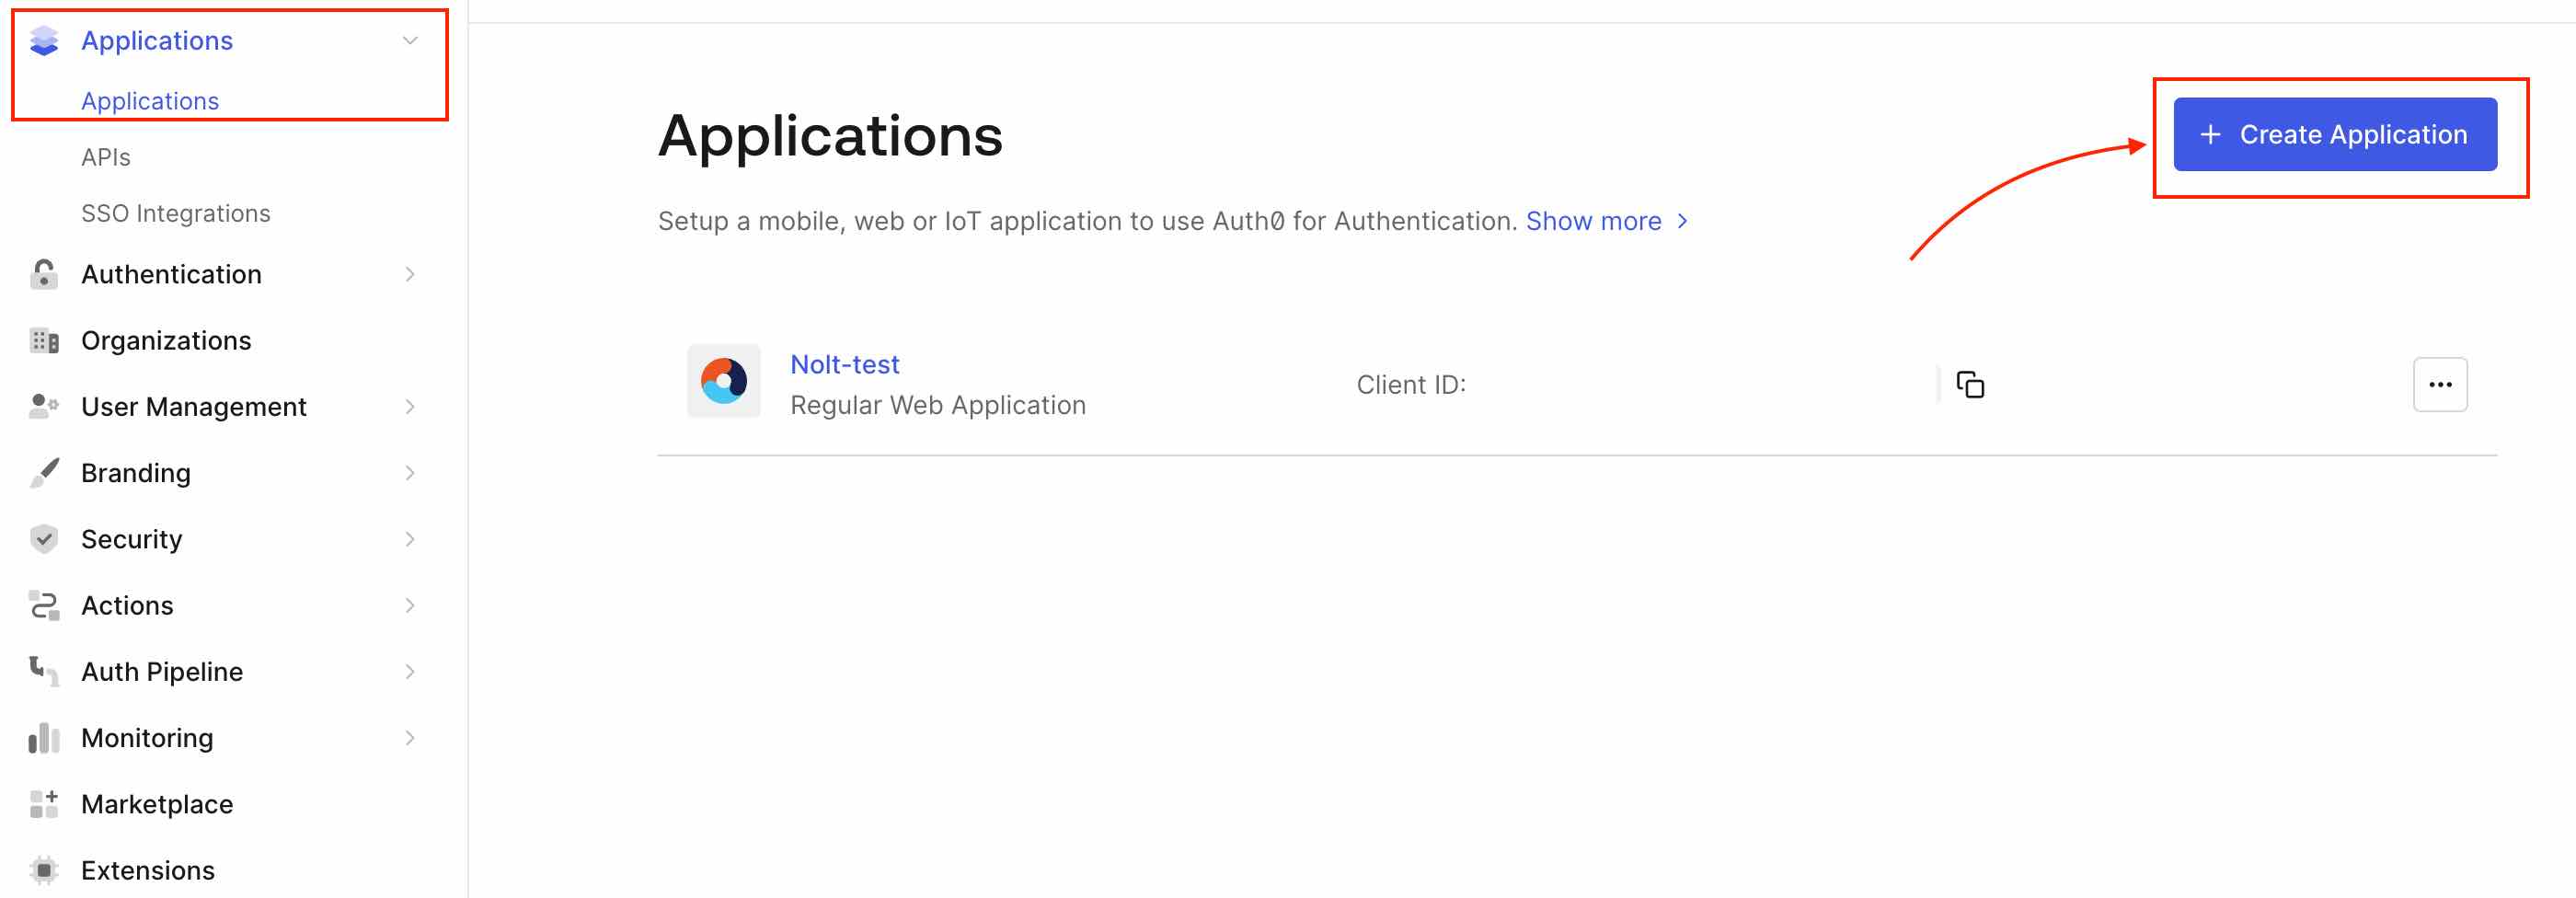
Sign in to your Auth0 account. Navigate to Dashboard → Applications → Applications and select Create Application. Enter a name for the application, select Regular Web Application for the application type, and then select Create.
Select Settings tab of your new application. Scroll to Application URIs and use the following for Allowed Callback URLs.
https://<YOUR_BOARD>.nolt.io/sso/openIdConnect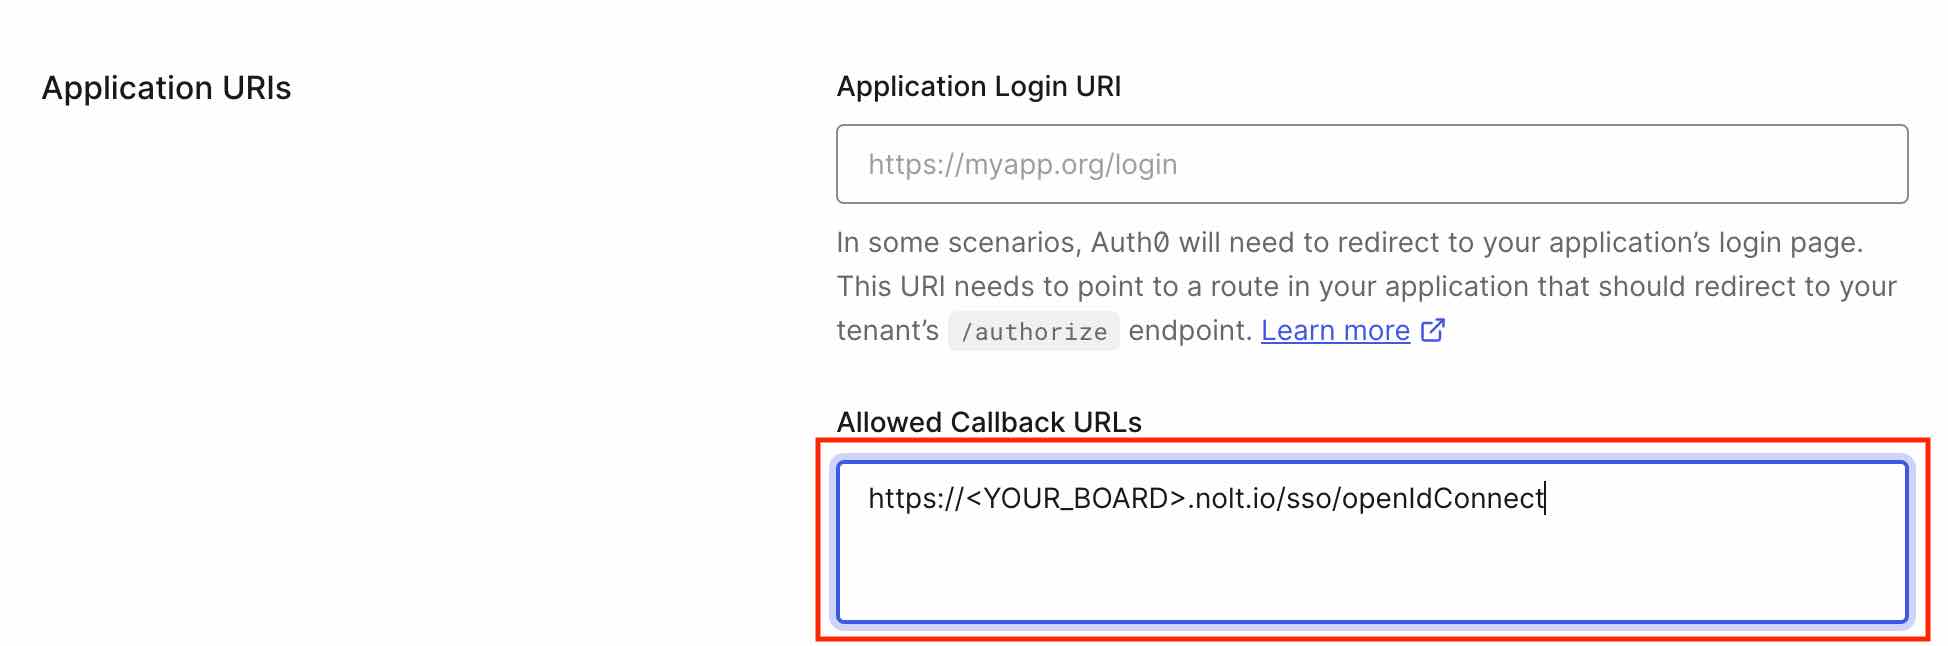
Scroll to the bottom of the tab and select Save Changes.
2. Integrating in Nolt
Navigate to your board → Integrations → OpenID Connect.
Navigate to the Settings tab of your new application in Auth0 to view the information that you need to configure the OpenID Connect integration.
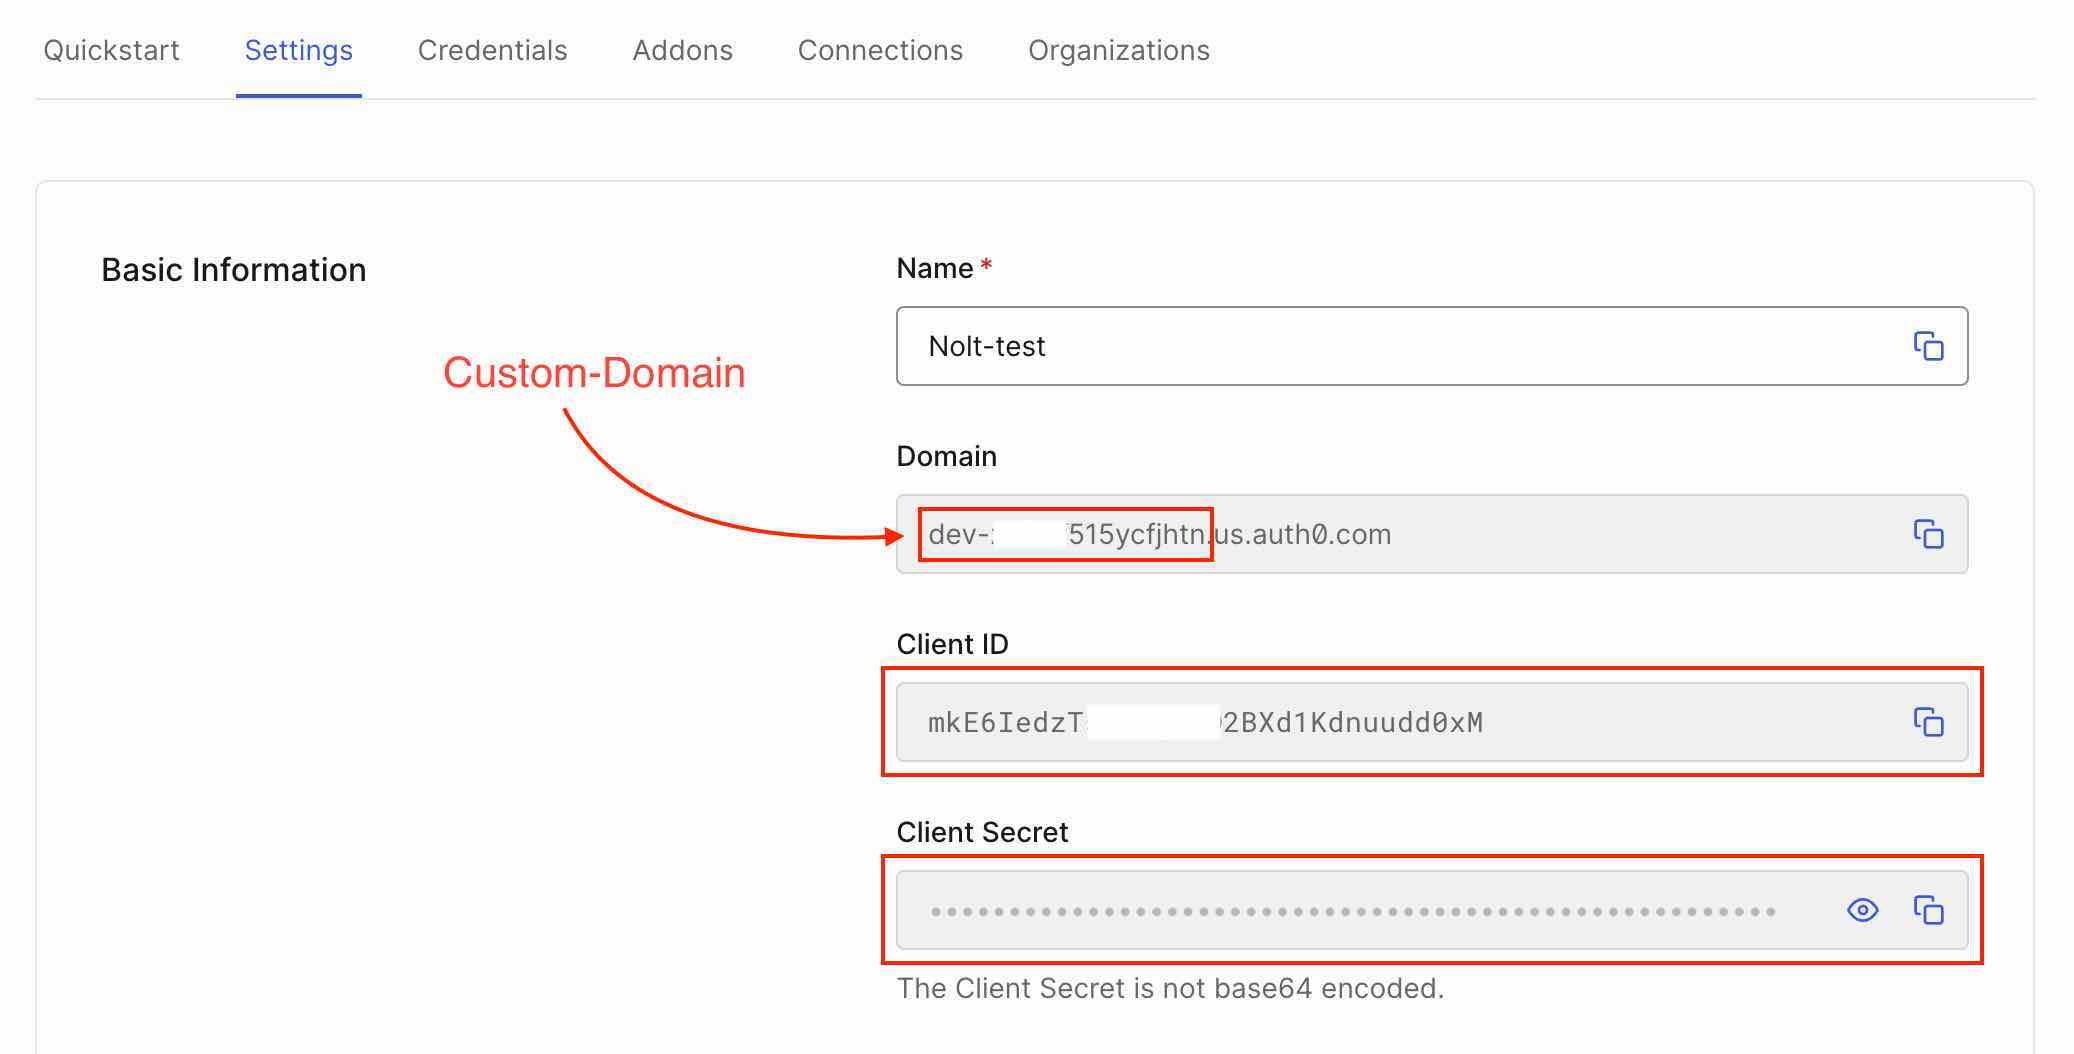
- Client ID:Copy the Client ID from the application.
- Client Secret:Copy the Client Secret.
- Issuer URL:
https://<YOUR_AUTH0_DOMAIN>.us.auth0.com - Token URL:
https://<YOUR_AUTH0_DOMAIN>.us.auth0.com/oauth/token - Remote Login URL:
https://<YOUR_AUTH0_DOMAIN>.us.auth0.com/authorize?client_id=<CLIENT_ID>&redirect_uri=https://<YOUR_BOARD>.nolt.io/sso/openIdConnect&response_type=code&scope=openid%20profile%20email - Remote logout URL (optional)Add a Remote logout URL if you want to redirect users to a specific URL after they log out from their Nolt account.
- User role structure (optional)If you are passing the user role for nolt other than noltUserRole in the OIDC token, you need to set this field. If you have the attribute as follows:Then the user role structure should be set as follows:
userRole: 'ADMIN'userRole - Custom Attributes (optional)If you are passing any custom attributes in OIDC token, you need to set this field. If you have custom attribute as follows:Then the user custom attribute structure should be set as follows:
department empId{"Department":"department","EmployeeID":"empId"} - Click Test and activate:This should activate the SSO. To test the SSO try logging in as a new user.
Note: YOUR_AUTH0_DOMAIN is available in the settings tab of your application. Make sure to replace YOUR_AUTH0_DOMAIN, CLIENT_ID and YOUR_BOARD before using the remote login URL.
SAML 2.0 Integration
If you want to use SAML 2.0 based authentication for your users then you can follow along the steps to integrate Auth0 with Nolt.
1. Setting up Application in Auth0
Sign in to your Auth0 account. Navigate to Dashboard → Applications → Applications and select Create Application. Enter a name for the application, select Regular Web Application for the application type, and then select Create.
2. SAML SSO Configuration
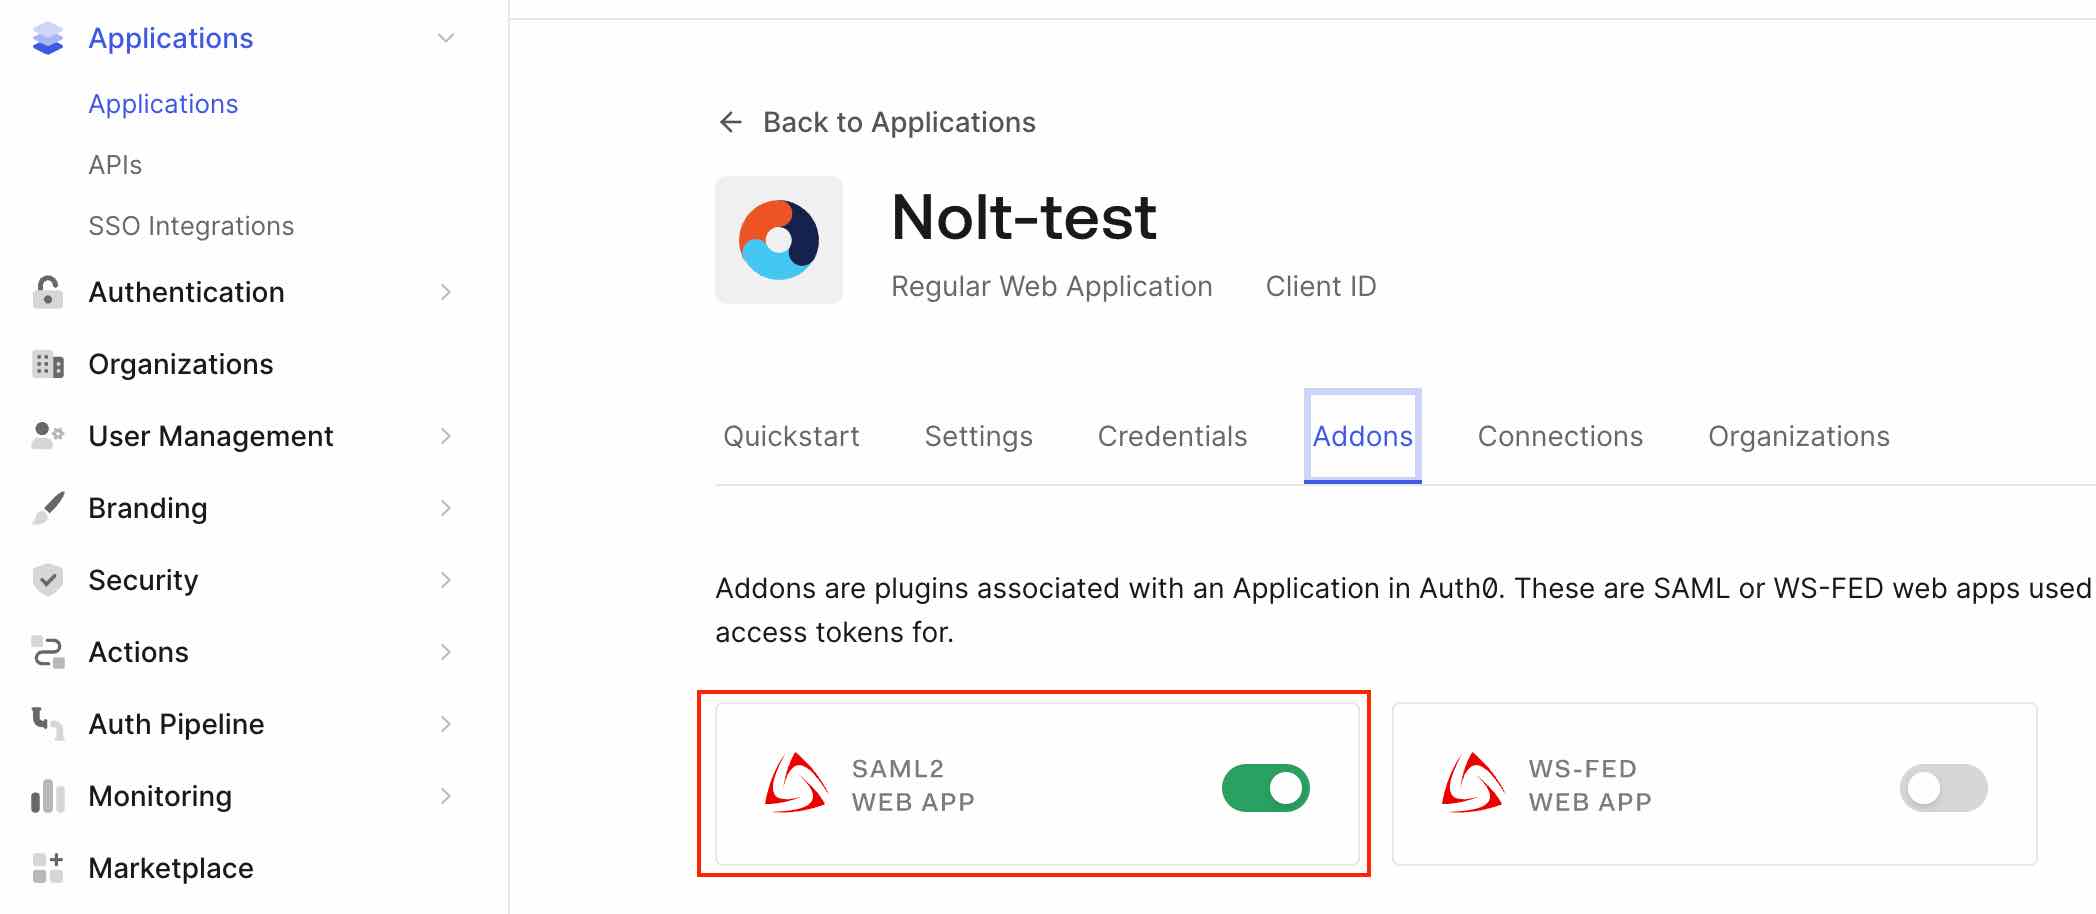
Navigate to your newly created application (Applications → Applications → YOUR_APP). Select Addons tab and enable SAML2 Web App toggle.
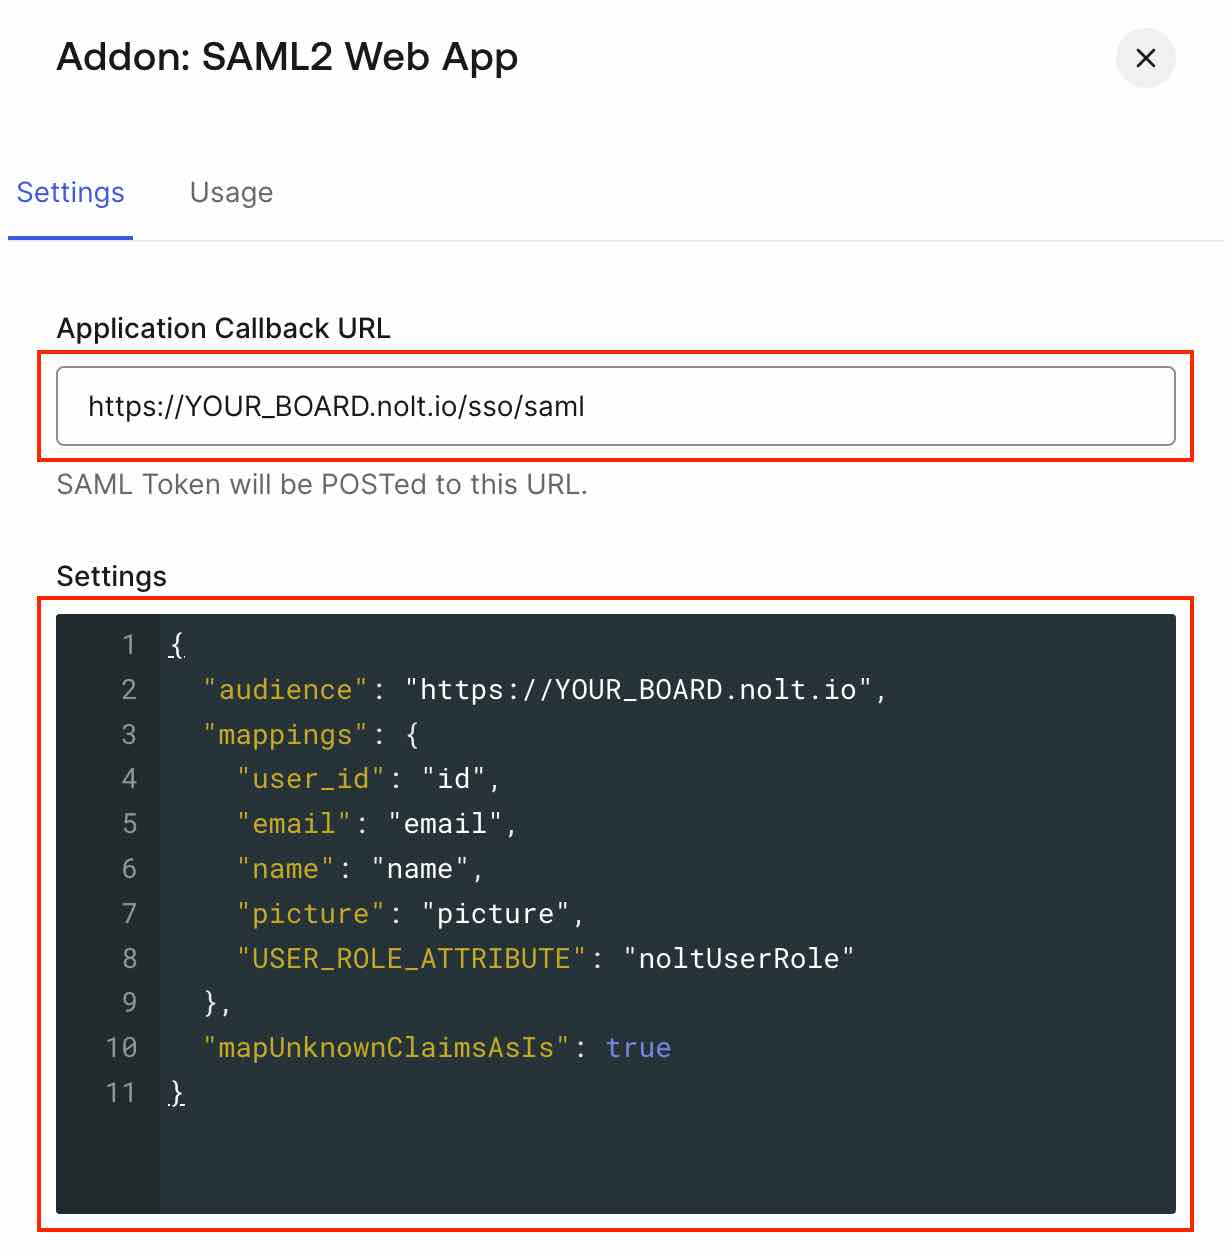
- On the Settings tab, enter the Application Callback URL as:
https://YOUR_BOARD.nolt.io/sso/saml - Settings:Use the below code in settings. Replace YOUR_BOARD to your board name and USER_ROLE_ATTRIBUTE to the field that describes user role for Nolt board. If you do not want to configure noltUserRole you can remove this line from settings.
{
  "audience": "https://YOUR_BOARD.nolt.io",
  "mappings": {
    "user_id": "id",
    "email": "email",
    "name": "name",
    "picture": "picture",
    "USER_ROLE_ATTRIBUTE": "noltUserRole"
  },
  "mapUnknownClaimsAsIs": true
}
See Login Flow in Auth0 if you want to pass user/app metadata as custom attributes to SAML response. - Scroll to the bottom of the tab and click Enable.
3. Integrating in Nolt
Navigate to your board → Integrations → SAML 2.0. Set up all the required fields to activate the integration.
Navigate to the SAML Addon Usage tab to view the information that you need to configure the SAML integration.
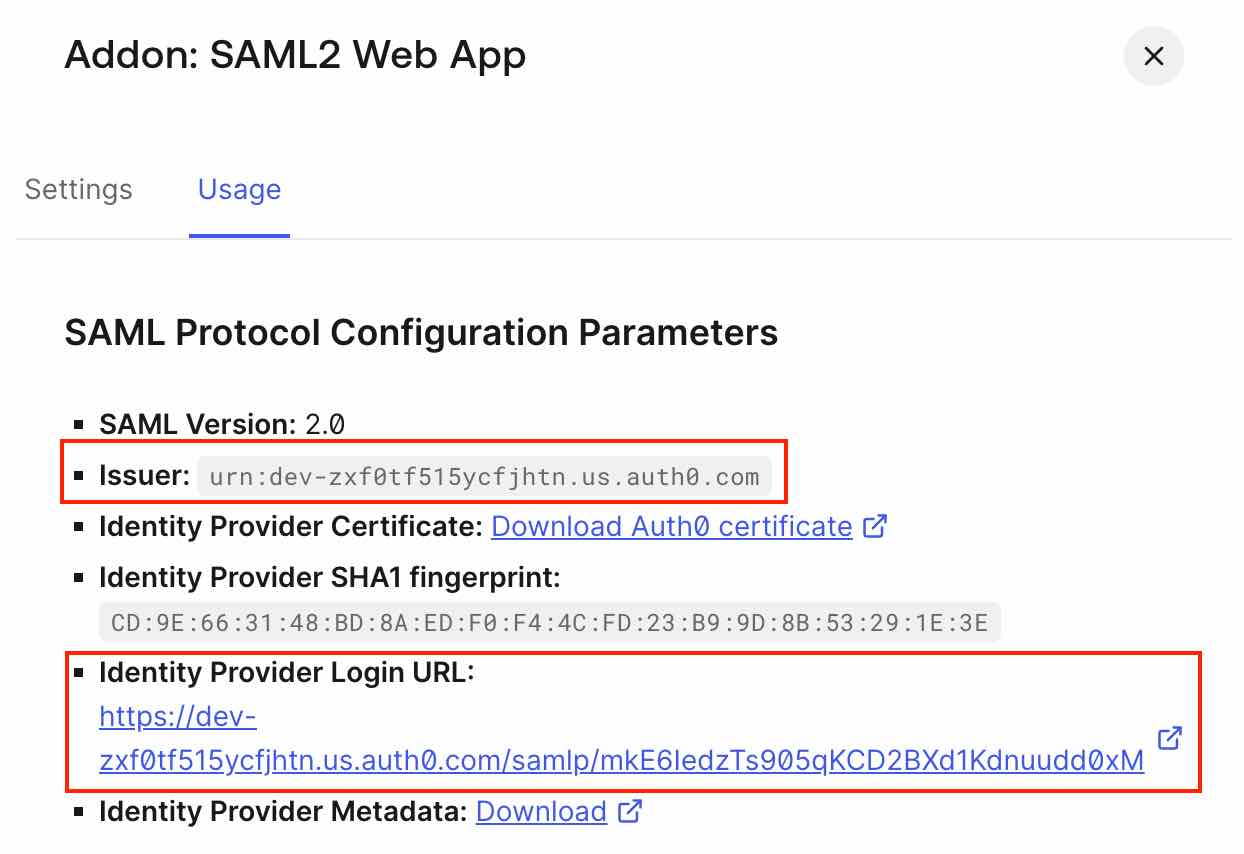
- IDP entity ID (Issuer URL):Copy the Issuer.
- SP Entity ID (Audience URI):
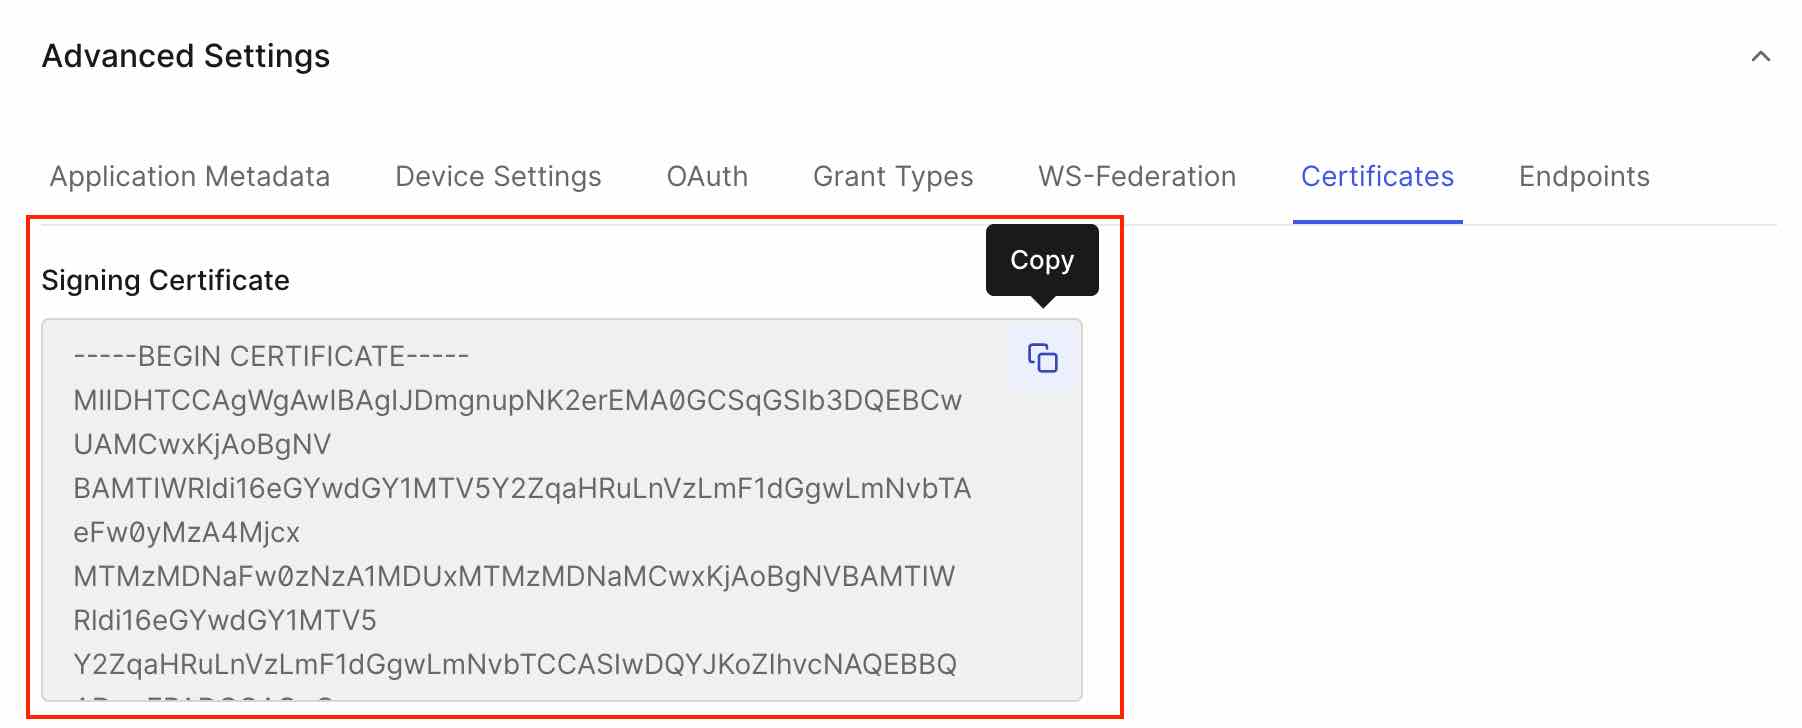
https://YOUR_BOARD.nolt.io - X509 Certificate:Scroll to the bottom of the Settings tab of your Auth0 application and click Advanced Settings. Select the Certificates tab and copy the certificate.
- Remote Login URL:Copy the Identity Provider Login URL from usage tab of SAML2 addon.
- Remote logout URL (optional)Add a Remote logout URL if you want to redirect users to a specific URL after they log out from their Nolt account.
- User role structure (optional)If you are passing the user role for nolt other than noltUserRole in the SAML response, you need to set this field. If you have following attribute for setting Nolt user role,Then the structure should be,
userRoleuserRole - Custom Attributes (optional)If you have any custom attributes that needs to be displayed in user profile, you need to set this field. If you have set Auth0 Rule (see Login Flow in Auth0) as follows:
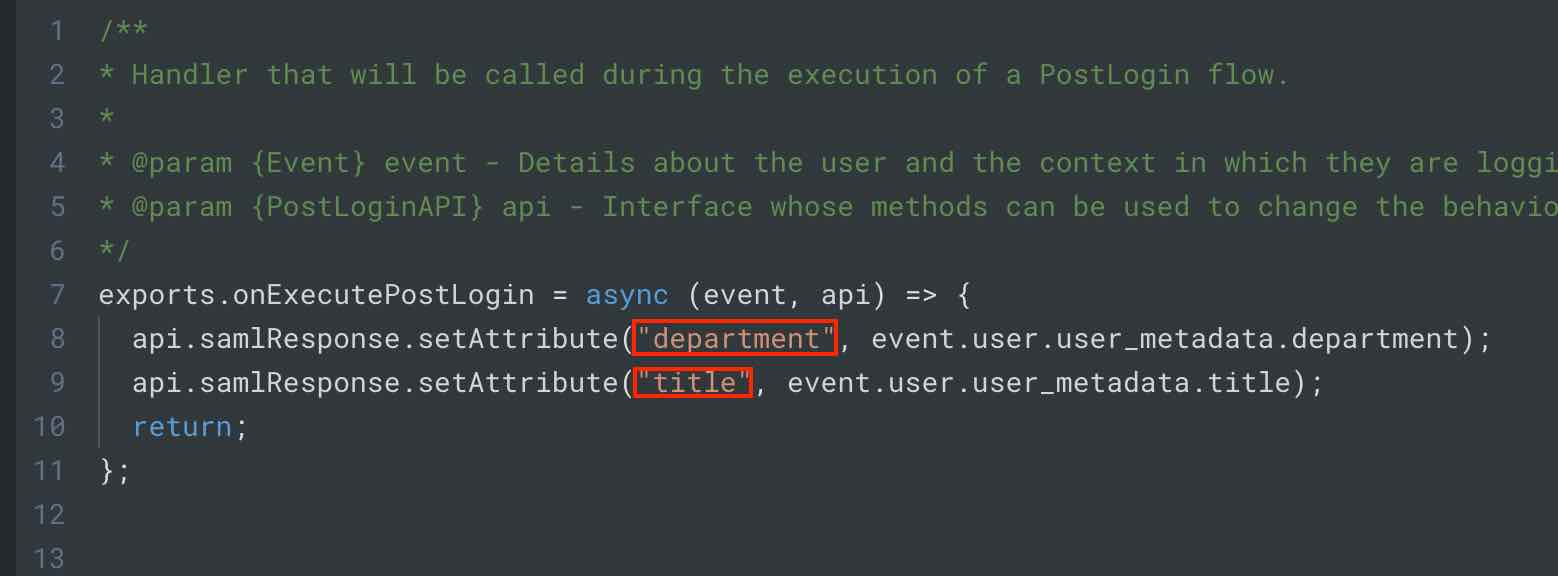 Then the structure should be,
{"Department":"department","Title":"title"} - Click Test and activate:This should activate the SSO. To test the SSO try logging in as a new user.
Need help?
Please feel free to reach out at hello@nolt.io for any help regarding SSO.
Related
Setting up SSO with OpenID Connect (OIDC)
Setup OpenID Connect via your IdP to provide single-sign-on.
Setting up SSO with SAML 2.0
Setup SAML via your IdP to provide single-sign-on.
Setting up SSO with Microsoft Entra ID (Azure AD)
Setup single-sign-on (SSO) via Microsoft Entra ID.
Setting up SSO with Okta
Setup single-sign-on (SSO) via Okta.
Setting up SSO with OneLogin
Setup single-sign-on (SSO) via OneLogin.