If you have an existing user directory, you can use SCIM to automatically provision users to your Nolt board. This allows you to manage users in your user directory and reflect those changes automatically in Nolt. Nolt supports auto-provisioning for users only. Group provisioning is not supported. This help article will guide you through the process of setting up SCIM for your IdP.
This feature is only available for enterprise customers.
Table of Contents
Setting up SCIM in Nolt
Navigate to your board → Integrations → SCIM.
- SCIM type
Nolt supports three different ways of sign-on for your users. You can select the one that suits your needs.
The sign-on type can only be selected once and can not be changed later. Please make sure you have selected the correct type.
- SCIM
Selecting this type will allow users to use their email to sign in to Nolt. - SCIM with SAML 2.0
Selecting this type will enable SAML based SSO to sign in to Nolt. The provisioned users will be authenticated using SAML protocol and requires SAML 2.0 to be enabled in Nolt (see Single sign-on (SSO) via SAML 2.0). - SCIM with OpenID Connect
Selecting this type will enable OpenID based SSO to sign in to Nolt. The provisioned users will be authenticated using OpenID Connect protocol. You need to setup OpenID Connect to select this (see Single sign-on (SSO) via OpenID Connect).
- Optional fields
If you have selected SCIM as your sign-on type then you can set the following optional fields.
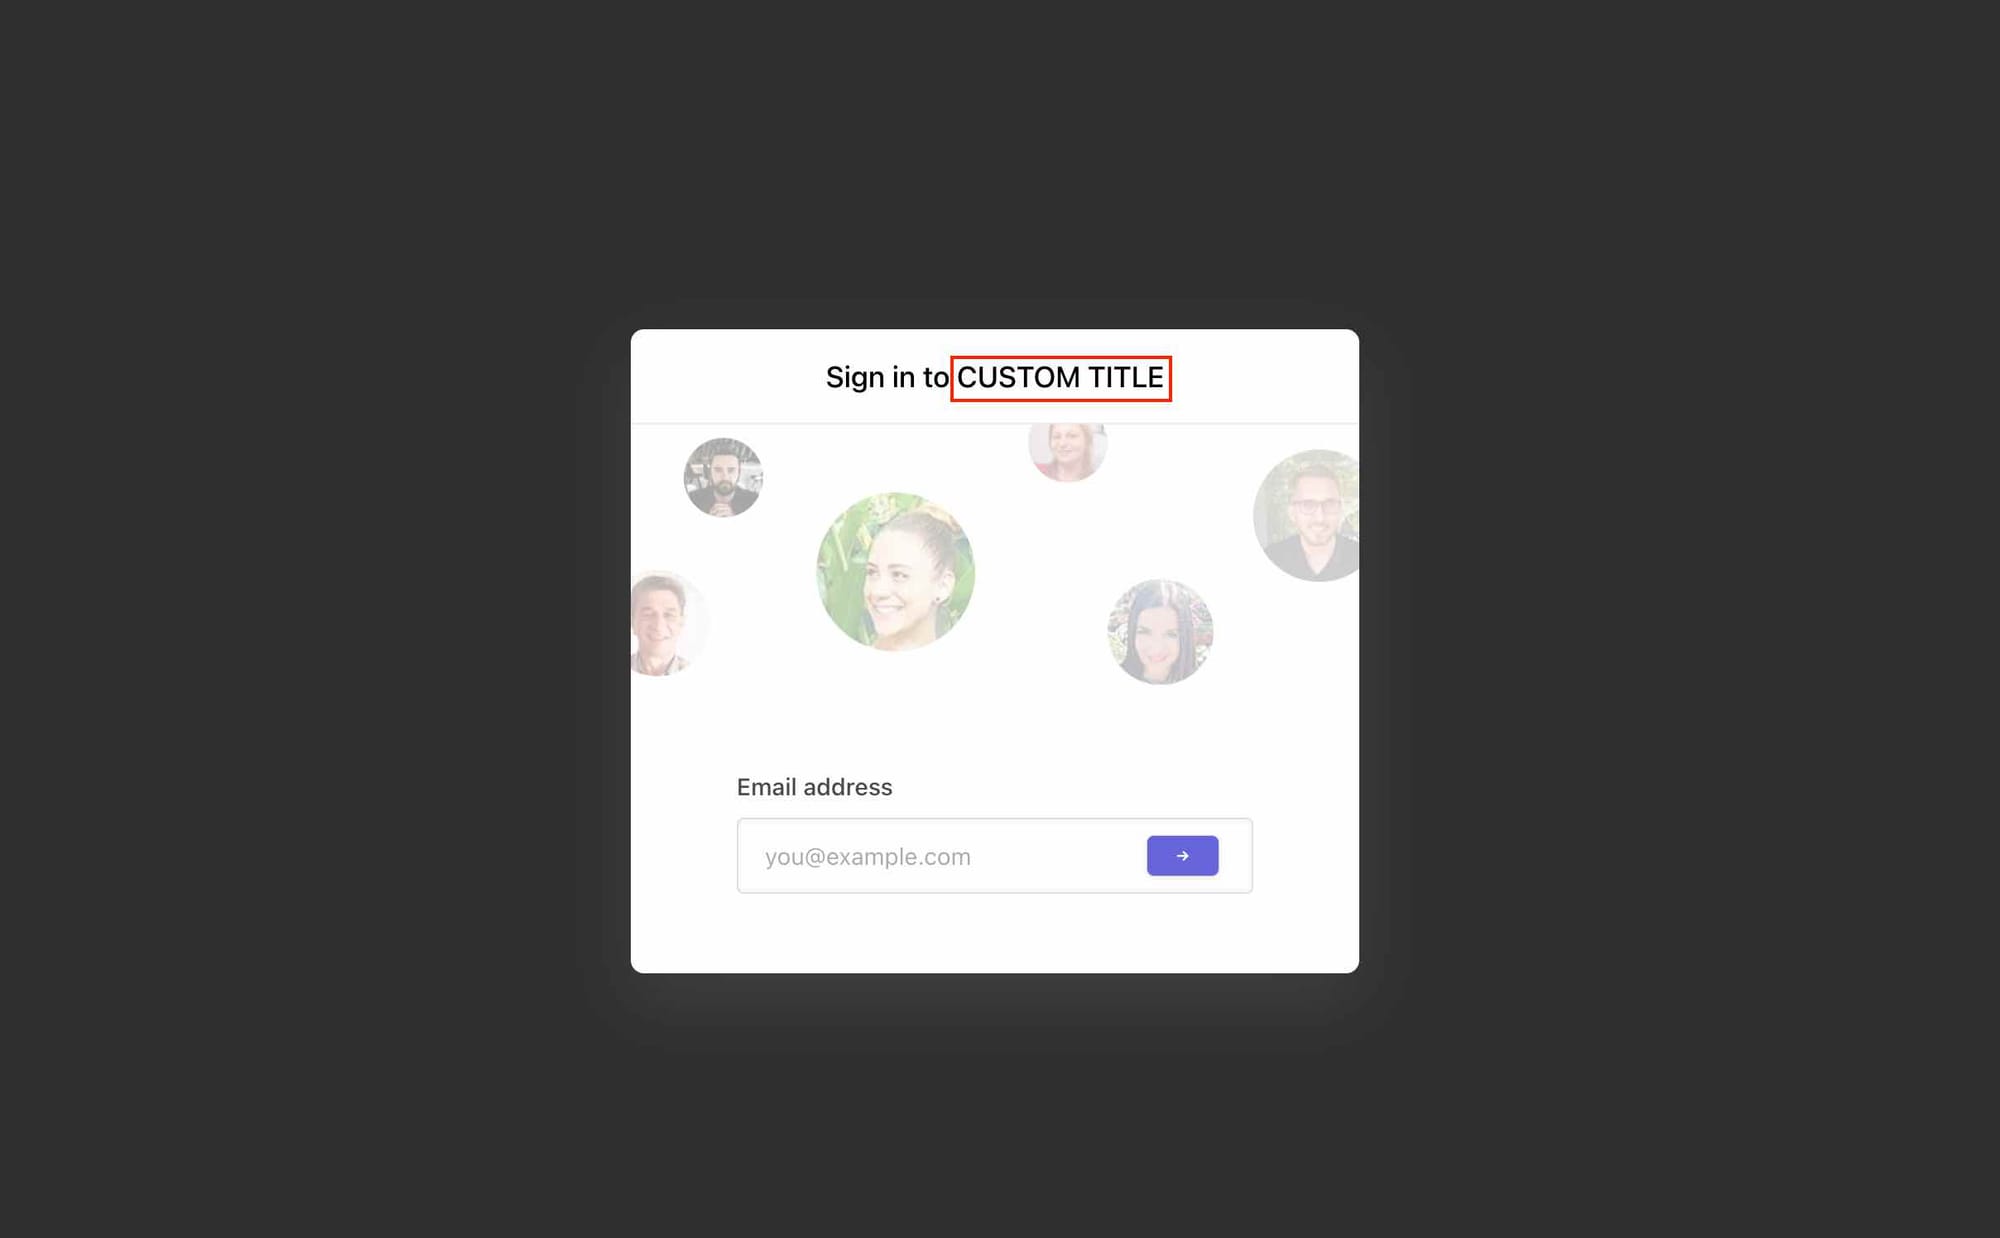
- Custom Login Title (Optional)You can customize the login message shown for your users. This option is only available for SCIM sign in type.
- User role structure (Optional)
This field is used to set the role for your users. You can set this field with the attribute that sets the role of your users. Make sure to pass the attribute while configuring SCIM in your IdP. This option is only available for SCIM sign in type. For SAML and OpenID, you can set this field in their respective settings. - Custom attributes (Optional)
This field is used to set the custom attributes for your users. These attributes are shown in user profile. Make sure to pass the attributes while configuring SCIM in your IdP. This option is only available for SCIM sign in type. For SAML and OpenID, you can set this field in their respective settings.
- API Key
- Click on Create a new API Key
- Copy your API Key

- Enable the integration
Setting up SCIM in your IdP
Different Identity Providers (IdP) have different process for setting up SCIM. This help guide covers the process of setting up SCIM for some popular IdPs.
Microsoft Entra ID (Azure AD)
If you using Microsoft Entra ID (Azure Active Directory) to manage your organization you can use SCIM to automatically provision users to Nolt. The users will be synced between Azure and Nolt (one way) and allowed access to your Nolt board.
1. Setup Enterprise Application
In order to provision users to Nolt with Microsoft Entra ID, create an enterprise application.
If you are using single sign-on along with SCIM, skip this section and follow the steps mentioned in Single sign-on (SSO) via Microsoft Entra ID.
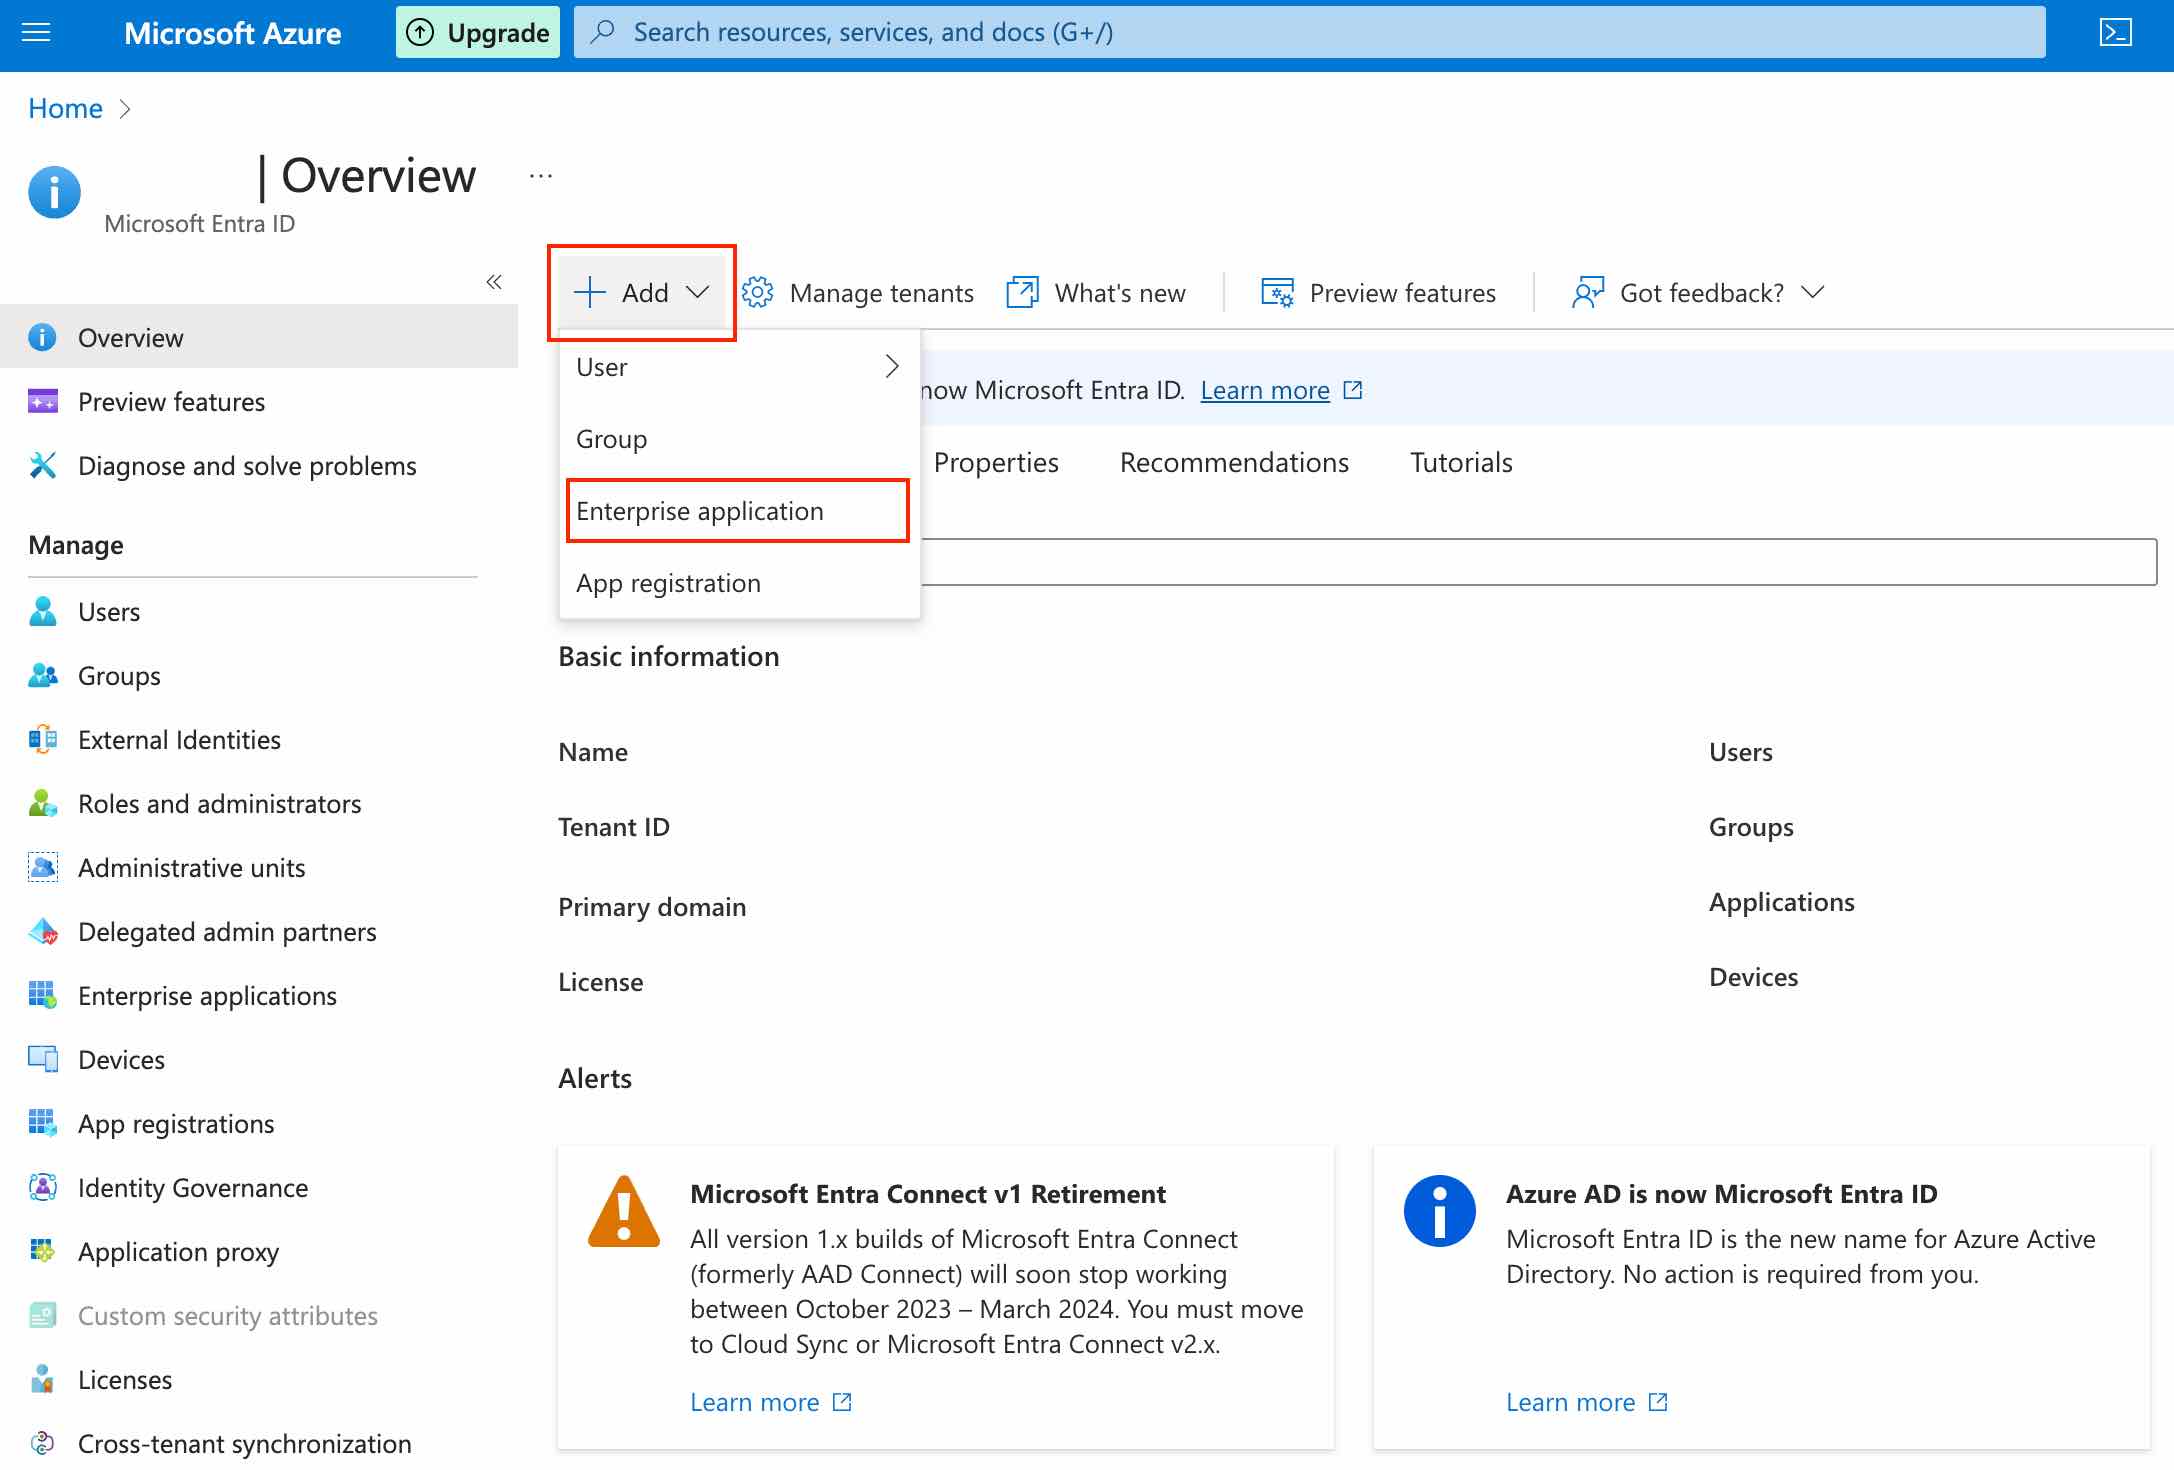
Sign in to your Azure account. Navigate to Microsoft Entra ID → Add → Enterprise Application.
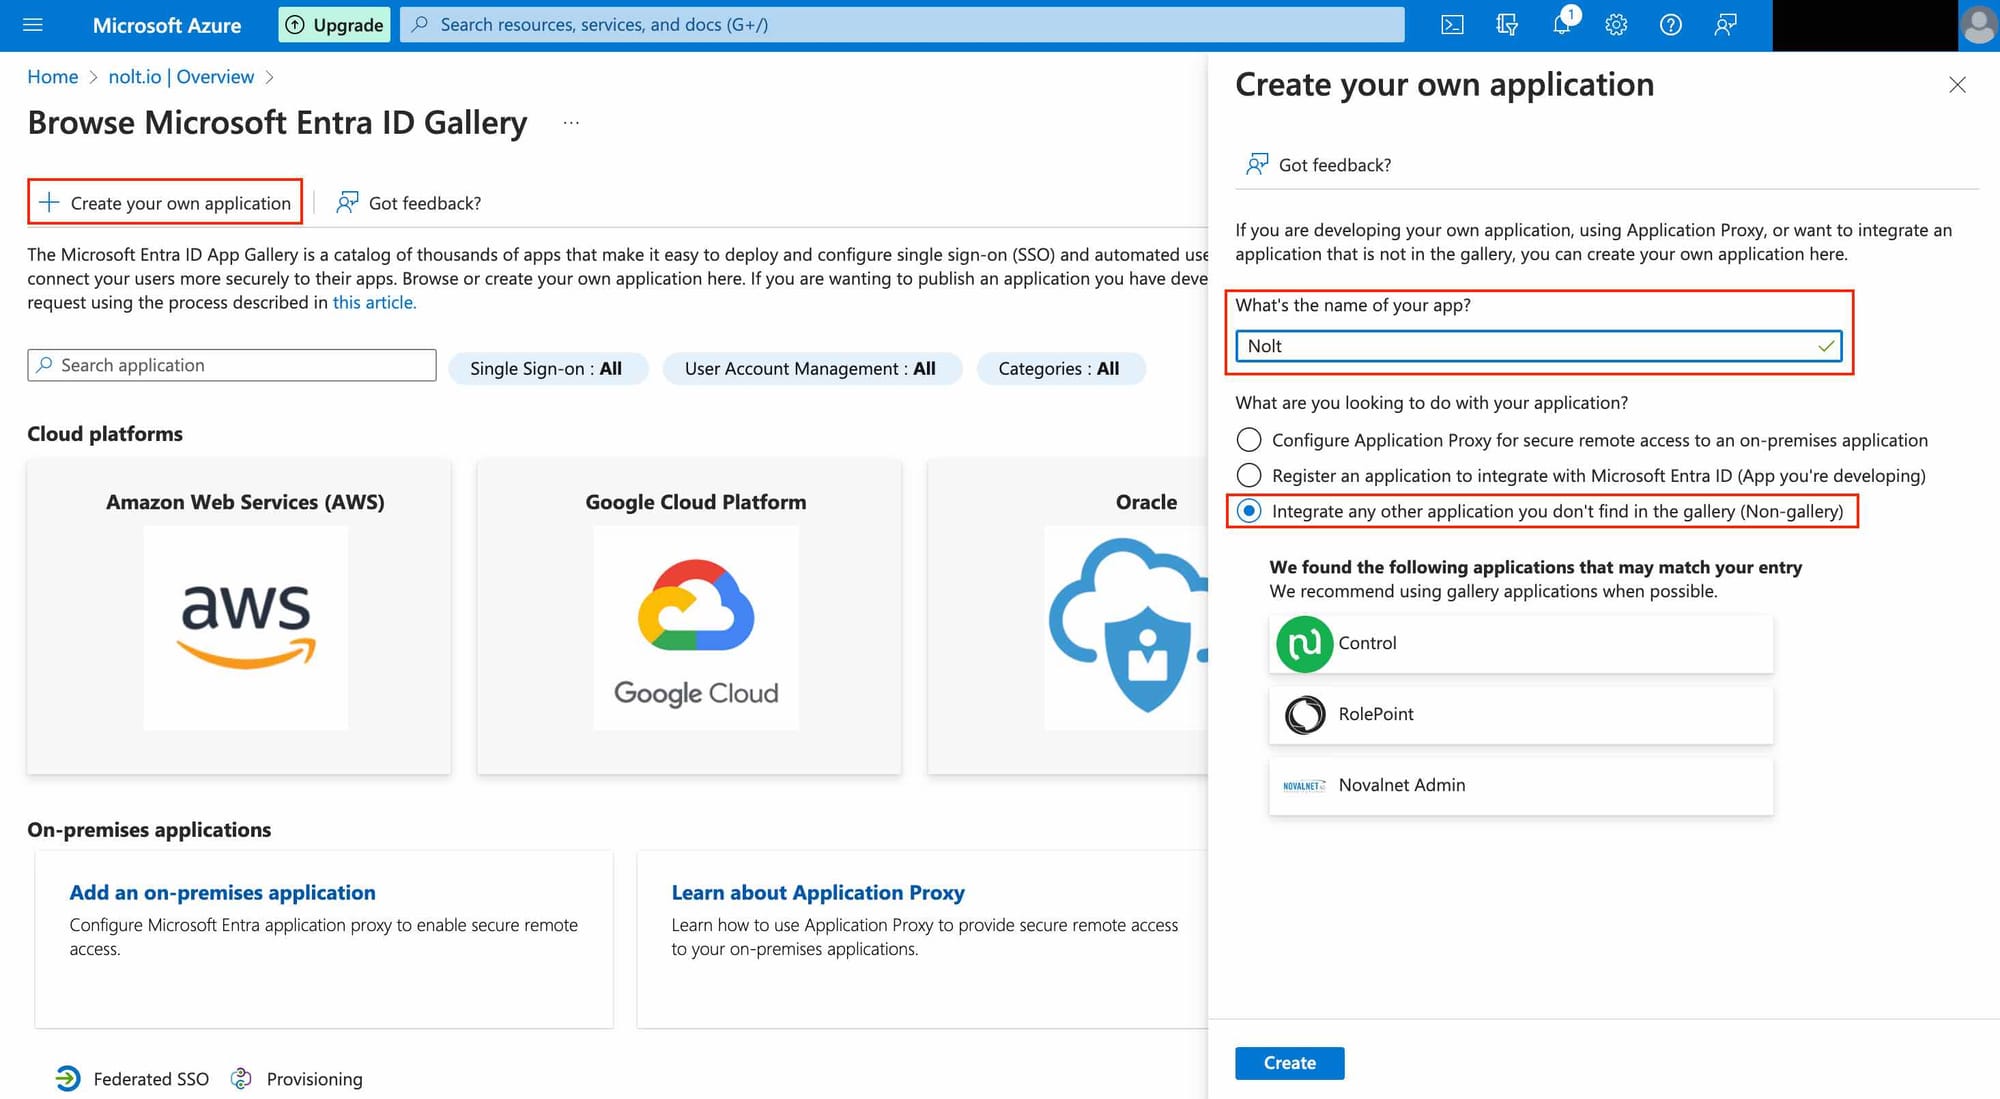
Click on Create your own application. Enter a name for the application, select Integrate any other..., and then click Create.
2. Setup SCIM Provisioning
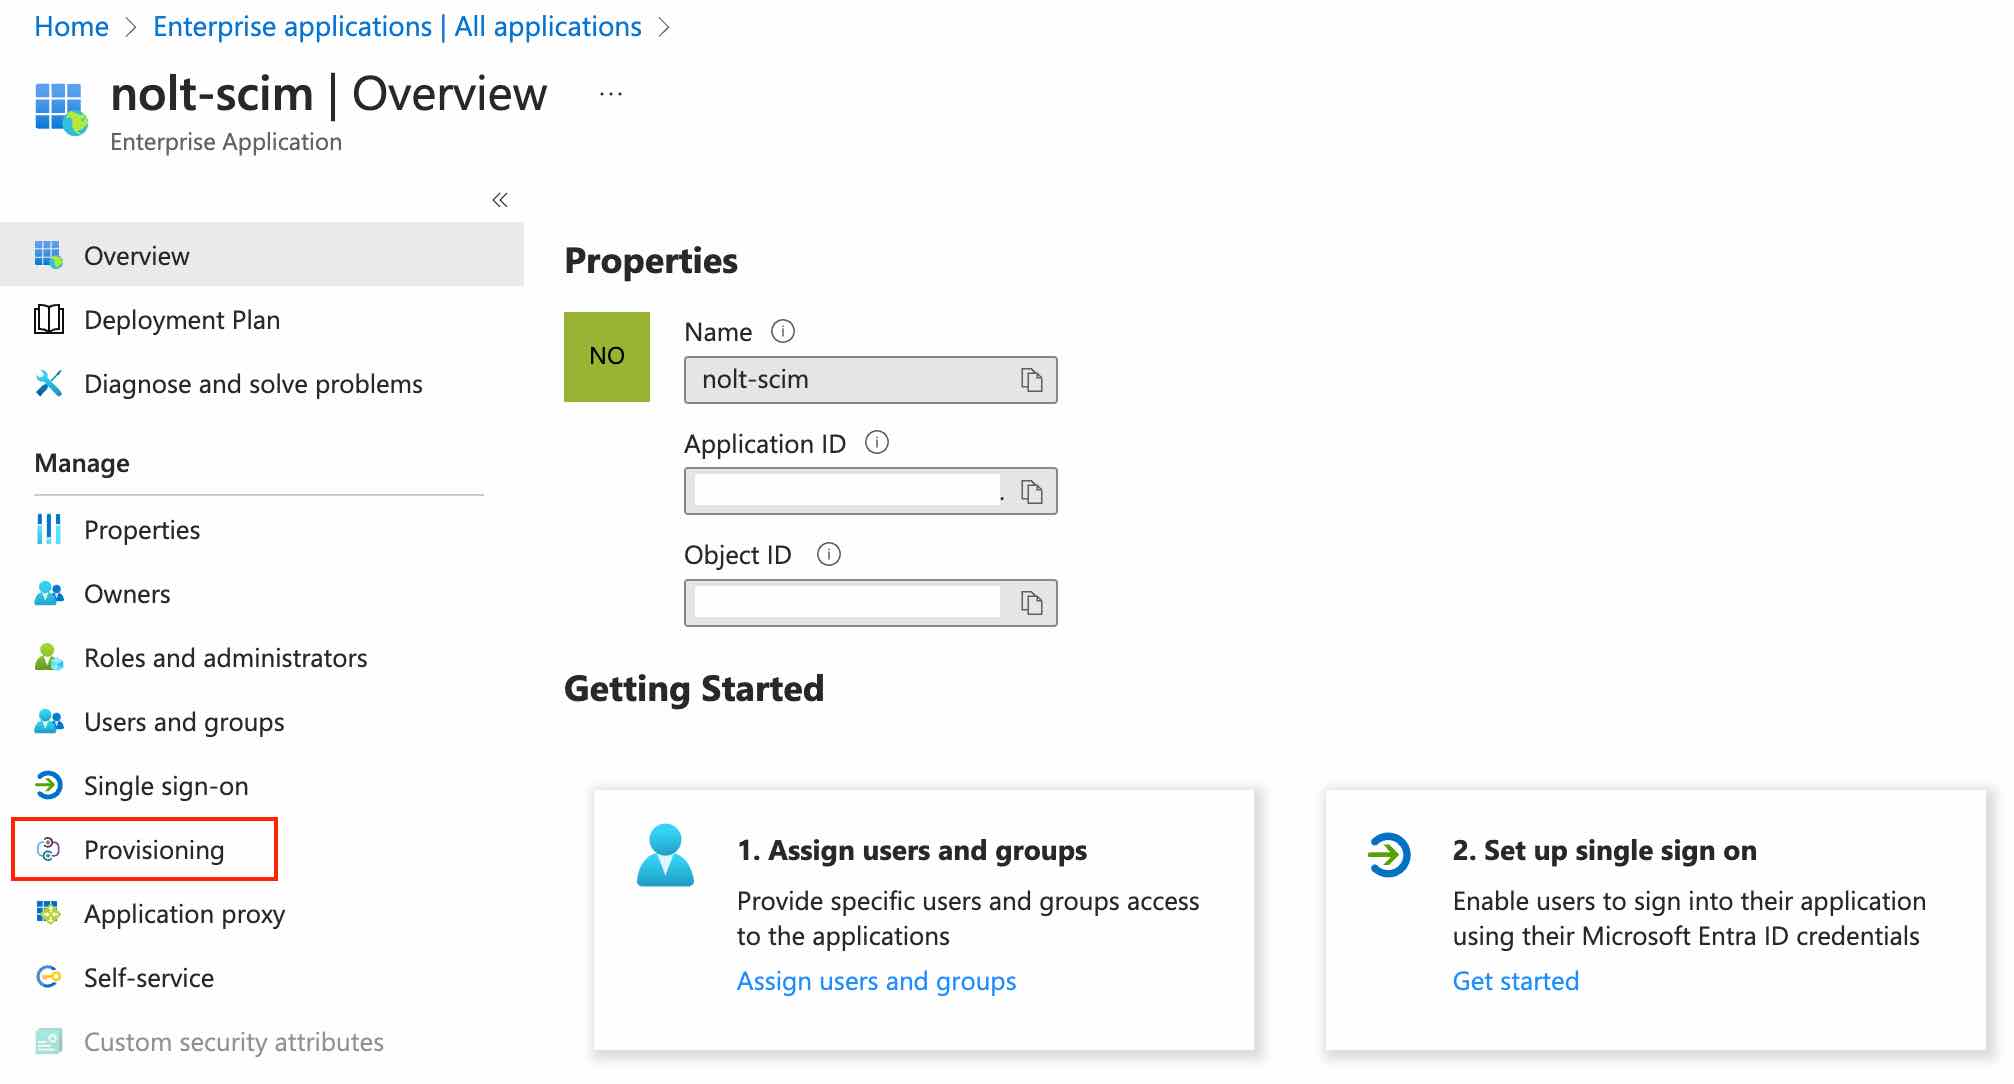
Navigate to Provisioning tab of your application and navigate to Provisioning tab in next page as well.
Configure the following settings to setup SCIM.
- Provisioning Mode
Select Automatic as the Provisioning Mode - Tenant URL
https://YOUR_BOARD.nolt.io/api/scim/v2
- Secret Token
Paste the API Key
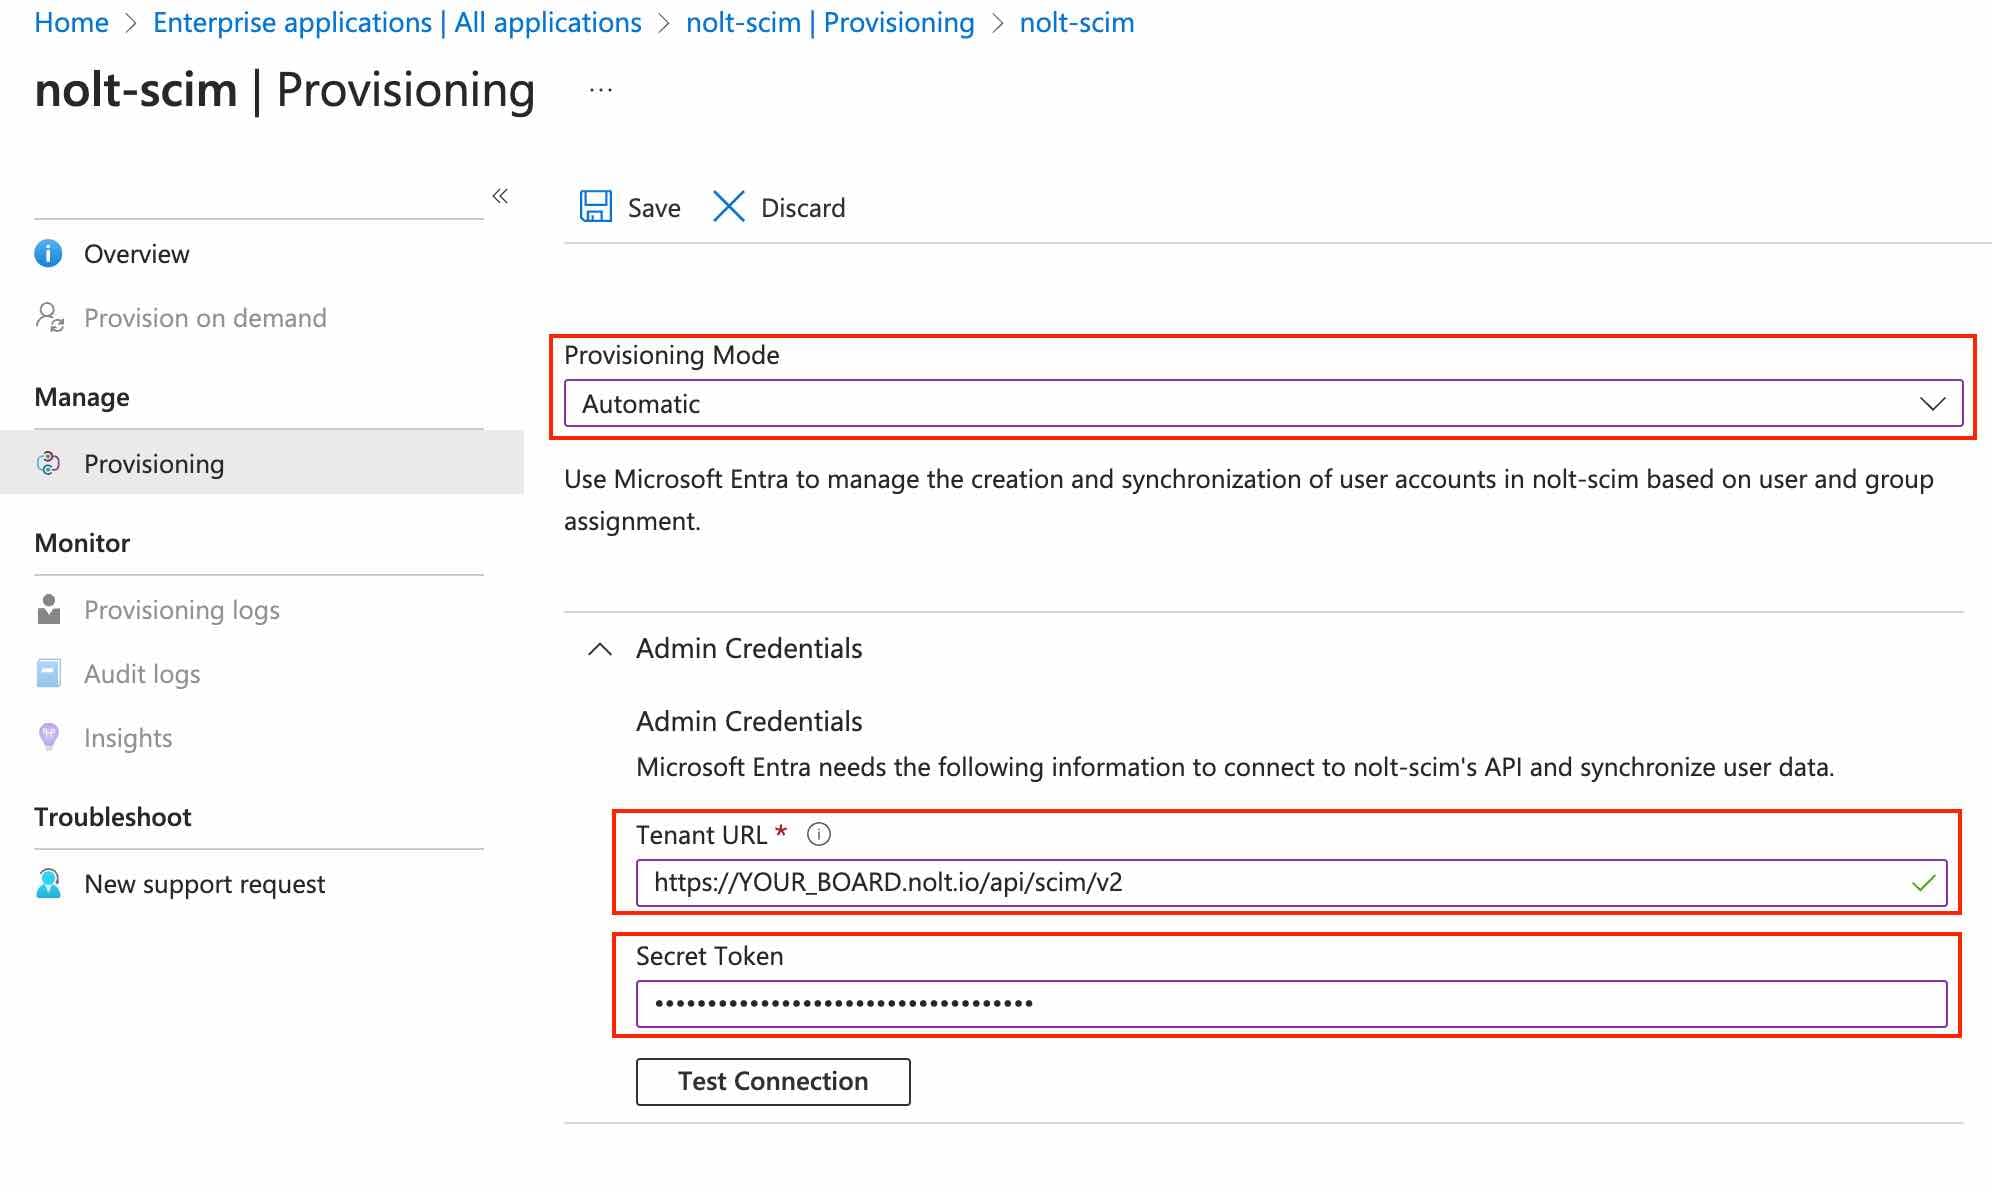
- Click on Test Connection.
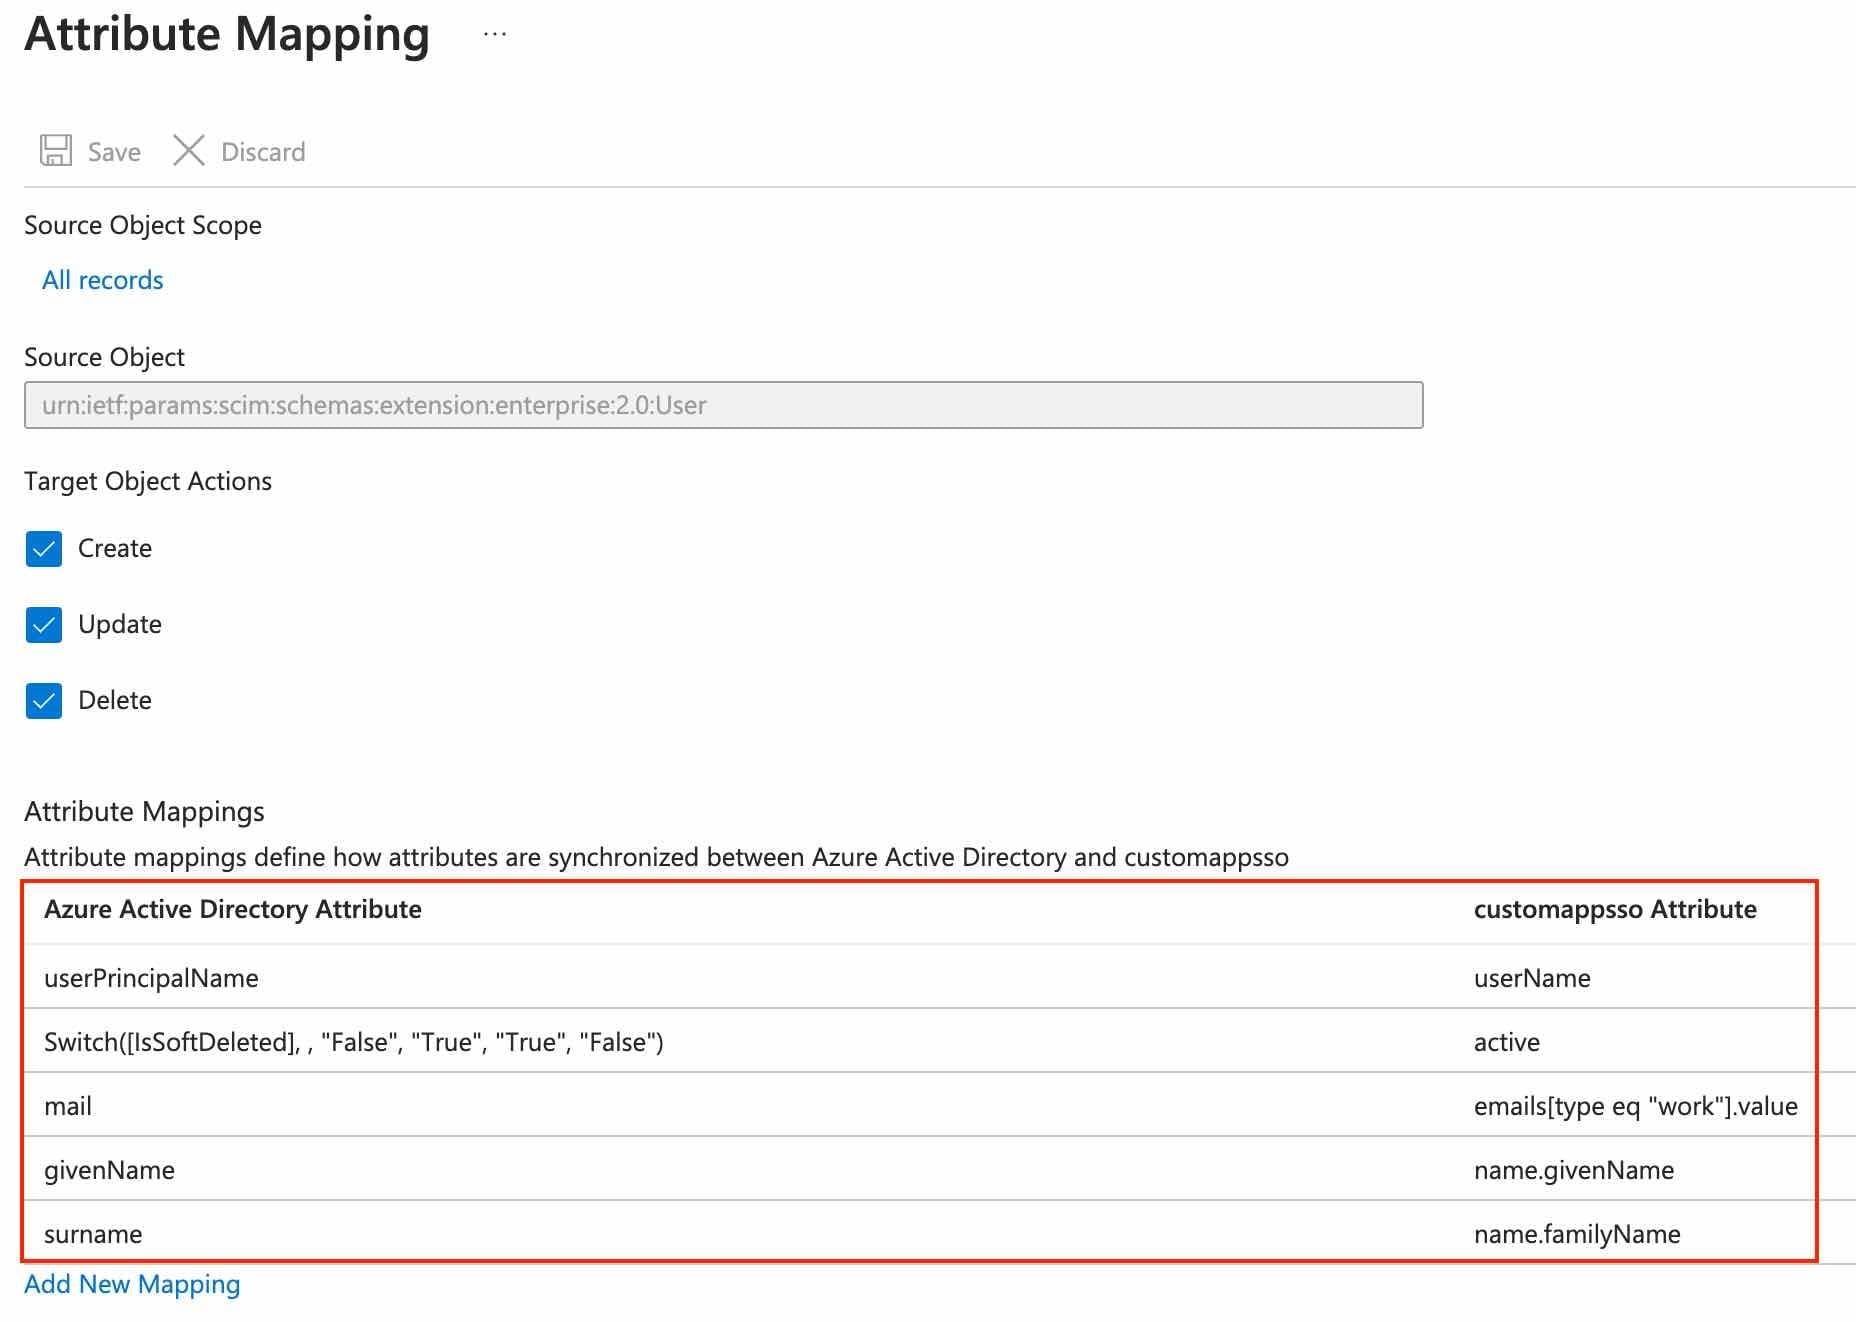
- Mappings
Navigate to Provision Azure Active Directory Users.- Required attributes:
Remove mapping for all attributes except for userPrincipalName, switch, mail, givenName and surName.
- Required attributes:
- User Role:
Mapping noltUserRole attribute sets the role for user automatically. If you want to pass a different attribute for setting the role you can map that attribute (and add that attribute in User Role structure field in Nolt). - Custom attributes:
Any other attribute mapped will be treated as custom attribute as long as you mention it in Custom attributes field in Nolt.
- Set the Provisioning Status to on.
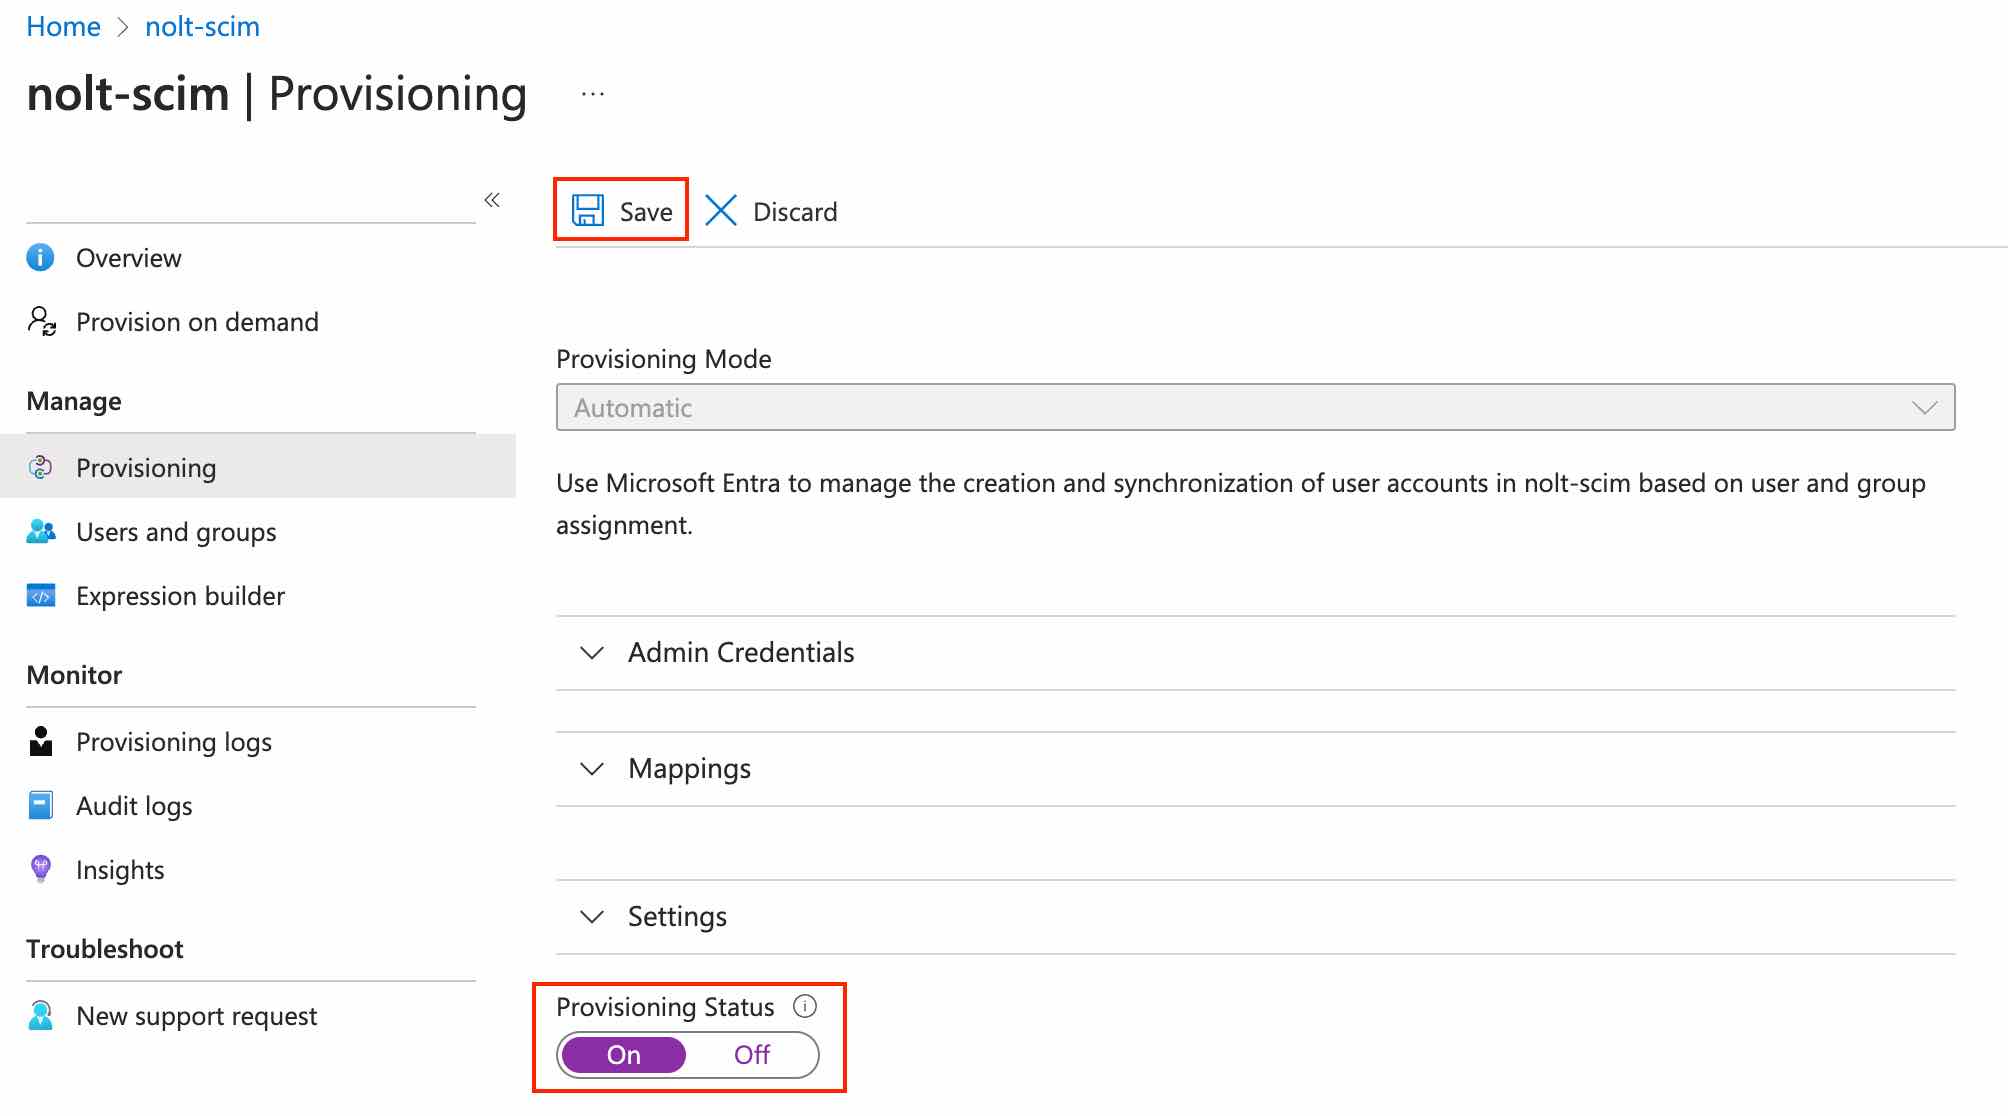
- Save the configuration
Okta
If you have Okta as your Identity Provider (IdP) then you can use SCIM to automatically provision users to Nolt and allow them to contribute and manage your Nolt board.
1. Setup SAML 2.0
An application with SAML 2.0 as sign-in method is required in Okta to automatically provision users to Nolt. Follow the steps in SSO with Okta to setup SAML 2.0 in Okta. You can skip Integrating in Nolt section if you are not using Single sign-on.
2. Enable SCIM Provisioning
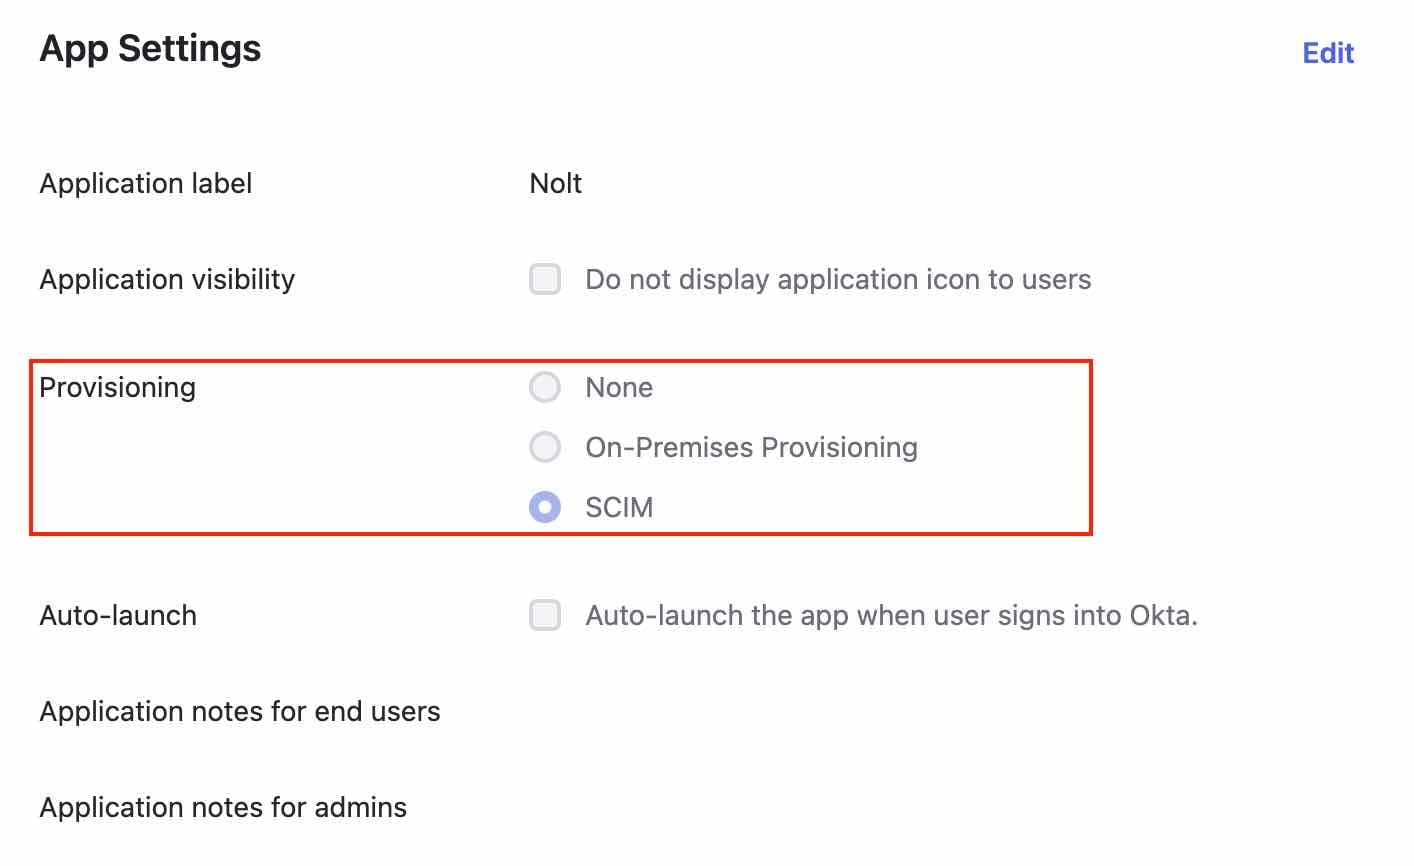
- In Okta, navigate to Applications → Applications → Nolt
- Select General tab and click on Edit available in App Settings
- Select SCIM as provisioning and click Save
3. SCIM Configuration
Select Provisioning tab and click Edit available in Integrations → SCIM Connection.
- SCIM connector base URL:
https://YOUR_BOARD.nolt.io/api/scim/v2
- Unique Identifier field for users:
userName- Supported provisioning actions:
Push New Users
Push Profile Updates- Authentication Mode:
HTTP Header
- Authorization:
Paste the API Key
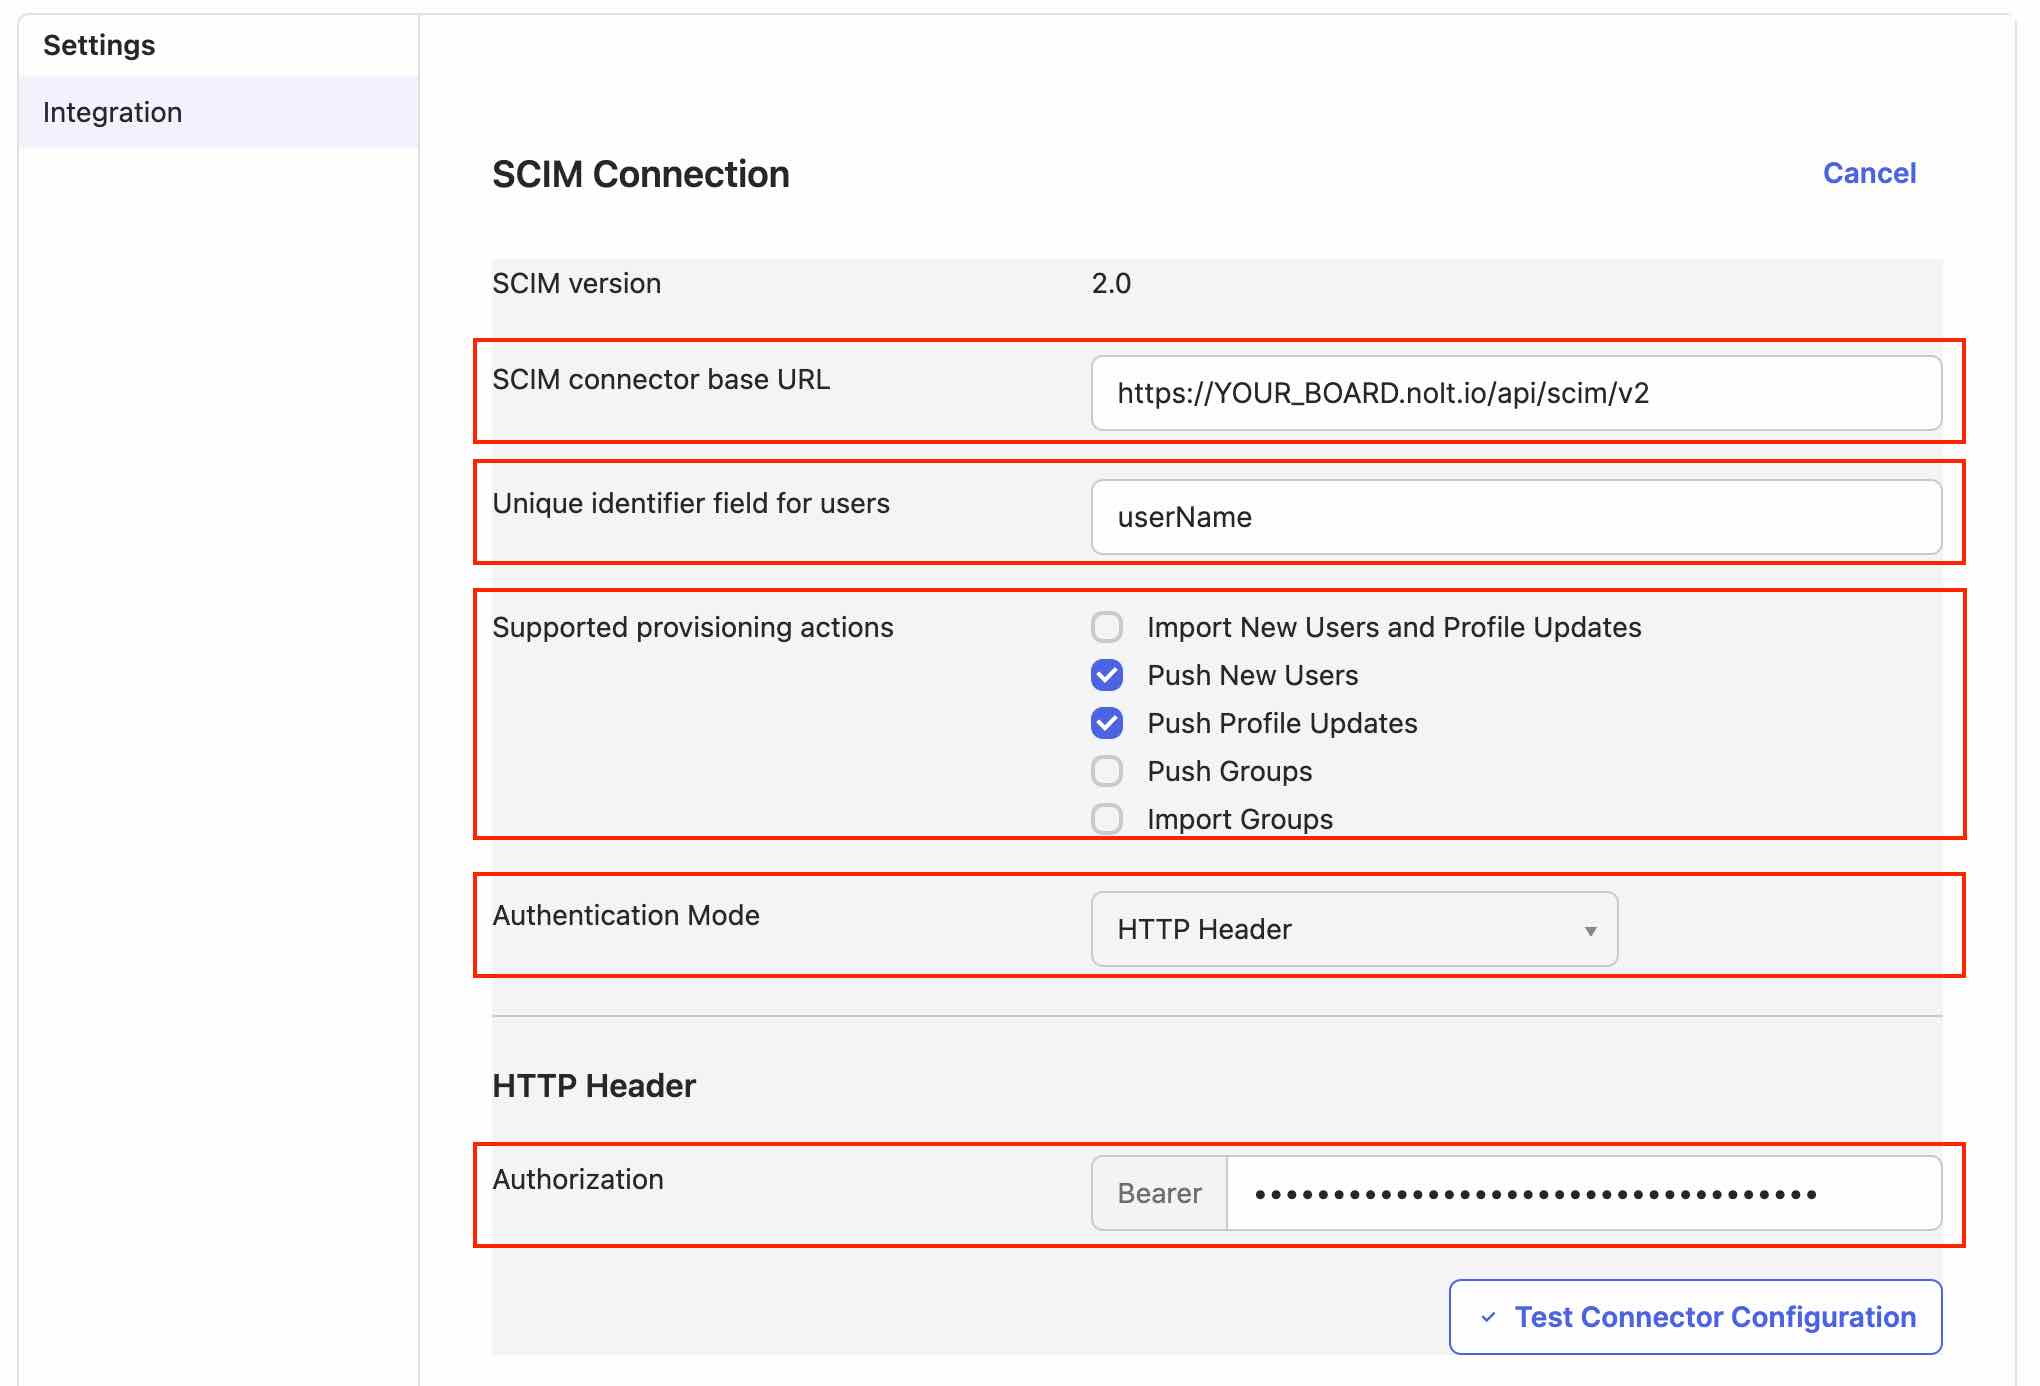
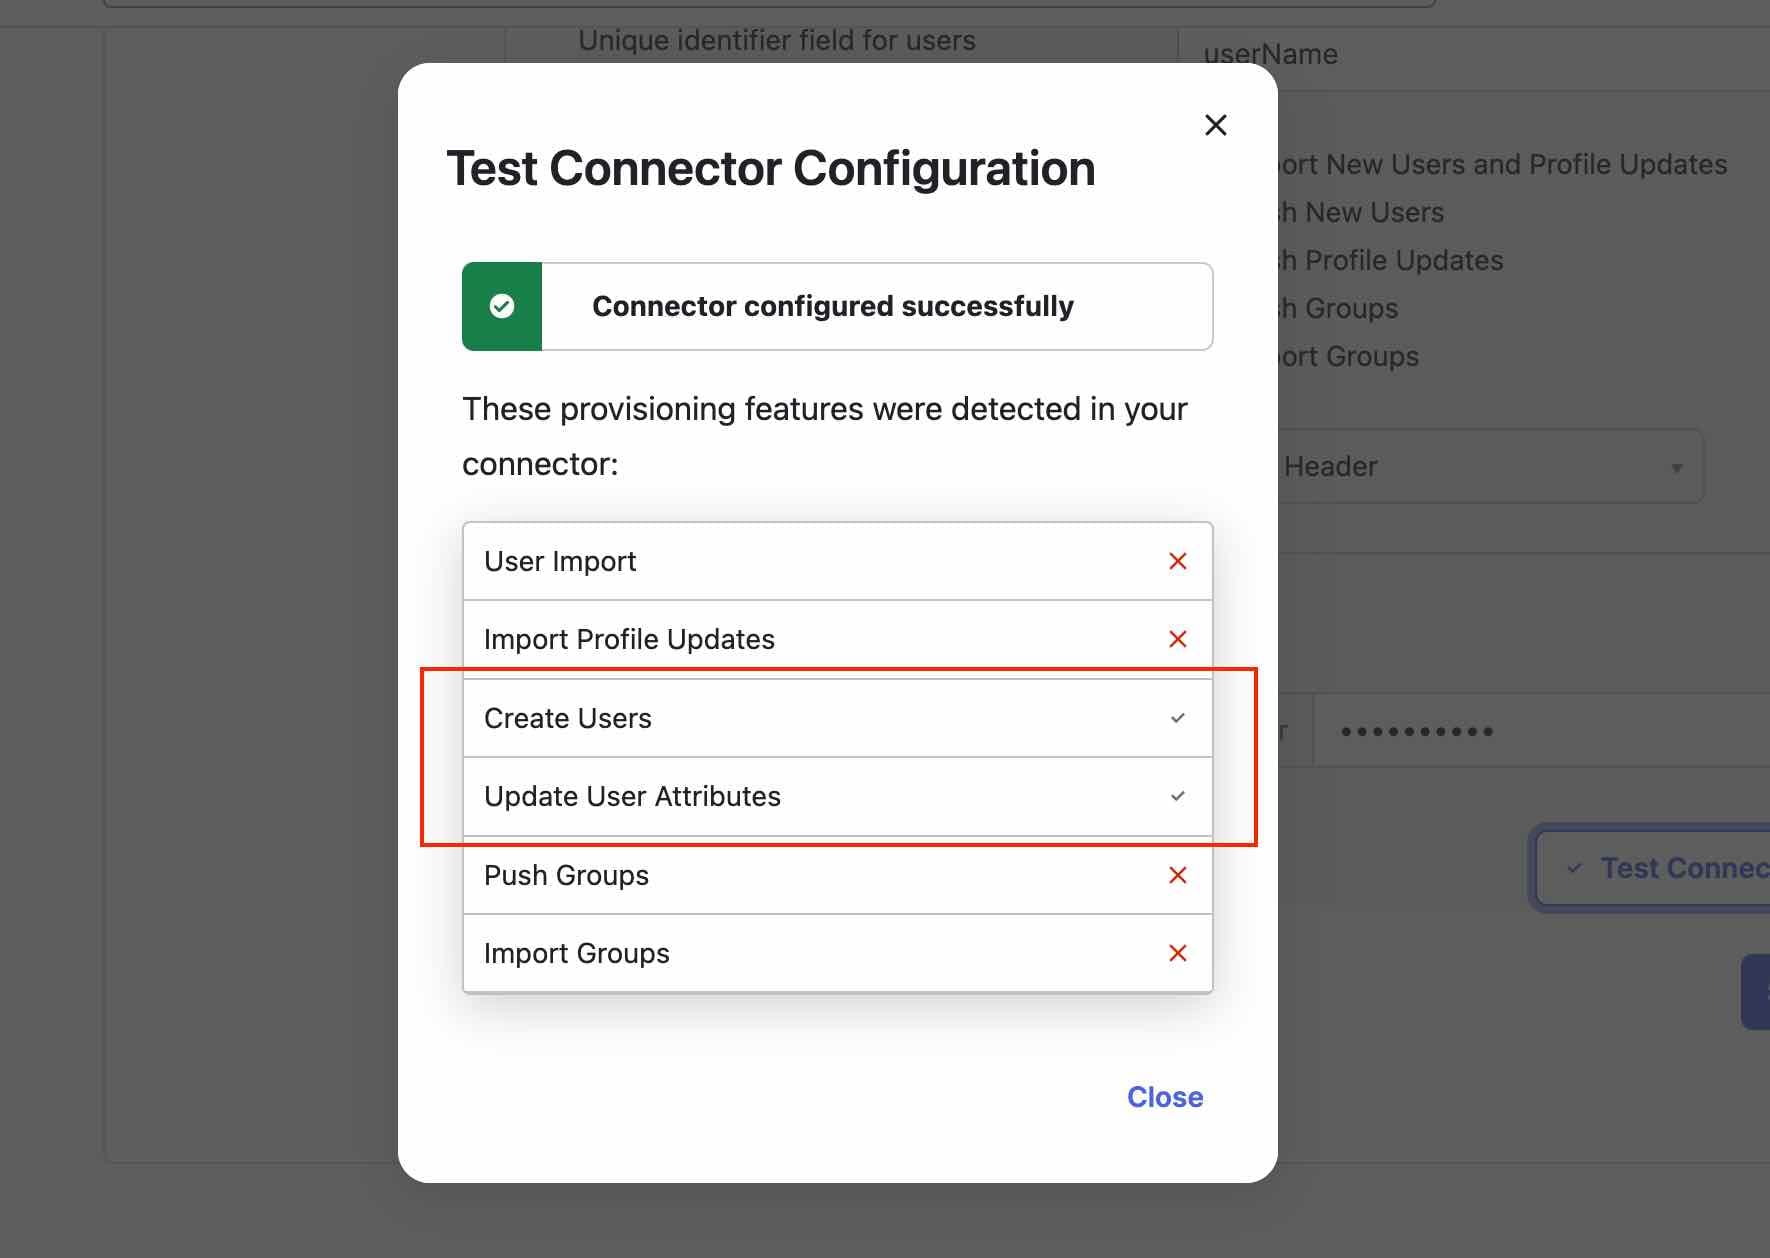
- Click Test Connector Configuration
- Click Save
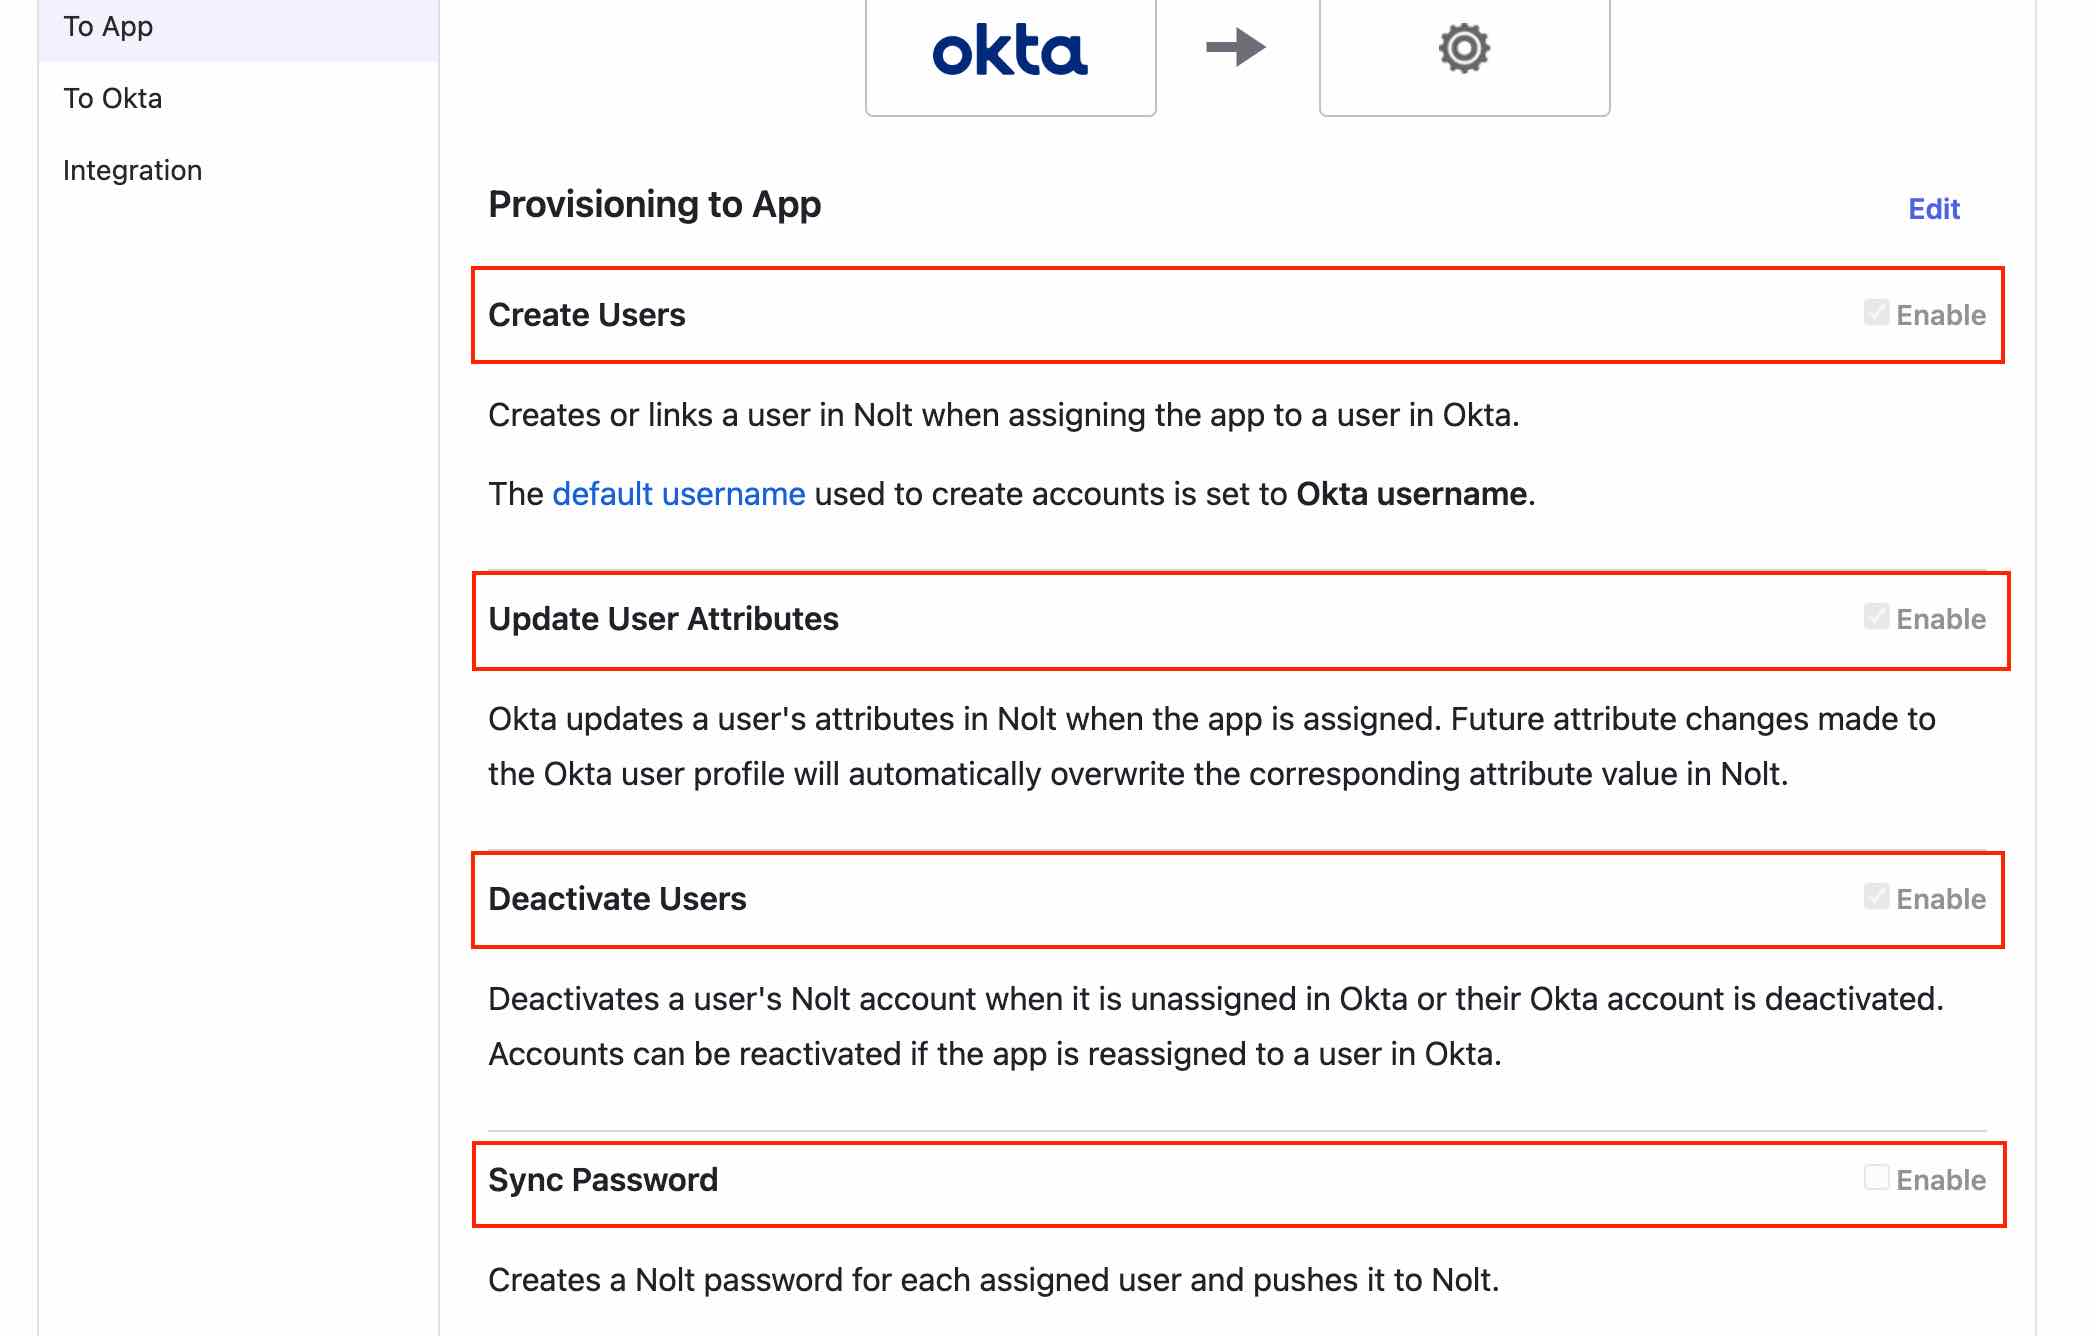
2. To App Configuration
Select To App tab and click Edit available in Provisioning to App.
- Enable Create Users, Update User Attributes and Deactivate User
- Disable Sync Password
- Click Save
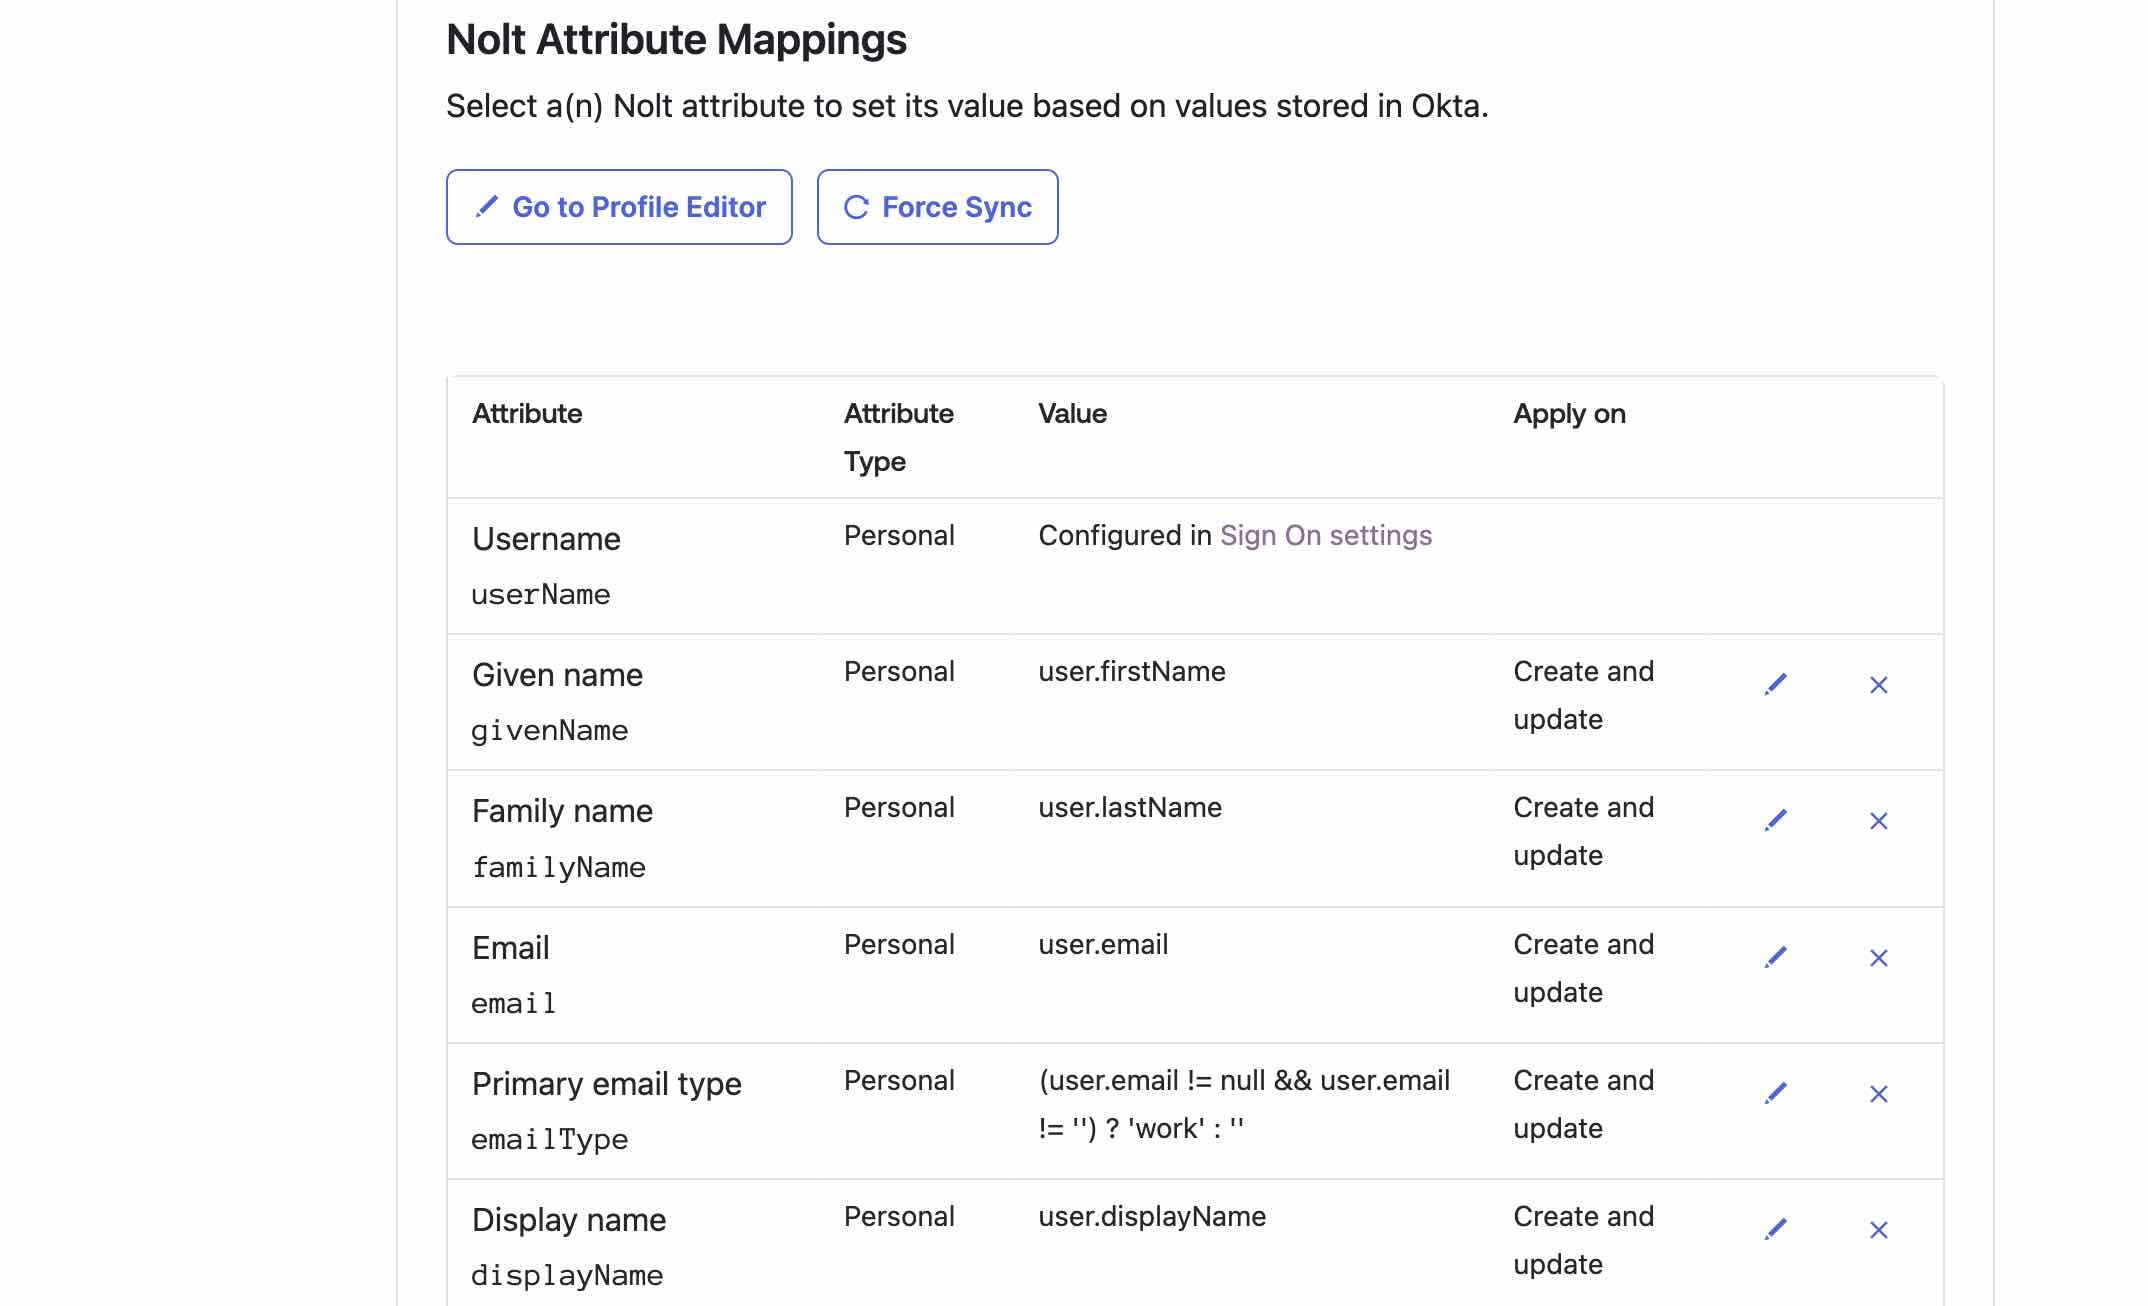
- Attribute Mappings:
- Required attributes:
Disable mapping for all attributes except for userName, givenName, familyName, email and emailType. - User Role:
Passing noltUserRole attribute sets the role for user automatically. If you want to pass a different attribute for setting the role you can map that attribute (and add that attribute in User Role structure in Nolt). - Custom attributes:
Any other attribute mapped will be treated as custom attribute as long as you mention it in Custom attributes field in Nolt. - Verify that all attributes have Create and Update under Apply On column
- Required attributes:
Need help?
Please feel free to reach out at hello@nolt.io for any help regarding SCIM.